Mastering Pipetting Techniques: A Comprehensive Guide for Laboratory Professionals
Accurate pipetting is the cornerstone of reliable laboratory results. Even minor inconsistencies in technique can significantly impact experimental outcomes, particularly in sensitive applications like PCR, ELISA, and cell culture. This comprehensive guide explores essential pipetting techniques, from pre-wetting tips to proper dispensing methods, helping laboratory professionals achieve optimal precision and accuracy in their daily work.
The Fundamentals of Pipetting
Understanding Your Pipette and Corresponding Tips
A pipette is a precision instrument designed to transfer measured volumes of liquid. The two main components of a pipetting system are the pipette itself and the disposable tips. Using the correct pipette tips for your specific pipette model is crucial for accuracy. Most laboratories use three standard volume pipettes:
- P-20: For volumes between 0.02 μl and 20 μl
- P-200: For volumes between 20 μl and 200 μl
- P-1000: For volumes between 200 μl and 1000 μl
How to Insert Pipette Tips Properly
Proper tip attachment is essential for accurate pipetting. To attach a tip:
- Select the appropriate tip size for your pipette and volume
- Firmly press the shaft of the pipette into the wider opening of the tip to create a good seal
- Use minimal force – excessive pressure can damage the pipette shaft over time
- Verify the tip is securely attached by visual inspection
Remember that loose tips can cause significant variation in dispensed volumes and lead to experimental inconsistencies.
Pre-Wetting Pipette Tips: The Critical First Step
Why Do You Prerinse Pipette Tips?
Pre-wetting (also called pre-rinsing) pipette tips is a fundamental technique that significantly improves accuracy and precision. The practice offers several important benefits:
- Increases humidity within the tip, reducing evaporation and sample loss
- Equalizes temperature differences between the pipette, tip, and sample
- Neutralizes the capillary effect in micro-volume pipettes
- Can improve pipetting accuracy by up to 0.2%
- Prevents lower volume in the first few dispenses due to evaporation
Pre-Wetting Pipette Tips: Step-By-Step Technique
To properly pre-wet a pipette tip:
- Attach a fresh tip to your pipette
- Set the exact volume you need to transfer
- Aspirate and fully expel the sample liquid at least 3 times before final aspiration
- Perform this procedure each time you change tips for consistency
Pre-wetting is particularly important when working with volumes under 50 μL and with volatile liquids like organic solvents.
Proper Aspiration Technique
Do You Push the Plunger on the Pipette Down Before or After You Place the Tip into the Liquid?
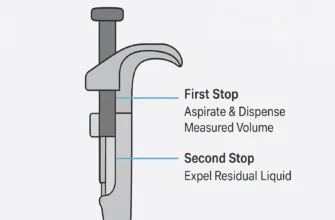
The correct sequence is critical for accurate aspiration:
- First, depress the plunger to the first stop and hold it in this position
- Then place the tip into the liquid sample
- Slowly release the plunger to draw the liquid into the tip
Never release the plunger rapidly as this can create inaccuracies and potential sample splashing.
When Aspirating a Solution Why Is It Important to Actually See the Solution Enter the Pipette Tip?
Visual confirmation that the solution is entering the pipette tip is essential to:
- Verify that no air bubbles have formed (which would compromise volume accuracy)
-
Ensure the tip is properly sealed and functioning correctly
-
Confirm that the appropriate volume is being aspirated
If you observe air bubbles during aspiration, return the sample to the original container, discard the tip, and begin again with a fresh tip.
Immersion Depth and Angle Matter
For optimal aspiration:
- Hold the pipette vertically or within a 20-degree angle from vertical
Immerse the tip just below the liquid’s surface:
- 2-3 mm for volumes of 1-100 μL
- 2-4 mm for volumes of 101-1000 μL
- 3-6 mm for volumes of 1.1-10 mL
- Avoid touching the sides or bottom of the container
- Pause for 1-2 seconds after aspiration, keeping the tip still in the liquid
- Pull the pipette straight out from the container
The Art of Dispensing
To Dispense a Sample in a Pipette Tip Correctly
Proper dispensing technique ensures complete sample transfer:
- Touch the tip against the side wall of the receiving vessel
- Slowly and steadily press the plunger down to the first stop
- Pause for 2-3 seconds to allow complete dispensing
- Continue pressing to the second stop (blow-out) to expel any residual sample
- While keeping the plunger depressed, withdraw the pipette from the vessel
- Allow the plunger to slowly return to its original position
Should You Eject All Liquid from a Pipette Tip?
Yes, for standard pipetting technique, you should eject all liquid from the pipette tip by using the two-stop dispensing method described above. The second stop (blow-out) is specifically designed to expel any residual sample, ensuring complete delivery of the measured volume.
Touch Off After Dispensing
After dispensing, you should “touch off” the tip against the side of the receiving vessel to remove any droplets clinging to the outside of the tip. This technique ensures that all the measured liquid is delivered and improves accuracy.
Special Considerations for Microplates and Small Volumes
Should Pipette Tips Touch Wells?
When pipetting into microplate wells:
- Pipette onto the side of a well rather than directly onto the bottom
- For small volumes (≤10 μL), touch the tip to the side wall of the well just below the liquid level
- Avoid forming a seal between the tip and the bottom of the well, which can block smooth transfer
- For empty wells, aim for the bottom corner where the side and bottom meet
- Touch down once in the corner of the well and dispense liquid rather than sliding the tip down the side
Step Down Pipette Tip Techniques for Small Volumes
When working with volumes below 10 μL:
- Use a “step down” or “reverse pipetting” technique for improved accuracy
-
In reverse pipetting, depress the plunger past the first stop before aspirating
-
Dispense by pressing only to the first stop, leaving excess liquid in the tip
-
This technique is particularly useful for viscous or volatile liquids
-
For critical small volume work, pipette the sample up and down a couple of times in the diluent
Tip Management and Hygiene
Does Each Dispense Require a New Pipette Tip?
Whether to change tips depends on the application:
- For critical measurements, precise dilutions, and when working with different samples or reagents, use a fresh tip for each dispense
- For repetitive dispensing of the same solution into multiple containers (like filling plate wells with buffer), a single tip may be used continuously
- When performing serial dilutions, changing tips between dilutions prevents carryover contamination
- For quantitative PCR and other sensitive applications, always use fresh tips to prevent cross-contamination
How to Handle Pipette Tips
Proper handling of pipette tips ensures both accuracy and safety:
- Only touch the upper part of the tip during handling, never the barrel end of pipette tip
- Only wipe the pipette tip if there is liquid on the outside of the tip, using a lint-free cloth
- When wiping, be careful not to touch the tip opening to avoid wicking liquid out of the tip
- After use, eject tips directly into appropriate biohazard containers
- Never touch used tips with your fingers to avoid contamination
Advanced Pipetting Tips and Tricks
Wet Pipette Tip Techniques for Special Applications
Beyond standard pre-wetting, specialized “wet tip” techniques include:
- For viscous liquids: Use reverse pipetting and slower aspiration/dispensing speeds
- For volatile liquids: Pre-wet more extensively (5+ cycles) and work quickly to minimize evaporation
- For proteins and enzymes: Pre-wet to minimize protein binding to the plastic surface of new tips
Pipetting Tips and Tricks: How to Read a Pipette
Understanding your pipette’s volume indicators is essential:
- Different pipettes display volumes differently depending on their maximum capacity
-
For a P-20 pipette, the display “1-2-5” typically means 12.5 μL
-
For a P-200 pipette, the same display would indicate 125 μL
-
For a P-1000 pipette, it would represent 1.25 mL
-
Always confirm the maximum volume of your pipette to interpret the display correctly
Laboratory Pipette Tips: Pipetting for Multichannel Applications
When using multichannel pipettes:
- Visually inspect all tips to ensure they contain equal volumes
-
Mark wells as you go to track progress using a finger on the side of the plate or a temporary cover
-
Organize tip boxes efficiently to match plate layouts
-
Ensure all tips are securely attached before beginning
-
Use higher volumes when possible – pipetting 50 μL is typically more accurate than 5 μL
Troubleshooting Common Pipetting Problems
Barrel End of Pipette Tip Issues
Problems at the barrel end of pipette tips can compromise results:
- If the barrel end (upper part) of the tip doesn’t seal properly, leakage can occur
-
Never immerse the shaft or barrel of the pipette into liquid
-
If liquid enters the barrel of the pipette, it can damage the internal mechanics
-
Check for damaged O-rings or seals if you consistently have issues with the barrel end of tips
Using Pipette Tips: Common Errors to Avoid
Watch for these common mistakes:
- Inconsistent pre-wetting practices between samples
- Immersing tips too deeply or at inconsistent depths
- Holding the pipette at varying angles rather than consistently vertical
- Pulling the plunger up too quickly during aspiration
- Allowing the plunger to snap back after dispensing
- Touching the bottom of containers with tips during aspiration
Conclusion
Mastering pipetting techniques is essential for generating reliable laboratory results. By understanding and consistently applying proper practices for pre-wetting tips, aspirating liquids, dispensing samples, and managing pipette tips, laboratory professionals can significantly improve the accuracy and precision of their work. Remember that attention to detail matters—seemingly minor aspects like immersion depth, angle, and pre-wetting can have substantial impacts on experimental outcomes. Regular practice, consistent technique, and following the guidelines outlined in this article will help ensure your pipetting work meets the highest standards of laboratory excellence.
As pipetting technology continues to evolve, staying current with best practices remains important. Whether you’re working with standard, multichannel, or electronic pipettes, the fundamental principles of good technique are universal. Apply these pipetting tips and tricks in your daily laboratory routine to enhance workflow efficiency and experimental reproducibility.