Comprehensive Guide to Reverse Pipetting: Techniques, Applications, and Benefits
Pipetting is a fundamental laboratory technique that can significantly impact experimental outcomes. Among the various pipetting methods, reverse pipetting stands out as a specialized technique that offers distinct advantages for handling challenging liquids. This comprehensive guide explores what reverse pipetting is, how it differs from forward pipetting, when to use it, and step-by-step instructions for mastering this valuable laboratory skill.
What is the Meaning of Reverse Pipetting?
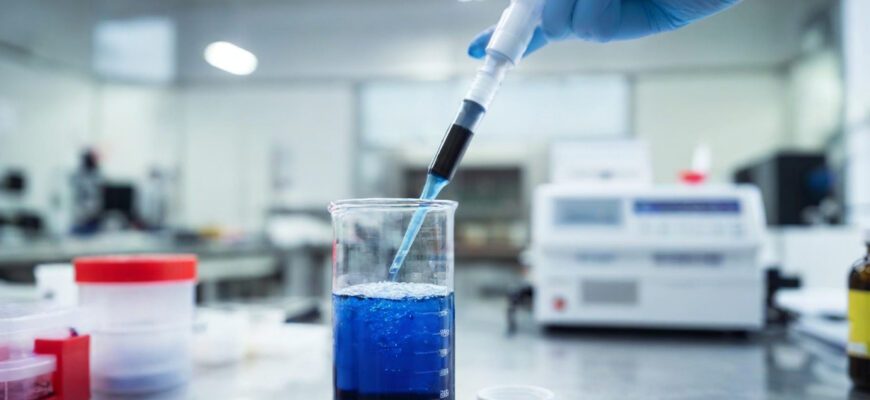
Reverse pipetting is a technique to dispense a measured quantity of liquid by means of an air displacement pipette. Unlike standard forward pipetting, reverse pipetting involves aspirating a volume larger than what’s actually needed for dispensing, with only the target volume being delivered to the receiving vessel. The excess liquid compensates for any solution that might cling to the inside of the pipette tip, particularly when working with viscous or protein-containing solutions.
This technique is primarily recommended for solutions with high viscosity or a tendency to foam, as it significantly reduces the risk of splashing, foam, or bubble formation. Reverse pipetting delivers more precise results when dispensing small volumes of liquids containing proteins and biological solutions compared to forward pipetting methods.
What is Forward Pipetting and Reverse Pipetting?
To fully understand reverse pipetting, it’s important to distinguish it from the standard forward pipetting technique.
Forward Pipetting Technique
Forward pipetting involves:
-
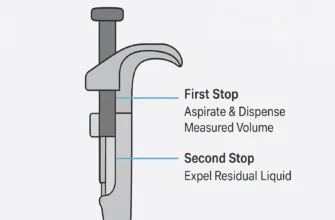
Pressing the plunger to the first stop
-
Immersing the tip into the liquid and slowly releasing the plunger to aspirate the desired volume
-
Dispensing by pressing to the first stop
-
Completing the delivery with a separate blowout step by pressing to the second stop
This technique is ideal for aqueous solutions like buffers, diluted acids, or alkalis. It’s the conventional method taught in most laboratory settings and works well for routine liquid handling tasks with non-problematic solutions.
Reverse Pipetting Technique
In contrast, reverse pipetting follows a different sequence:
-
Setting the pipette to the desired volume
-
Depressing the plunger completely – past the first stop to the second (blowout) stop
-
Immersing the tip in the liquid and slowly releasing the plunger to full extension
-
Dispensing by pressing only to the first stop
-
A small volume of liquid remains in the tip, which can be discarded or returned to the source
The fundamental difference lies in how the liquid is aspirated and dispensed. In reverse pipetting, you draw up more liquid than needed and dispense only to the first stop, leaving excess in the tip.
How to Reverse a Pipette?
Mastering the reverse pipetting technique requires proper understanding and practice. Here’s a detailed step-by-step guide on how to reverse pipette:
- Set your pipette to the desired volume that you want to dispense.
- Press the plunger all the way down to the second stop (beyond the first resistance point).
- Immerse the tip into your liquid source to a depth of about 2-3 mm (avoid going too deep).
- Slowly release the plunger to its resting position, allowing the tip to fill with liquid. The amount aspirated will be greater than your set volume.
- Remove excess droplets from the outside of the tip by touching it briefly against the wall of the source container (avoid touching the opening).
- Position the tip at a 45° angle against the wall of the receiving vessel for optimal results.
- Dispense the liquid by depressing the plunger only to the first stop. Unlike forward pipetting, do not go to the second stop when dispensing.
- Discard any remaining liquid in the tip by depressing to the second stop in a waste container or return it to your source container.
- Dispose of the tip appropriately after use, especially when working with sensitive or hazardous materials.
Remember that keeping the pipette at a consistent angle (preferably 45°) leads to more accurate and precise results when using the reverse pipetting technique.
When to Use Reverse Pipetting
Reverse pipetting is not necessary for all laboratory work, but becomes invaluable in specific scenarios. Understanding when to employ this technique can significantly improve your experimental outcomes.
Why is Reverse Pipetting Used for Difficult Solutions?
The primary application of reverse pipetting is for handling challenging liquids where standard pipetting methods fall short. Reverse pipetting should be considered when working with:
- Viscous liquids: Solutions like glycerol, oils, and thick buffers that adhere to the inside of tips
- Foaming solutions: Detergent-containing buffers, protein solutions, or any liquid that readily forms bubbles
- Volatile liquids: Solvents like ethanol, acetone, or acetonitrile with high vapor pressure that can cause dripping
- Protein-containing solutions: Including BSA solutions, enzymes, and biological samples
- Small volumes: When pipetting very small amounts (1-10 μL) where accuracy is critical
- PCR Master Mix: Which contains proteins and can form bubbles that may affect qPCR results
Why Reverse Pipetting is Useful for Viscous Liquid
Viscous liquids present unique challenges in laboratory work. When using standard forward pipetting with viscous samples:
- The liquid adheres to the inside surface of the tip
- Complete dispensing becomes difficult
- Accuracy decreases as variable amounts remain in the tip
- Air bubbles can become trapped
Reverse pipetting overcomes these issues because:
- The excess liquid in the tip compensates for the amount that adheres to the inside surface
- The adherence mainly affects the excess amount rather than the dispensed volume
- The technique eliminates the need for a blow-out step, which can create bubbles in viscous solutions
- It allows for slow, controlled dispensing, which is crucial for viscous solutions
Studies have shown that when pipetting viscous liquids like glycerol, reverse pipetting shows significantly smaller deviations between doses and reduced imprecision compared to forward pipetting.
Is Reverse Pipetting More Accurate?
Reverse Pipetting vs Forward Pipetting Accuracy
The accuracy of reverse versus forward pipetting depends on the type of liquid being handled:
- For standard aqueous solutions, forward pipetting is generally more accurate
- For viscous liquids, protein solutions, or foaming samples, reverse pipetting delivers superior accuracy and precision
In a study with 1% BSA solution, reverse pipetting reduced imprecision by over 50% compared to forward pipetting. Similarly, when working with glycerol, reverse pipetting demonstrated smaller variation between dispensed volumes.
However, it’s important to note that:
- The accuracy of reverse pipetting can be user-dependent
- For maximum accuracy, pipettes should be calibrated for the specific liquid and technique being used
- Proper angle of pipetting (45°) leads to more accurate results with reverse pipetting
- Pre-wetting the tip (especially with volatile liquids) can further improve accuracy
The consensus among laboratory experts is that while reverse pipetting may waste a small amount of reagent, the improved accuracy with challenging liquids generally outweighs this disadvantage.
Reverse Pipetting qPCR
Quantitative PCR (qPCR) is a technique that demands exceptional precision and accuracy. The sensitivity of qPCR assays makes them particularly vulnerable to pipetting errors.
Why Use Reverse Pipetting for qPCR?
According to ISO guidelines, it is recommended to pre-wet the pipette tip 3 to 5 times and use the reverse pipetting technique for qPCR applications. This recommendation stems from several advantages:
-
PCR Master Mix contains proteins that can create bubbles when pipetted using standard techniques
-
Bubbles in qPCR samples can interfere with fluorescence readings and skew results
-
Reverse pipetting reduces variation between technical replicates
-
The technique minimizes the creation of aerosols when dispensing DNA or RNA
When setting up qPCR reactions in multiwell plates (96 or 384 wells), consistency between wells is critical. Reverse pipetting helps ensure that each well receives an identical volume of reaction components, improving the reliability of comparative analyses.
Reverse Pipetting Multichannel
As laboratory workflows increasingly demand high-throughput methods, multichannel pipettes have become essential tools. Reverse pipetting can be effectively combined with multichannel pipetting for optimal results.
Benefits of Reverse Pipetting with Multichannel Pipettes
When working with multichannel pipettes:
-
Prepare master mixes (such as SYBR+Primers) in a row of a 96-well plate
-
Use an 8/12/24-channel multi-pipette to reverse pipette into 384-well plates
-
This ensures equal amounts of master mix are evenly and quickly distributed across multiple wells simultaneously
This approach is particularly time-saving when working with 96 or 384 well plates. Reproducibility can be further increased by using an electronic pipette with multi-dispensing mode.
For optimal results when reverse pipetting with multichannel pipettes:
- Ensure all tips are picking up and dispensing uniformly
- Maintain a consistent angle during dispensing
- Follow with a brief centrifugation step to remove any potential bubbles
Best Practices for Reverse Pipetting
To maximize the benefits of reverse pipetting while minimizing potential drawbacks, consider these best practices:
- Pre-wet the tip when working with volatile liquids by aspirating and dispensing the desired volume at least 5 times before actual use
- Use low-retention tips for demanding tasks, especially when working with proteins or viscous solutions
- Maintain a consistent pipetting angle of approximately 45° for optimal accuracy and precision
- Immerse the tip to an appropriate depth (2-3mm is typically sufficient) to prevent excess liquid from adhering to the outside of the tip
- Adjust pipetting speed – use slow, controlled movements, especially with viscous liquids
- Consider the trade-off between improved accuracy and reagent waste, particularly for expensive reagents
- Ensure regular calibration of pipettes, as this is essential for any precise pipetting technique
- Practice with water on an analytical balance to perfect your technique before working with valuable samples
Conclusion
Reverse pipetting is a valuable technique in the laboratory arsenal, particularly when working with challenging liquids that cause problems with standard pipetting methods. While it requires slightly more reagent and practice to master, the improvements in accuracy and precision make it an essential skill for any laboratory scientist working with viscous, foaming, or protein-containing solutions.
By understanding when and how to apply reverse pipetting techniques, researchers can significantly improve the reliability of their experimental results, especially in sensitive applications like qPCR. Whether using single-channel or multichannel pipettes, the principles remain the same – aspirate more than needed, dispense to the first stop, and enjoy the benefits of more consistent liquid handling.
Mastering both forward and reverse pipetting techniques allows laboratory personnel to select the optimal approach based on the specific requirements of their experiment, leading to more reproducible and reliable scientific outcomes.

