Selecting inappropriate crutches leads to axillary nerve compression, chronic wrist strain, premature fatigue, and increased fall risk. The consequences of improper fitting extend beyond discomfort—studies document secondary upper extremity injuries in 30–40% of crutch users who rely on incorrectly sized or specified assistive walking devices . Short-term users recovering from ankle fractures or minor lower extremity surgeries face different biomechanical demands than individuals managing long-term neurological conditions or permanent gait deficits. Correct sizing, appropriate weight capacity selection, and material consideration directly influence rehabilitation outcomes, ambulation efficiency, and musculoskeletal health throughout the recovery continuum.
Step 1 — Determine Your Medical Need
The underlying medical condition dictates crutch type, load-bearing capacity requirements, and expected duration of use . Temporary injuries such as ankle sprains, metatarsal fractures, or minor soft tissue trauma typically require 3–8 weeks of partial weight-bearing support, making standard axillary crutches biomechanically sufficient for most patients with normal upper body strength. Post-surgical recovery from procedures including ACL reconstruction, total knee arthroplasty, or Achilles tendon repair demands progressive weight-bearing protocols that may transition from non-weight-bearing to full ambulation over 6–12 weeks, requiring adjustable devices with reliable stability.
Long-term neurological conditions including incomplete spinal cord injury, multiple sclerosis, cerebral palsy, or post-polio syndrome create permanent or progressive gait deficits requiring sustained assistive device use for months to years . These patients develop compensatory movement patterns and require ergonomic designs that minimize repetitive strain injury to upper extremity joints. Balance disorders stemming from vestibular dysfunction, peripheral neuropathy, or cerebellar pathology necessitate gait support that provides broad base stability without demanding excessive upper body coordination or strength reserves.
The distinction between temporary and permanent use fundamentally alters device selection—temporary users prioritize cost-effectiveness and adequate function, while long-term users require ergonomic optimization to prevent overuse syndromes in the shoulders, elbows, and wrists over extended periods.
Types of Crutches Explained
Underarm Crutches (Axillary)
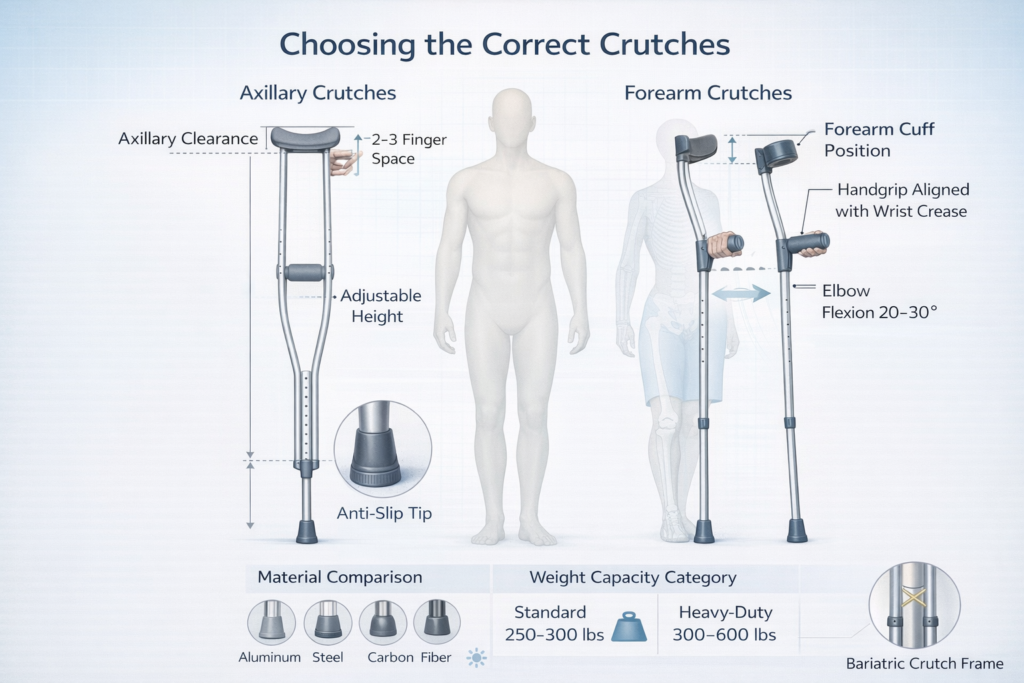
Axillary crutches position the upper support pad 1–2 inches below the axilla, transferring bodyweight through the handgrip rather than the underarm pad . Proper technique requires patients to bear weight on their hands while using the shoulder girdle for stabilization, not compression.
Advantages: Maximum stability due to three-point contact (both handgrips plus underarm pads), intuitive weight distribution for first-time users, lower cost ($20–60 standard models), readily available in emergency departments and pharmacies, suitable for stairs and uneven terrain when properly fitted.
Disadvantages: Risk of axillary nerve compression if used incorrectly (leaning on pads rather than handgrips), bulkier profile limiting maneuverability in confined spaces, greater energy expenditure compared to forearm models, uncomfortable for extended daily use beyond 8–12 weeks, limited adjustability in some economy models.
Best for: Acute injuries requiring 2–10 weeks of partial weight-bearing, post-operative recovery with defined healing timeline, patients with good upper body strength and coordination, temporary use where cost minimization is prioritized.
Typical duration: 3–12 weeks maximum recommended for continuous daily use to avoid secondary overuse injuries.
Forearm Crutches (Elbow Crutches)
Forearm crutches eliminate axillary contact, featuring a forearm cuff that terminates 2–3 inches below the elbow and a handgrip positioned to maintain 20–30° elbow flexion during stance phase . The cuff distributes compressive forces across the proximal forearm rather than concentrating load at the wrist.
Advantages: Reduced energy expenditure (studies show 15–20% less oxygen consumption versus axillary designs), improved long-term comfort for sustained use, easier manipulation for activities of daily living including door opening and carrying objects, reduced shoulder fatigue, more compact profile for indoor navigation, better aesthetic acceptance encouraging compliance in younger patients.
Disadvantages: Requires greater balance and core strength compared to underarm models, steeper learning curve for gait training (typically 2–5 sessions versus 1–2 for axillary), contraindicated in patients with significant wrist arthritis or carpal tunnel syndrome, more expensive ($60–200 per pair), may concentrate excessive load on the radiocarpal joint in heavy users.
Better for long-term mobility: Patients requiring assistive devices beyond 3 months develop fewer overuse injuries with forearm crutches due to improved ergonomic load distribution and reduced compensatory postural adaptations .
Wrist load considerations: Peak forces at the wrist during forearm crutch use reach 40–60% of bodyweight during swing phase, necessitating adequate wrist extensor strength and intact joint integrity. Patients with pre-existing wrist pathology require padded ergonomic grips and may benefit from custom molded cuffs.
Bariatric Crutches
Bariatric models feature reinforced aluminum or steel frames rated for 400–600 pounds, wider handgrips to accommodate larger hand circumference, extended adjustment ranges to fit taller stature, and heavy-duty rubber tips with broader surface contact . Frame tubing diameter increases from standard 1-inch to 1.25–1.5 inches, with reinforced joints using through-bolts rather than spring-pin adjustments.
These devices address both weight capacity and ergonomic fit for larger body habitus, preventing catastrophic frame failure and improving stability through enhanced base width. Standard crutches fail at loads exceeding manufacturer specifications, creating acute fall risk and potential for secondary injury more severe than the original condition.
Pediatric Options
Pediatric crutches accommodate patients 30–90 pounds and heights 30–56 inches, featuring proportionally scaled frame geometry, smaller diameter grips sized for reduced hand span, and lighter overall weight to match pediatric strength capacity . Bright colors and pattern options improve compliance in younger patients who may resist assistive device use due to social concerns.
Sizing becomes critical in growing children—devices should allow 2–3 inches of height adjustment to accommodate growth during extended recovery periods without requiring replacement.
| Type | Best For | Stability | Long-Term Comfort | Weight Capacity |
|---|---|---|---|---|
| Underarm (Axillary) | Temporary injury, post-surgery 3–12 weeks | Excellent | Poor beyond 12 weeks | 250–300 lbs standard |
| Forearm (Elbow) | Long-term conditions, extended use >3 months | Good (requires balance) | Excellent | 250–350 lbs standard |
| Bariatric | Users >300 lbs, reinforced needs | Excellent (wider base) | Good | 400–600 lbs |
| Pediatric | Children 30–90 lbs, ages 4–12 | Good (proportional) | Good | 30–90 lbs |
Step 2 — Correct Sizing Guide
Improper crutch height causes excessive spinal flexion, abnormal scapular mechanics, increased fall risk, and accelerated upper extremity fatigue . Correct sizing establishes neutral joint positioning that optimizes force transmission while minimizing compensatory movement patterns.
How to Size Underarm Crutches
Two-to-three finger rule: With the patient standing upright wearing typical footwear, position the crutch tip 6 inches lateral and 2 inches anterior to the small toe. The axillary pad should sit 2–3 finger widths (1.5–2 inches) below the axilla. Patients who lean on the axillary pad compress the brachial plexus and radial nerve against the humerus, causing crutch palsy characterized by wrist drop and sensory deficits.
20–30° elbow bend: Adjust the handgrip so the elbow maintains 20–30° of flexion when the hand grasps the grip with the shoulder in neutral position. This angle optimizes triceps mechanical advantage during weight transfer while preventing hyperextension stress on the elbow joint. Angles less than 15° reduce push-off power; angles exceeding 40° cause premature biceps fatigue.
Height estimation formula: For initial fitting without patient present, subtract 16 inches from total height (measured in shoes). For a 5’8″ patient (68 inches), estimated crutch length is 52 inches from floor to axillary pad. This formula provides a starting point requiring refinement through clinical fitting with weight-bearing assessment.
How to Size Forearm Crutches
Wrist crease alignment: With arms hanging naturally at sides, measure from the floor to the wrist crease (distal forearm). This distance determines handgrip height. The grip should align with the greater trochanter when the crutch tip is positioned 6 inches lateral to the foot.
Cuff position: The forearm cuff should terminate 1.5–3 inches below the elbow joint, depending on forearm length. Cuffs positioned too proximally restrict elbow motion; distal placement concentrates load at the wrist rather than distributing it along the forearm. For forearm lengths 9–11 inches (elbow to wrist), position the cuff 2–2.5 inches below the olecranon.
Elbow angle: Maintain 20–30° elbow flexion identical to axillary crutch specifications. This angle remains biomechanically optimal regardless of crutch design, as it balances power generation with fatigue resistance across the elbow flexor and extensor groups.
| User Height | Recommended Crutch Range (Underarm) | Handgrip Height |
|---|---|---|
| 4’8″–5’0″ (56–60″) | 40–44 inches | 28–30 inches |
| 5’0″–5’4″ (60–64″) | 44–48 inches | 30–33 inches |
| 5’4″–5’8″ (64–68″) | 48–52 inches | 33–36 inches |
| 5’8″–6’0″ (68–72″) | 52–56 inches | 36–39 inches |
| 6’0″–6’4″ (72–76″) | 56–60 inches | 39–42 inches |
| 6’4″–6’8″ (76–80″) | 60–64 inches | 42–45 inches |
Common sizing mistakes: Purchasing crutches based on rounded height estimates without accounting for footwear, failing to verify elbow angle under loaded conditions, selecting fixed-height models that prevent adjustment as edema resolves or footwear changes, measuring from axilla rather than 2 inches below, and ignoring torso-to-leg proportions in patients with non-standard body ratios.
Step 3 — Understanding Weight Limits
Weight capacity ratings reflect the maximum load the frame can sustain during normal ambulation without structural failure or permanent deformation . These specifications incorporate safety factors of 1.5–2.0×, meaning a 300-pound rated crutch undergoes failure testing at 450–600 pounds.
Standard capacity (250–300 lbs): Constructed from aluminum tubing (6061-T6 or 7075-T6 alloy) with wall thickness 0.065–0.083 inches and 1-inch outer diameter. Spring-pin adjustment mechanisms rated for 300 pounds. Suitable for 75% of adult patients when body weight remains 10–15% below rated capacity to preserve structural margin during dynamic loading (stairs, uneven terrain, or rapid direction changes generate forces 1.5–2.0× static bodyweight).
Heavy-duty models (300–600 lbs): Utilize reinforced aluminum with increased wall thickness (0.083–0.095 inches) and larger diameter tubing (1.125–1.5 inches), or steel construction with powder-coat finish for corrosion resistance. Through-bolt adjustment systems replace spring pins to prevent shear failure under sustained heavy loading. Bariatric rubber tips increase ground contact diameter from 0.875 inches to 1.25–1.5 inches, improving stability and reducing floor stress concentration.
Frame reinforcement: Gussets welded at stress concentration points (handgrip junction, adjustment collar, tip ferrule) distribute load across greater surface area. Double-button push-pin adjustments prevent accidental height changes under load. Some models feature lateral cross-bracing that increases torsional rigidity during lateral weight shifts.
Why exceeding limit is dangerous: Aluminum frames undergo elastic deformation at loads approaching rated capacity, then catastrophic brittle fracture with minimal warning once yield strength is exceeded. Unlike steel, which deforms visibly before failure, aluminum provides no tactile feedback of impending collapse. Sudden crutch failure during swing phase results in uncontrolled falls with high risk of secondary fracture to the contralateral limb, wrist, or hip.
| User Weight | Recommended Category | Frame Material | Safety Margin |
|---|---|---|---|
| Up to 220 lbs | Standard (250 lb rated) | Aluminum 6061-T6 | 30+ lbs |
| 220–270 lbs | Standard (300 lb rated) | Aluminum 7075-T6 | 30+ lbs |
| 270–350 lbs | Heavy-duty (400 lb rated) | Reinforced aluminum | 50+ lbs |
| 350–500 lbs | Bariatric (600 lb rated) | Steel or thick-wall aluminum | 100+ lbs |
| >500 lbs | Walker or wheeled device | N/A—crutches contraindicated | N/A |
Patients within 20 pounds of rated capacity should upgrade to the next weight class, as weight fluctuations, heavy winter clothing, and backpack loads reduce available safety margin.
Step 4 — Materials Matter
Material selection influences weight, durability, corrosion resistance, cost, and vibration damping characteristics . The optimal material balances strength-to-weight ratio with patient-specific factors including upper body strength, expected duration of use, and environmental exposure.
Aluminum
Lightweight alloys (6061-T6, 7075-T6) produce crutches weighing 2–3 pounds per pair for standard models and 3.5–5 pounds for bariatric versions. The reduced mass decreases energy expenditure during swing phase—metabolic studies demonstrate 10–15% lower oxygen consumption with aluminum versus steel crutches over 30-minute ambulation periods. Adjustability through drilled holes and spring-pin mechanisms allows precise height customization in 0.5–1 inch increments. Corrosion resistance eliminates rust formation in humid climates or with exposure to perspiration. Aluminum costs $25–80 for standard models and $90–150 for bariatric versions.
Steel
Steel construction delivers superior strength at lower cost ($15–50 per pair) but increases weight to 4–6 pounds per pair for standard models. The additional mass causes faster upper extremity fatigue, particularly in elderly patients or those with reduced shoulder strength. Steel crutches require powder-coating or chrome plating to prevent oxidation; any coating damage exposes bare metal to rust formation. The increased material stiffness provides enhanced stability for heavier patients who prefer the rigid feel during weight transfer. Steel remains the economical choice for short-term use in budget-constrained situations.
Carbon Fiber
High-modulus carbon fiber composite construction achieves ultimate strength-to-weight ratios, producing crutches weighing 1–1.5 pounds per pair while maintaining 300+ pound capacity. The material cost and manufacturing complexity increase retail pricing to $200–400 per pair, limiting application to elite athletes, long-term users prioritizing performance, or patients with severe upper body weakness requiring minimum device weight. Carbon fiber exhibits excellent fatigue resistance, maintaining structural integrity through millions of loading cycles without stress-crack formation common in aluminum after 2–3 years of daily use.
Shock absorption: Aluminum and carbon fiber demonstrate superior vibration damping compared to steel, reducing peak impact forces transmitted to the upper extremity by 20–30% during heel strike. This characteristic decreases cumulative joint stress in the wrist, elbow, and shoulder, particularly during prolonged use on hard surfaces (tile, concrete). Some premium models incorporate elastomer inserts at the handgrip junction that further attenuate shock transmission.
Noise reduction: Rubber tip composition and frame material interact to produce varying noise levels during ambulation. Aluminum generates less acoustic emission than steel when contacting hard floors. Softer rubber compounds (Shore A durometer 60–70) reduce clicking sounds compared to harder tips (Shore A 80–90) but wear faster, requiring replacement every 3–6 months under daily use.
Durability: Steel outlasts aluminum in abusive environments or rough handling but suffers corrosion vulnerability. Aluminum develops fatigue cracks after 18–36 months of daily use (approximately 1–2 million gait cycles), visible as hairline fractures near adjustment holes or weld points. Carbon fiber maintains integrity beyond 5 years of continuous use when not subjected to impact damage.
Grip, Cuff & Tip Considerations
Handgrip ergonomics, forearm cuff design, and rubber tip composition directly influence comfort, control, and safety throughout the gait cycle .
Ergonomic grips: Contoured handles molded to match natural hand position reduce pressure concentration on the thenar and hypothenar eminences. Cylindrical grips 1–1.25 inches in diameter distribute load across the palm; diameters exceeding 1.5 inches cause grip fatigue in patients with smaller hands. Gel-padded or memory foam grips compress to conform to individual hand anatomy, reducing peak pressures by 25–35% compared to hard plastic. Patients ambulating more than 2 hours daily benefit significantly from premium grip designs that prevent callus formation and median nerve compression.
Shock-absorbing handles: Elastomer or coil-spring dampening systems integrated into the handgrip mount absorb 15–25% of impact forces during weight acceptance phase. This technology benefits patients with arthritic changes in the wrist or hand, reducing pain during extended ambulation. The mechanical compliance creates subtle vertical displacement (2–4 mm) that some users find unstable initially but adapt to within 3–5 days.
Anti-slip rubber tips: Standard tips utilize natural rubber or synthetic compounds with Shore A durometer 65–75, providing optimal traction on tile, wood, and concrete while maintaining wear resistance. The ferrule should contact the ground with the crutch shaft at 15–20° from vertical for maximum grip. Tips smaller than 0.875 inches diameter concentrate floor stress and increase slip risk on smooth surfaces. Ice tips featuring retractable metal cleats deploy for winter conditions, though they sacrifice indoor traction and damage flooring.
Replaceable components: Quality crutches feature user-serviceable tips, grips, and axillary pads secured with friction fit or threaded connections rather than permanent bonding. Tips require replacement when tread depth decreases below 1/8 inch or when radial cracks appear in the rubber—typically every 3–6 months under daily use. Grips degrade after 6–12 months as plasticizers migrate from the material, causing hardening and reduced cushioning. Axillary pads compress and wear through vinyl coverings after 4–8 months of heavy use.
Fatigue reduction correlates strongly with contact point comfort—studies measuring time-to-exhaustion during extended ambulation show 30–40% improvement with ergonomic grips versus standard cylindrical designs.
Should You Use One or Two Crutches?
Single versus bilateral crutch use depends on weight-bearing status, balance capability, and injury laterality .
Balance requirements: Bilateral crutches provide maximum stability through three-point gait patterns (both crutches plus affected limb) or two-point patterns (crutch and opposite limb simultaneously). Patients with vestibular deficits, peripheral neuropathy affecting proprioception, or history of falls require bilateral support to maintain center of mass within base of support during swing phase. Single crutch users must possess intact balance reflexes and ability to single-leg stance on the unaffected limb for 3–5 seconds.
Strength requirements: Bilateral crutches distribute upper body load across both shoulders and arms, reducing demand on each individual limb to 50% of the load imposed on single-crutch users. Elderly patients, those with rotator cuff pathology, or individuals with upper extremity weakness contraindicate single-crutch use regardless of lower extremity status. Single crutch technique requires the non-affected arm to absorb 40–60% of body weight during swing phase, necessitating intact shoulder girdle strength.
Medical advice: Orthopedic protocols for fracture management specify weight-bearing status: non-weight-bearing (0% load), touch-down weight-bearing (10–20% load for balance only), partial weight-bearing (30–50% load), or weight-bearing as tolerated. Non-weight-bearing and touch-down protocols mandate bilateral crutches to prevent inadvertent overload of the healing structure. Partial weight-bearing permits single crutch use in patients with adequate balance and strength, positioning the crutch on the unaffected side to reduce load on the injured limb. Weight-bearing as tolerated allows single crutch or cane transition based on pain and stability.
Physical therapy evaluation should determine readiness for single crutch use through specific testing: 30-second single-leg stance with eyes open, ability to ascend/descend four stairs without assistive device while holding rails, and demonstration of proper crutch gait pattern without Trendelenburg gait or lateral trunk lean.
When Crutches Are NOT the Best Option
Certain patient populations face excessive risk or inadequate support from crutch-type assistive devices, necessitating alternative solutions .
Severe balance issues: Patients with cerebellar ataxia, acute vestibular neuritis, advanced Parkinson’s disease, or stroke with significant proprioceptive loss cannot maintain stability with crutches that require dynamic balance during single-limb stance phase. The narrow base of support (6–8 inches lateral displacement) provides insufficient stability for individuals unable to achieve 10-second single-leg stance with eyes open.
Upper body weakness: Rotator cuff tears, bilateral shoulder arthroplasty, advanced rheumatoid arthritis affecting upper extremities, or neurological conditions causing arm weakness preclude safe crutch use. Patients unable to perform five wall push-ups or support 50% of body weight through one arm lack sufficient strength for crutch ambulation. Grip strength below 20 pounds (measured by dynamometry) correlates with increased fall risk during crutch use.
High fall risk: History of three or more falls in the preceding 12 months, orthostatic hypotension with recurrent syncope, severe visual impairment, or cognitive deficits affecting judgment and safety awareness contraindicate crutches. These patients require continuous stability provided by four-point walker designs.
Crutches versus walker: Walkers provide four-point base stability requiring minimal balance, distribute weight across both arms reducing strength demands per limb, and allow rest periods during ambulation by supporting bodyweight while stationary. However, walkers limit ambulation speed to 40–60% of crutch users, navigate stairs poorly, and create greater barriers to independence. Crutches suit younger, stronger patients with intact balance recovering from unilateral injuries. Walkers serve elderly patients, bilateral lower extremity involvement, or those with multiple comorbidities affecting stability and strength.
Crutches versus knee scooter: Wheeled knee platforms support the affected limb in flexion while the patient propels with the unaffected leg, eliminating upper extremity demands entirely. Knee scooters excel for patients with upper body weakness, bilateral arm injuries, or those facing 8–12 week non-weight-bearing protocols. Limitations include poor performance on stairs, uneven terrain, and in confined spaces. Knee scooters promote disuse atrophy of the affected limb and core musculature, whereas crutch use maintains muscle activation and proprioceptive input.
Common Mistakes When Choosing Crutches
Buying wrong height: Patients frequently purchase based on general height categories without clinical fitting, resulting in devices 2–4 inches incorrect. This error causes compensatory spinal flexion (too short) or shoulder hiking with lateral trunk lean (too tall), accelerating secondary pain syndromes. Always verify sizing through weight-bearing assessment with measurement of elbow angle and axillary clearance.
Ignoring weight capacity: Standard 250-pound rated crutches appear adequate for 240-pound patients, but the 10-pound margin disappears with winter clothing, backpack, or natural weight fluctuations. Dynamic loading during stairs or rapid gait increases effective load 1.5–2.0× bodyweight. Selecting devices rated 50+ pounds above current weight provides appropriate safety factor.
Choosing based on price only: Economy crutches ($15–25) utilize thin-wall aluminum, plastic adjustment collars prone to stripping, and non-replaceable tips that require complete device replacement when worn. Mid-tier models ($40–80) feature serviceable components, better grip ergonomics, and more durable construction that reduces long-term cost through extended service life. The $20–30 price difference becomes irrelevant when economy models require replacement after 2–3 months versus 12–18 months for quality devices.
Not consulting clinician: Self-selecting crutches without physical therapy evaluation or orthopedic guidance results in inappropriate device type for medical condition. Patients underestimate the importance of proper gait training—incorrect technique causes inefficient energy expenditure, compensatory injury patterns, and potential overload of healing structures. Professional fitting takes 20–30 minutes but prevents months of secondary problems.
Quick Decision Tree
Is this a temporary injury expected to heal within 12 weeks?
- YES → Consider underarm crutches for cost-effectiveness and maximum stability
- Patient weight <250 lbs → Standard aluminum underarm
- Patient weight 250–350 lbs → Heavy-duty or bariatric underarm
- Patient weight >350 lbs → Evaluate walker or knee scooter options
Is this a long-term condition requiring assistive device beyond 3 months?
- YES → Prioritize forearm crutches to prevent overuse injury
- Good balance and upper body strength → Forearm crutches with ergonomic grips
- Limited balance or strength → Evaluate walker with wheels
- Weight >350 lbs → Bariatric walker or custom forearm crutches
Does patient have intact balance (10+ second single-leg stance)?
- NO → Crutches contraindicated; prescribe standard or wheeled walker
- YES → Proceed with crutch selection based on strength and injury
Does patient have adequate upper body strength (five push-ups or 50% bodyweight support per arm)?
- NO → Walker or knee scooter more appropriate
- YES → Crutches acceptable; size and fit carefully
Is weight-bearing status non-weight-bearing or touch-down only?
- YES → Bilateral crutches mandatory regardless of balance/strength
- NO → Single crutch may be appropriate if partial or full weight-bearing allowed
Is patient over 300 pounds?
- YES → Bariatric crutches with 400–600 lb rating mandatory
- NO → Standard devices acceptable with proper sizing
Frequently Asked Questions
How do I know what size crutches to buy?
Measure from the floor to a point 2 inches below your armpit while wearing shoes, standing upright with shoulders relaxed. For underarm crutches, this distance equals the crutch length from floor to axillary pad. Alternatively, subtract 16 inches from your total height in shoes as a starting estimate. The handgrip should position your elbow at 20–30° of bend when grasping with the crutch tip placed 6 inches to the side of your foot. Forearm crutch sizing uses the floor-to-wrist measurement with arms hanging naturally; the handgrip aligns with your wrist crease. All crutches require clinical verification through weight-bearing fitting—measurements provide approximations that need adjustment based on individual biomechanics, torso-to-leg ratios, and footwear. Never rely solely on manufacturer size charts without physical trial and verification of proper elbow angle and axillary clearance.
What is the weight limit for crutches?
Standard crutches support 250–300 pounds maximum user weight, heavy-duty models rate for 300–400 pounds, and bariatric crutches accommodate 400–600 pounds. These ratings include built-in safety factors of 1.5–2.0×, meaning frames undergo testing at higher loads before failure. However, dynamic activities like stair climbing or rapid directional changes generate forces 1.5–2.0× your static bodyweight, effectively reducing practical capacity. Select crutches rated at least 50 pounds above your current weight to preserve structural safety margin. Exceeding rated capacity causes frame failure without warning—aluminum collapses catastrophically while steel bends gradually. Weight limits account for frame strength, adjustment mechanism integrity, and rubber tip capacity. Users approaching rated limits should upgrade to bariatric models or consider walker alternatives that distribute load across four points rather than two.
Are forearm crutches better than underarm crutches?
Forearm crutches prove superior for long-term use exceeding 3 months due to reduced energy expenditure (15–20% less oxygen consumption), elimination of axillary nerve compression risk, improved ergonomics reducing upper extremity overuse injuries, and easier integration into daily activities. Underarm crutches provide better stability for short-term use, require less balance and core strength, feature lower cost, and offer more intuitive learning for first-time users. The optimal choice depends on expected duration, patient strength and balance capabilities, and specific medical condition. Temporary injuries healing within 8–12 weeks favor underarm designs; chronic conditions requiring sustained support beyond 3 months warrant forearm crutches despite higher initial cost. Patients with excellent balance and coordination transition to forearm crutches more easily, while those with stability concerns benefit from the three-point contact of underarm models. Neither design is universally superior—selection requires matching device characteristics to patient-specific factors and medical requirements.
Can I buy crutches without a prescription?
Crutches are available for purchase without prescription at pharmacies, medical supply stores, and online retailers. However, self-selection without professional evaluation frequently results in inappropriate device type, incorrect sizing, and inadequate gait training that increases injury risk and compromises recovery. Physical therapy assessment provides crucial guidance on device type, proper sizing under loaded conditions, weight-bearing status appropriate for your specific condition, and instruction in correct gait patterns that prevent compensatory injuries. Insurance coverage typically requires prescription documentation for reimbursement, and some medical supply companies offer better pricing through insurance channels versus cash purchase. Even if purchasing without prescription, schedule professional fitting to verify appropriate selection and receive gait training—the 30–45 minute evaluation prevents months of complications from improper technique. Renting crutches through medical supply companies often proves more cost-effective for short-term use under 6 weeks.
What height should crutches be?
Properly fitted underarm crutches position the axillary pad 1.5–2 inches (two to three finger widths) below your armpit when standing upright with the crutch tip placed 6 inches lateral and 2 inches forward of your small toe. The handgrip should create 20–30° of elbow flexion when grasping with your shoulder in neutral position. For forearm crutches, the handgrip aligns with your wrist crease when arms hang naturally at your sides, and the forearm cuff terminates 1.5–3 inches below your elbow joint. These positions optimize biomechanical efficiency by maintaining neutral joint alignment, distributing forces appropriately across load-bearing surfaces, and minimizing compensatory postural adaptations. Height requirements vary based on individual proportions—patients with longer torsos relative to leg length need different adjustments than those with proportionately long legs. Footwear significantly affects proper height; always size while wearing shoes you’ll use during ambulation. Crutches set too tall force shoulder elevation and lateral trunk lean; excessively short crutches cause forward flexion and neck strain.
How do I adjust crutches correctly?
Loosen the adjustment mechanism (spring-pin buttons, threaded collars, or push-pin locks depending on model) and extend or shorten the crutch to the measured height. For underarm crutches, adjust overall length first to position the axillary pad 2 inches below your armpit, then adjust the handgrip independently to achieve 20–30° elbow bend. Forearm crutches typically feature single-point adjustment controlling overall length; verify handgrip height aligns with wrist level and cuff position sits 2–3 inches below elbow. When extending adjustment posts, ensure holes align precisely with locking pins—partial engagement causes mechanical failure under load. Push spring-pin buttons fully through both sides of the frame until they click into locked position; pull firmly on the adjusted section to verify secure engagement. Threaded collars require hand-tightening until resistance is felt, then an additional half-turn; avoid power tools that strip plastic threads. Check adjustment security daily for the first week as components settle during initial use. Re-verify height under loaded weight-bearing conditions—measurements taken while sitting or without bearing weight produce incorrect heights that require modification once actual ambulation begins.