Crutches are essential assistive walking devices prescribed to reduce or eliminate weight-bearing on an injured lower extremity, facilitating recovery while maintaining mobility. Improper selection, fitting, or use can result in secondary injuries including nerve compression, musculoskeletal overuse, and falls. Understanding the biomechanical principles, clinical indications, and proper techniques for crutch use is critical for safe rehabilitation and optimal recovery outcomes.
What Are Crutches? Medical Purpose & Biomechanics
Crutches function as external supports that transfer body weight from the lower extremities to the upper body, enabling ambulation when normal gait is compromised. The primary biomechanical mechanism involves redirecting ground reaction forces through the upper extremities—specifically the hands, wrists, and shoulders—rather than through the injured leg.
Load Transfer and Upper Extremity Mechanics
During crutch-assisted gait, the upper extremities bear substantial loads. Research demonstrates that peak reaction forces transmitted to the arms during axillary crutch use can reach 44.4% of body weight during the stance phase. This significant load transfer requires adequate upper body strength and places considerable stress on joints not evolved for weight-bearing function.
The distribution of forces varies by crutch type. Underarm crutches create a higher fulcrum point at the axilla, while forearm crutches position the pivot point at the wrist level. This biomechanical difference substantially affects energy expenditure, with studies from the late 1970s showing approximately 20% higher heart rate increase during ambulation with axillary crutches compared to elbow crutches.
Nerve Compression Risks
Improper crutch use poses significant neurological risks. The most serious complication is crutch palsy—compressive neuropathy of the brachial plexus caused by bearing weight directly on the axillary bar. The posterior cord is most commonly affected, resulting in radial nerve dysfunction with potential triceps and forearm extensor muscle weakness or paralysis. Cases have been documented where compression forces under the armpit reached 34% of body weight when crutches were used incorrectly.
Axillary crutch use has also been associated with axillobrachial arterial complications, with 34 documented cases in clinical literature. Forearm crutches present a different risk profile, with compressive neuropathies more commonly occurring from pressure at the forearm cuff (6 documented cases) rather than axillary structures.
Energy Expenditure and Gait Efficiency
Crutch-assisted ambulation requires substantially more metabolic energy than normal walking. The elevated fulcrum of underarm crutches (approximately 62% higher than forearm crutches) necessitates greater acceleration and deceleration forces with each step, increasing cardiovascular demand and fatigue. Studies using instrumented crutches demonstrate that bilateral crutch use significantly alters whole-body angular momentum and restricts reciprocal arm swing, further increasing energy cost.
Walking velocity decreases significantly during crutch gait due to reduced cadence and shorter stride length. Stance phase duration shortens while swing phase lengthens compared to normal gait patterns. These temporal alterations reflect the biomechanical constraints of offloading lower extremity weight while maintaining balance and forward progression.
Short-Term vs Long-Term Use Considerations
Short-term crutch use (typically under 6-8 weeks) for acute injuries generally resolves without permanent complications. However, long-term or permanent crutch dependence increases risk for overuse injuries including lateral epicondylitis, carpal tunnel syndrome, and rotator cuff pathology. The repetitive loading patterns and abnormal stress distribution on upper extremity structures can lead to progressive deterioration if proper technique and equipment selection are not maintained.
Types of Crutches (Clinical Comparison)
Underarm Crutches (Axillary)
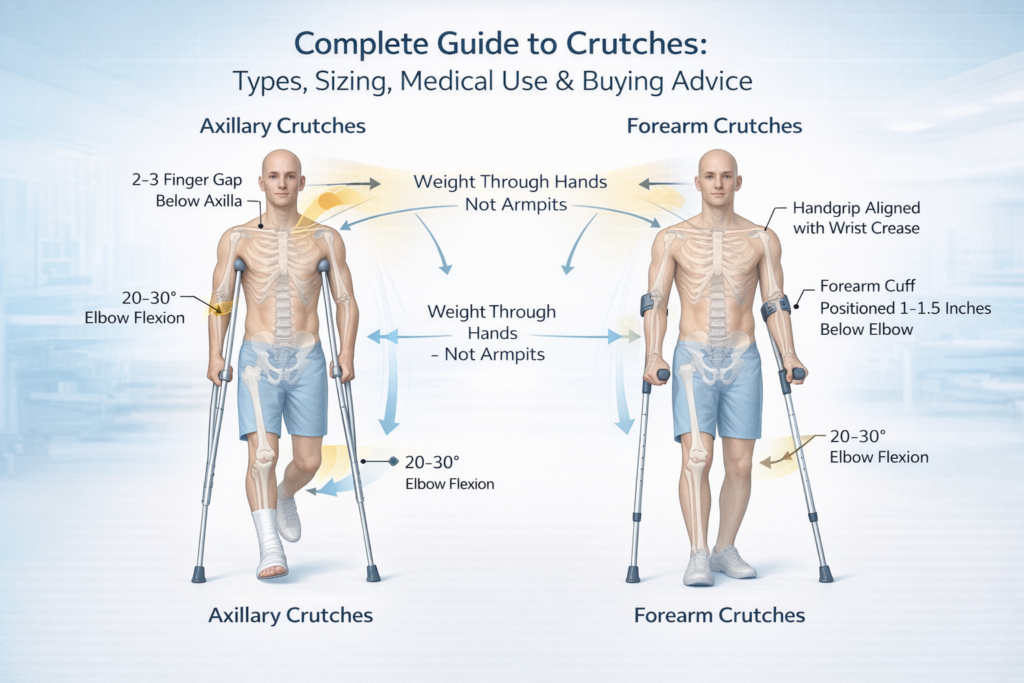
Underarm crutches, also termed axillary crutches, are the most commonly prescribed assistive device in North America. These devices extend from the ground to just below the axilla, with a padded crossbar that sits beneath the armpit and handgrips positioned at mid-forearm level.
Design and Structure: Standard axillary crutches consist of dual uprights that converge at the top, creating a padded axillary support. The handgrip is typically positioned to allow 20-30 degrees of elbow flexion when the arm is relaxed. Height adjustment mechanisms permit customization to individual patient dimensions.
Clinical Indications: Axillary crutches are best suited for short-term use following acute lower extremity injuries, particularly in patients unfamiliar with assistive devices. They provide stability for individuals learning non-weight-bearing or partial weight-bearing ambulation techniques.
Risk Profile: The primary risk associated with underarm crutches is compressive injury to neurovascular structures in the axilla. Brachial plexus palsy typically involves the posterior cord and can result in radial nerve dysfunction with wrist drop and loss of finger extension. Most cases resolve spontaneously within 8-12 weeks, though severe axonotmesis lesions may require 9 months for complete recovery. The higher pivot point also increases fall risk and makes stair navigation more challenging compared to forearm designs.
Posture Considerations: The elevated fulcrum of axillary crutches tends to promote forward trunk lean during gait, particularly when using 2-point or 4-point patterns. This postural deviation can contribute to thoracic spine strain and altered biomechanics over time.
Forearm Crutches (Elbow Crutches)
Forearm crutches, widely used in Europe and increasingly popular in North America, feature a forearm cuff and handgrip without axillary contact. These devices are also called Lofstrand crutches or elbow crutches.
Design and Weight Distribution: The crutch terminates at a forearm cuff—typically a molded plastic or padded metal band that encircles the forearm 1-3 inches below the elbow. Weight is distributed across the forearm, wrist, and hand rather than concentrated at the axilla. The lower pivot point (at wrist level versus axilla) fundamentally alters biomechanics during ambulation.
Advantages for Long-Term Use: Forearm crutches demonstrate clear superiority for extended or permanent use. The lower fulcrum reduces energy expenditure by approximately 20% compared to axillary designs. They permit more natural posture maintenance and allow greater freedom of hand movement—users can release the handgrip while the forearm cuff maintains device attachment.
Stability and Safety Profile: The broader base of support provided by forearm crutches enhances balance and coordination. Risk of compressive neuropathy shifts from axillary structures to potential median or ulnar nerve compression at the forearm cuff, though this occurs less frequently than axillary complications. Forearm crutches are associated with fewer serious neurovascular complications overall.
Clinical Preference: Current engineering analysis concludes that forearm crutches have minimum disadvantages compared to other crutch types and are suitable for the majority of users. They are particularly recommended for patients requiring prolonged support or those with adequate upper body strength and coordination.
Platform Crutches
Platform crutches represent a specialized design for patients unable to bear weight through their hands or wrists. These devices feature a horizontal platform that supports the forearm, with a vertical handgrip for stability.
Indications: Platform crutches are indicated for individuals with severe arthritis, carpal tunnel syndrome, wrist fractures, or conditions causing hand weakness. They allow weight distribution across the forearm rather than requiring grip strength or wrist extension.
Functional Characteristics: The platform design prevents excessive wrist extension and reduces stress on hand joints. Users rest their forearms on padded surfaces and maintain a neutral wrist position. This configuration is particularly valuable for patients with inflammatory arthropathies or post-surgical wrist immobilization.
Bariatric Crutches
Bariatric crutches are reinforced devices designed for individuals exceeding standard weight capacity limits. Standard crutches typically support up to 250-300 pounds, while bariatric models accommodate 500 pounds or more.
Structural Modifications: These devices feature reinforced tubing, wider bases, and enhanced handgrips to distribute increased loads safely. Platform attachments for bariatric applications provide additional forearm support and comfort during weight-bearing.
Clinical Necessity: Obesity increases fall risk and alters biomechanics during assisted gait. Proper equipment selection prevents device failure and reduces injury risk in this population.
Pediatric Crutches
Pediatric crutches are scaled devices designed for children’s proportions and developmental needs. Sizing is typically based on height rather than age alone, with consideration for arm length and torso proportions.
Sizing Considerations: Children require regular adjustments as they grow to maintain proper fit and prevent developmental musculoskeletal issues. Improper crutch height can lead to abnormal gait patterns and potentially affect growth and posture.
Comparative Analysis
| Type | Best For | Stability | Energy Cost | Long-Term Use | Risk Profile |
|---|---|---|---|---|---|
| Underarm (Axillary) | Short-term acute injuries, initial training | Moderate | High (+20% heart rate) | Not recommended | Axillary nerve palsy, arterial compression |
| Forearm (Elbow) | Long-term use, active patients | High | Lower | Excellent | Forearm nerve compression (rare) |
| Platform | Arthritis, hand weakness, wrist injury | Moderate | Moderate | Good for specific conditions | Minimal if properly fitted |
| Bariatric | Patients >300 lbs | High (reinforced) | Variable | Depends on underlying condition | Equipment failure if standard crutches used |
| Pediatric | Growing children | Moderate | Age-dependent | Requires frequent adjustment | Developmental issues if improperly sized |
Crutch Sizing Guide (Clinical Accuracy Required)
Proper crutch sizing is essential to prevent injury and optimize function. Incorrectly fitted crutches contribute to 22 documented cases of injury in clinical literature.
How to Measure for Underarm Crutches
Standing Measurement Method:
- Patient stands upright wearing normal walking shoes
- Position crutch tip 15 cm (6 inches) lateral and 15 cm anterior to the little toe
- The top of the crutch pad should sit 2-3 finger widths (approximately 5 cm or 2 inches) below the axilla
- Adjust handgrip height so the elbow maintains 20-30 degrees of flexion with shoulders relaxed
Supine Measurement Method:
- Patient lies supine with shoes on
- Measure from the anterior axillary fold to a point 15 cm lateral to the heel
- This measurement determines total crutch length
- Handgrip position is adjusted separately to achieve proper elbow angle
Critical Fitting Parameters:
- Axillary clearance: The 2-3 finger rule is non-negotiable. Contact between the axillary bar and armpit during weight-bearing indicates improper fit and high risk for nerve compression
- Elbow angle: 20-30 degrees of flexion optimizes force transmission while minimizing joint stress
- Height-specific guidelines: For individuals of average height (5’8″), axillary clearance should be approximately 3 inches; for taller individuals (6’+), increase to 4 inches; for shorter individuals (5′), reduce to approximately 2 inches
How to Measure for Forearm Crutches
Wrist Crease Alignment Method:
- Patient stands upright with arms relaxed at sides
- The top of the handgrip should align with the wrist crease when the crutch tip is positioned 6 inches lateral and 2 inches anterior to the small toe
- The forearm cuff should sit 1-3 inches below the elbow
- Elbow flexion should measure 20-30 degrees when gripping the handhold
Cuff Height and Positioning:
- The forearm cuff must be high enough to provide adequate support without restricting elbow flexion
- Proper cuff placement distributes pressure across the forearm rather than concentrating force at a single point
- The cuff opening should face away from the body to allow easy release during sitting or falls
Sitting Verification Test:
The patient should sit with one crutch attached. Point the crutch tip forward and upward at approximately 45 degrees. The distance from the top of the cuff to the elbow should match height-adjusted standards.
Common Sizing Mistakes
Crutches Too Long:
- Forces shoulders upward creating constant elevation and trapezius strain
- Reduces stability and increases fall risk
- Promotes incorrect weight-bearing on axillary structures
Crutches Too Short:
- Causes excessive forward trunk lean
- Increases energy expenditure
- Produces abnormal gait mechanics and back pain
Improper Handgrip Height:
- Creates wrist hyperextension or excessive flexion
- Concentrates forces at carpal structures
- Increases risk of median nerve compression and carpal tunnel syndrome
Insufficient Axillary Clearance:
- Direct cause of crutch palsy
- Can lead to axillobrachial arterial thrombosis
- Represents the single most dangerous fitting error
Printable Measurement Checklist
Pre-Fitting Assessment:
- ☐ Patient height measured with shoes on
- ☐ Upper extremity strength evaluated
- ☐ Balance and coordination assessed
- ☐ Weight-bearing status confirmed with physician
- ☐ Appropriate crutch type selected
Fitting Verification:
- ☐ Crutch tips positioned 6 inches lateral, 6 inches forward of toes
- ☐ Axillary clearance 2-3 finger widths (underarm crutches only)
- ☐ Elbow flexion 20-30 degrees measured with goniometer
- ☐ Handgrips at wrist crease level when arms relaxed
- ☐ Forearm cuff 1-3 inches below elbow (forearm crutches only)
- ☐ Patient can achieve full standing posture without leaning
- ☐ Weight-bearing test completed without axillary pressure
Post-Fitting Education:
- ☐ Proper weight-bearing technique demonstrated
- ☐ Gait pattern appropriate to injury practiced
- ☐ Stair navigation reviewed
- ☐ Safety warnings provided in writing
How to Use Crutches Properly (Step-by-Step)
Proper crutch technique is essential for safety and therapeutic effectiveness. Gait pattern selection depends on weight-bearing restrictions, balance, coordination, and bilateral versus unilateral lower extremity involvement.
Non-Weight-Bearing Gait
Indication: Complete offloading of one lower extremity—no contact between injured foot and ground.
Technique:
- Position both crutches 6-12 inches ahead
- Advance both crutches simultaneously
- Press down through hands (not armpits) and swing the body forward
- The uninjured leg passes between or slightly ahead of the crutches
- The injured leg remains elevated throughout, never touching the ground
- Land on the uninjured foot
- Repeat the sequence
Safety Critical: All body weight transfers through the upper extremities and the single weight-bearing leg. This pattern demands significant upper body strength and balance.
Partial Weight-Bearing Gait (25-75% Body Weight)
Indication: Graduated loading of an injured extremity as healing progresses.
Technique:
- Both crutches move forward together
- Step with the injured leg, making ground contact
- Apply only the physician-prescribed percentage of body weight to the injured leg
- Crutches bear the remaining load
- Step through with the uninjured leg
- The uninjured leg supports full body weight during its stance phase
Clinical Challenge: Patients demonstrate substantial difficulty accurately reproducing prescribed partial weight-bearing percentages. Variability is particularly pronounced at 10% and 90% weight-bearing targets. Studies recommend using two crutches when unloading exceeds 10% of body weight to maintain biomechanical accuracy.
Three-Point Gait
Indication: Single lower extremity injury with minimal to moderate weight-bearing restriction (typically <50% body weight).
Sequence:
- Both crutches and the affected leg move forward together
- The affected leg makes ground contact but bears minimal weight
- The unaffected leg steps through independently, passing the crutches
- Full body weight transfers to the unaffected leg during its stance phase
- Three points of contact exist during the double support phase: two crutches and one leg
Characteristics: This is a fairly rapid and stable gait pattern. It provides good stability while permitting forward progression at reasonable velocity.
Four-Point Gait
Indication: Bilateral lower extremity weakness, poor balance, or coordination deficits.
Sequence:
- Right crutch advances
- Left foot advances
- Left crutch advances
- Right foot advances
- Pattern repeats
Characteristics: This is the slowest but safest gait pattern, maintaining three points of floor contact at all times. It is frequently used with platform crutches and is optimal for patients with neurological conditions affecting both legs.
Sitting Down
- Back up to the chair until you feel it against the back of your legs
- Transfer both crutches to the side of the injured leg, holding them by the handgrips
- Reach back with the free hand to grasp the armrest or seat
- Lower yourself slowly while keeping the injured leg extended forward
- Once seated, position crutches within reach but away from traffic areas
Standing Up
- Move to the front edge of the chair
- Hold both crutches by the handgrips on the injured side
- Push up with the hand on the armrest and the crutches simultaneously
- Stand on the uninjured leg
- Position one crutch under each arm before attempting to walk
Stairs – Ascending (Going Up)
With Handrail:
- Transfer both crutches to the hand opposite the handrail
- Grasp the handrail with the free hand
- Step up with the uninjured leg first
- Push down on the handrail and crutches
- Bring the injured leg and crutches up to the same step
- Repeat for each step
Without Handrail:
- Position both crutches on the step below
- Push down forcefully through both handgrips
- Step up with the uninjured leg
- Lift the injured leg and crutches to the same step
- Maintain balance before advancing to the next step
Memory Aid: “Up with the good, down with the bad”
Stairs – Descending (Going Down)
With Handrail:
- Transfer both crutches to the hand opposite the handrail
- Grasp the handrail firmly
- Lower the crutches and injured leg to the next step down
- Support weight with the handrail and uninjured leg
- Step down with the uninjured leg to meet the crutches and injured leg
- Repeat for each step
Without Handrail:
- Position crutches on the step below
- Lower the injured leg toward the lower step
- Support full weight through the crutches and the uninjured leg
- Step down with the uninjured leg
- All three points (both crutches and injured leg) should reach the lower step together
Curbs and Uneven Terrain
Curb Ascent: Treat as a single stair step using techniques described above.
Curb Descent: Position crutches and injured leg down first, then step down with the uninjured leg.
Uneven Surfaces: Reduce stride length, slow cadence, and increase visual attention to ground surface. Consider alternative mobility aids if terrain is excessively irregular.
Critical Safety Warnings
Never Rest Weight on Armpits: All weight-bearing must occur through the hands and arms, not the axillary pads. Leaning on the axillary bars is the primary mechanism of crutch palsy and vascular injury.
Slipping Hazards:
- Inspect crutch tips daily for wear; replace when tread depth decreases
- Avoid wet, icy, or highly polished floors
- Use extreme caution on grass, gravel, or sand
- Consider temporary activity restriction during adverse weather
Backpack Balance: Carrying items in a backpack helps maintain balance by distributing weight symmetrically. Avoid carrying items in hands while using crutches, as this compromises stability and grip security.
Medical Conditions That Require Crutches
Ankle Sprains
Severe ankle sprains (Grade II-III) involving significant ligament damage require partial or non-weight-bearing during the acute phase to prevent further injury and allow healing. Crutches reduce tensile stress on damaged ligament structures while maintaining lower extremity mobility.
Fractures
Most lower limb fractures from the pelvis through the foot require crutch assistance during healing. Specific indications include:
- Tibial plateau fractures
- Ankle fractures
- Metatarsal fractures
- Calcaneal fractures
- Femoral shaft fractures (following surgical stabilization)
- Pelvic fractures with weight-bearing restrictions
The duration of crutch use varies based on fracture location, configuration, stability, and healing progress documented on serial radiographs.
ACL Reconstruction
Following anterior cruciate ligament reconstruction, crutches are typically prescribed for 1-2 weeks postoperatively. Modern protocols emphasize early weight-bearing as tolerated to minimize quadriceps atrophy and promote proprioceptive recovery. Some surgeons recommend discontinuing crutches within one week if patients demonstrate adequate quadriceps control and minimal effusion.
Variability exists among rehabilitation protocols, with some therapists preferring extended crutch use to ensure proper gait mechanics, while others advocate early discontinuation to prevent dependency and gait deviation.
Hip Surgery
Hip fracture surgery necessitates postoperative mobility assistance. Studies demonstrate that patients who ambulate at least 5 feet within 72 hours after hip fracture surgery have significantly increased likelihood of independent ambulation at 3 months.
Crutch dependency before hip fracture surgery is associated with reduced odds of achieving first-day mobilization postoperatively. Patients using walking aids preoperatively face greater rehabilitation challenges.
Post-Operative Lower Extremity Procedures
Crutches are routinely prescribed following:
- Knee arthroscopy
- Bunionectomy
- Achilles tendon repair
- Ankle arthrodesis
- Osteotomies
- Soft tissue procedures requiring protected weight-bearing
Neurological Weakness
Less commonly, crutches may be prescribed for lower back injuries causing leg pain or weakness. However, patients requiring mobility aids primarily for balance are better served by more stable devices such as walkers.
Doctor Prescription Process
Medical Necessity Determination
Crutches are classified as durable medical equipment (DME) under Medicare and most insurance plans. Coverage requires:
- Medical necessity as determined by a physician
- A written prescription specifying crutch type
- Documentation of the condition requiring assistance
Insurance Coverage
Medicare Part B: Covers 80% of approved crutch costs after the deductible is met, with the beneficiary responsible for the remaining 20%. The prescribing physician must be enrolled in Medicare for coverage to apply.
Private Insurance: Coverage varies by plan. Most policies include DME benefits covering crutches with physician prescription and documentation of medical necessity.
Rental vs Purchase
Crutches may be rented or purchased depending on expected duration of use and insurance policy terms. Medicare and private insurers handle DME differently:
- Short-term needs (<3 months): Rental often most cost-effective
- Long-term or permanent needs: Purchase typically recommended
- Some equipment becomes beneficiary property after specified rental payments
DME Classification and Acquisition
Crutches fall within the same DME category as canes, walkers, wheelchairs, and hospital beds. Patients can obtain prescribed crutches through:
- DME suppliers contracted with their insurance
- Retail pharmacies with DME departments
- Orthopedic supply companies
- Hospital discharge supply services
Proper documentation from the treating physician is required for insurance reimbursement regardless of the acquisition source.
Crutches vs Wheelchair vs Walker
Selection among mobility aids depends on injury severity, weight-bearing restrictions, upper body strength, balance, and functional goals.
| Feature | Crutches | Walker | Wheelchair |
|---|---|---|---|
| Mobility & Independence | Moderate; requires upper body strength and coordination | High for partial weight-bearing; excellent stability | High for non-weight-bearing; completely eliminates lower extremity loading |
| Upper Body Strength Needed | Significant (supporting up to 100% body weight) | Minimal to moderate | Minimal (arms for propulsion only) |
| Home Suitability | Good for most homes; challenging on stairs | Excellent on single-level; poor on stairs | Requires wide doorways and ramps; excellent for level surfaces |
| Long-Term Comfort | Poor; hand pain, fatigue, axillary compression risk | Good; weight distributed across hands and forearms | Excellent; seated position reduces fatigue |
| Speed/Efficiency | Moderate once mastered | Slower but stable | Fast on level terrain |
| Weight-Bearing Support | Partial or complete offloading of one leg | Typically partial weight-bearing both legs | Complete non-weight-bearing |
| Fall Risk | Moderate to high; requires balance and coordination | Low; four-point stability | Very low when seated |
| Portability | Excellent; lightweight and collapsible | Moderate; foldable models available | Poor; bulky and requires vehicle accommodation |
When Crutches Are NOT Appropriate
Consider Walkers Instead:
- Bilateral lower extremity injuries requiring support
- Elderly patients with balance impairment or osteoporosis
- Patients with upper extremity weakness or arthritis limiting grip strength
- Long-term mobility assistance needs with partial weight-bearing
- Patients who benefit from seated rest breaks (rollator walkers with seats)
Consider Wheelchairs Instead:
- Complete non-weight-bearing restrictions for both lower extremities
- Severe cardiovascular or pulmonary disease limiting exertional capacity
- Upper extremity injury preventing crutch use
- Poor balance or high fall risk
- Long-distance mobility needs
- Outdoor use on uneven terrain where crutch stability is compromised
Clinical Decision Framework:
- Single leg injury, good strength/balance: Crutches appropriate
- Single leg injury, poor strength/balance: Walker or wheelchair
- Bilateral injury or weakness: Walker (partial WB) or wheelchair (non-WB)
- Temporary injury (<8 weeks): Crutches or walker
- Permanent disability: Wheelchair or specialized walker
Buying Guide – What to Look For
Material Construction
Aluminum: Lightweight (typically 2-4 lbs per pair), corrosion-resistant, and suitable for most users under 250 lbs. Aluminum provides adequate strength-to-weight ratio for standard applications.
Steel: Heavier but stronger. Required for bariatric models supporting 300-500 lbs. Steel construction increases durability but reduces portability.
Carbon Fiber: Premium lightweight option offering strength comparable to aluminum at reduced weight. Higher cost limits widespread adoption.
Weight Capacity
Verify the manufacturer’s rated weight limit. Standard crutches support 250-300 lbs, while bariatric models accommodate 500+ lbs. Using crutches beyond rated capacity risks catastrophic failure and serious injury.
Grip Comfort
Material: Foam, rubber, or gel padding. Gel grips provide superior shock absorption and reduce hand fatigue during extended use.
Ergonomic Contour: Anatomically shaped grips distribute pressure across the palm rather than concentrating force at specific points. This design reduces risk of carpal tunnel syndrome and median nerve compression.
Size: Grips should match hand size. Too small increases grip force requirements; too large reduces control.
Shock Absorption
Some premium models incorporate spring mechanisms or flexible components that absorb impact forces during ambulation. Shock absorption reduces transmitted vibration through the upper extremities, decreasing fatigue and improving comfort during extended use.
Anti-Slip Tips
Tread Pattern: Deep, multidirectional treads provide superior traction on varied surfaces.
Material: Rubber compounds offer best grip. Hardness rating affects durability versus traction—softer rubber provides better grip but wears faster.
Replacement: Tips are consumable components requiring periodic replacement. Purchase models with readily available, inexpensive replacement tips. Inspect tips weekly for wear.
Cuff Design (Forearm Crutches)
Material: Molded plastic versus padded metal. Plastic cuffs are lighter; padded metal offers superior comfort for long-term use.
Opening Size: Must be large enough to accommodate the forearm comfortably without restricting circulation, but secure enough to prevent slippage.
Release Mechanism: Quick-release cuffs allow rapid detachment during sitting or emergencies. This feature is particularly valuable for active users.
Noise Reduction
Rubber tip covers reduce the clicking sound of metal tips on hard floors. Some models incorporate vibration-dampening materials throughout the structure to minimize noise—an important consideration for apartment dwellers or those concerned about discretion.
Pre-Purchase Checklist
Fit and Function:
- ☐ Adjustability range accommodates your height
- ☐ Weight capacity exceeds your body weight by safety margin
- ☐ Grip style and size appropriate for your hands
- ☐ Cuff design comfortable (forearm crutches)
- ☐ Adjustment mechanisms easy to operate and secure
Safety Features:
- ☐ Anti-slip tips with adequate tread depth
- ☐ Replacement tips readily available and affordable
- ☐ Secure locking mechanisms for height adjustment
- ☐ No sharp edges or protrusions
Practical Considerations:
- ☐ Weight suits your strength level
- ☐ Portability meets your transportation needs
- ☐ Price within budget (remember to factor replacement tips)
- ☐ Warranty covers reasonable use duration
- ☐ Return policy allows trial period
Documentation:
- ☐ Physician prescription obtained
- ☐ Insurance preauthorization completed (if required)
- ☐ Supplier accepts your insurance
- ☐ Expected out-of-pocket costs clarified
Pros & Cons of Using Crutches
Advantages
Maintained Mobility: Crutches enable ambulation during recovery, preventing deconditioning and maintaining cardiovascular fitness.
Therapeutic Loading Control: Precise offloading of injured structures promotes optimal healing while allowing graduated return to weight-bearing.
Independence Preservation: Unlike wheelchairs, crutches allow standing transfers, reaching elevated objects, and navigating narrow spaces.
Portability: Lightweight and easily transported in vehicles or stored when not in use.
Cost-Effectiveness: Significantly less expensive than wheelchairs or knee scooters, with good insurance coverage.
Disadvantages and Realistic Challenges
Hand and Wrist Pain: Repetitive loading through hands and wrists causes discomfort and fatigue. Many users develop calluses on palms. Carpal tunnel syndrome risk increases with prolonged use.
Upper Body Fatigue: Supporting body weight through arms requires significant energy expenditure. Shoulder, trapezius, and triceps fatigue occurs rapidly in deconditioned individuals.
Social and Practical Limitations:
- Inability to carry objects while walking
- Difficulty opening doors
- Challenges with inclement weather
- Restricted participation in social activities
- Dependence on others for tasks requiring two hands
Stair Anxiety: Navigating stairs generates significant anxiety, particularly descending. Fear of falling is common and can limit independence.
Sleep Disruption: Getting to the bathroom at night becomes complicated. Injured leg positioning during sleep may cause discomfort.
Skin Irritation: Axillary pads can cause skin breakdown under the arms. Forearm cuffs may create pressure points or chafing.
Gait Deviation: Improper technique leads to compensatory movement patterns that can cause secondary injuries to the back, hips, or contralateral leg.
Appearance and Self-Consciousness: Many patients report feeling self-conscious about using crutches in public, particularly younger individuals.
Common Mistakes & Injury Risks
Axillary Nerve Palsy
Mechanism: Compression of the brachial plexus against the humerus by the axillary bar during weight-bearing. The posterior cord is most vulnerable.
Presentation: Weakness or paralysis of the triceps, wrist extensors, and finger extensors. Wrist drop is the classic finding. Sensory changes over the dorsal hand may occur.
Prevention:
- Maintain 2-3 finger widths clearance between axilla and crutch pad at all times
- Weight-bearing exclusively through hands, never armpits
- Proper crutch height adjustment
Prognosis: Most cases resolve within 8-12 weeks with crutch discontinuation and supportive care. Severe cases with axonotmesis may require up to 9 months for complete recovery.
Wrist Tendinitis and Carpal Tunnel Syndrome
Mechanism: Repetitive loading and wrist extension during crutch ambulation cause inflammatory changes in wrist tendons and median nerve compression in the carpal tunnel.
Presentation: Wrist pain, particularly on the palmar surface. Numbness or tingling in the thumb, index, and middle fingers. Weakness of thumb opposition.
Prevention:
- Proper handgrip height maintaining neutral wrist position
- Ergonomic grip design with adequate padding
- Regular rest breaks during extended ambulation
- Wrist stretching exercises
- Consider forearm crutches to distribute forces across larger surface area
Poor Posture and Back Pain
Mechanism: Incorrect crutch height, improper gait pattern, or compensation for weak upper body strength leads to excessive forward trunk lean and lumbar lordosis.
Presentation: Lower back pain, thoracic strain, neck tension.
Prevention:
- Accurate crutch sizing to patient height
- Gait training emphasizing upright posture
- Core strengthening exercises
- Forearm crutches for patients with tendency toward postural deviation
Falling Backward
Risk Factors: Inexperience, environmental hazards, excessive speed, wet surfaces, inadequate upper body strength.
Injury Potential: Head trauma, spinal injury, wrist fractures from attempting to break the fall.
Prevention:
- Comprehensive gait training before independent use
- Environmental assessment and hazard removal
- Appropriate assistive device selection for patient capability
- Use of handrails when available
- Reduced speed on unfamiliar or challenging terrain
Incorrect Weight-Bearing
Problem: Patients frequently exceed prescribed partial weight-bearing limits. Studies show large variations in ability to replicate target loads, particularly at 10% and 90% weight-bearing restrictions.
Consequences: Delayed healing, hardware failure after surgical fixation, re-injury.
Prevention:
- Use of instrumented crutches with force feedback for training
- Regular reinforcement of weight-bearing restrictions by physical therapy
- Bathroom scales used during practice to calibrate perceived versus actual loading
- Use of two crutches when weight-bearing restriction exceeds 10%
Making Life on Crutches Easier
Shower and Bathing Tips
Safety First:
- Install grab bars in shower/bath area
- Use non-slip bath mat with strong suction cups
- Consider shower chair or bath bench for seated bathing
- Keep injured leg outside shower curtain if immobilization or wound protection required
Technique:
- Sit on edge of tub, swing legs in together
- Use handheld shower head for better control
- Place toiletries within easy reach before showering
- Dry thoroughly while seated to prevent falls
Carrying Items
Backpack Strategy: Wear a backpack to carry essentials while keeping hands free for crutch use. Distribute weight evenly to maintain balance. Front-loading backpacks are not recommended as they shift center of gravity forward.
Pockets: Utilize cargo pants or jackets with large pockets for phones, keys, and small items.
Assistive Products:
- Crutch bags that attach to the crutch shaft
- Aprons with large pockets
- Tote bags worn crossbody (though this can affect balance)
Beverages: Use bottles with secure lids and carry in backpack. Avoid open containers as spills are inevitable.
Kitchen Modifications
Work Surface Strategy:
- Prepare food while seated at table or counter
- Slide items across counter rather than carrying
- Use wheeled cart to transport items from counter to table
One-Handed Techniques:
- Stabilize cutting boards with damp towel underneath
- Use electric appliances (can opener, mixer) to reduce manual effort
- Pre-prepare meals when possible
Safety:
- Clear floor of throw rugs or obstacles
- Avoid carrying hot liquids while using crutches
- Ask for assistance with tasks requiring two hands
Sleeping Adjustments
Positioning:
- Elevate injured leg on pillows to reduce swelling
- Place pillows between knees if side-sleeping
- Keep crutches within arm’s reach of bed
Nighttime Bathroom:
- Use nightlight to illuminate path
- Consider bedside commode for severe mobility restrictions
- Place necessary items (phone, water, medications) within reach before sleep
Transportation and Outdoors
Vehicle Access:
- Transfer crutches to vehicle after sitting
- Protect car interior with towels if crutches are wet or dirty
- Consider vehicles with running boards or lower entry height
Weather Considerations:
- Ice and snow create extreme fall risk—consider alternative mobility or activity restriction
- Rain makes crutch tips slippery—reduce speed and test grip before full weight transfer
- Purchase ice grips that attach to crutch tips for winter use
Public Spaces:
- Arrive early to scope out accessible routes and seating
- Request assistance in crowded environments
- Use elevators instead of escalators
- Advocate for your needs—ask for closer parking, seating, or assistance
Frequently Asked Questions
What are the four types of crutches?
The four main types of crutches are underarm (axillary) crutches, forearm (elbow) crutches, platform crutches, and bariatric crutches. Underarm crutches extend from the ground to below the armpit and are most common for short-term use. Forearm crutches have a cuff that wraps around the forearm and are preferred for long-term use. Platform crutches feature a horizontal support for the forearm and are used by people with hand or wrist weakness. Bariatric crutches are reinforced models designed to support individuals over 300 pounds.
How do I know what size crutches to buy?
Proper crutch sizing requires measuring from your armpit to the ground while standing upright. When standing with crutches positioned 6 inches to the side and 6 inches in front of your feet, there should be 2-3 finger widths (about 2 inches) of space between the top of the crutch and your armpit. The handgrip should be at wrist level when your arms hang relaxed at your sides, creating a 20-30 degree bend in your elbow. For forearm crutches, the cuff should sit 1-3 inches below your elbow with the handgrip at wrist crease level.
How long should you use crutches after surgery?
Duration of crutch use varies significantly based on the type of surgery and healing progress. After ACL reconstruction, crutches are typically used for 1-2 weeks. Following ankle fracture surgery, 6-8 weeks is common. Hip fracture patients may require crutches for 8-12 weeks or longer. Your surgeon determines the timeline based on bone healing shown on X-rays, pain levels, and ability to bear weight safely. Never discontinue crutches without explicit physician approval, as premature weight-bearing can cause re-injury or hardware failure.
Are forearm crutches better than underarm crutches?
Forearm crutches are generally superior for long-term use. They require approximately 20% less energy expenditure compared to underarm crutches. The lower pivot point at the wrist (rather than the axilla) allows better posture and more natural movement. Forearm crutches also carry lower risk of serious nerve or vascular injury since they do not contact the axilla. However, underarm crutches may be easier for beginners to learn and are acceptable for short-term use under 6-8 weeks. Patients should consult their physician or physical therapist for personalized recommendations.
How much weight can I put on my injured leg?
Weight-bearing restrictions are prescribed by your surgeon based on your specific injury and treatment. Non-weight-bearing means zero contact between your injured foot and the ground. Toe-touch weight-bearing allows foot contact for balance only (approximately 10% body weight). Partial weight-bearing typically means 25-50% of body weight, though exact percentages vary. Full weight-bearing as tolerated means you may bear as much weight as comfortable. Research shows patients have difficulty accurately following partial weight-bearing restrictions, particularly at 10% and 90% limits. Using a bathroom scale during practice can help calibrate the correct amount of pressure.
Can I buy crutches without a prescription?
You can purchase crutches without a prescription at pharmacies and medical supply stores. However, a prescription is required for insurance coverage. Medicare Part B and most private insurance plans classify crutches as durable medical equipment (DME) and will cover 80% of approved costs after your deductible is met, but only with a physician’s written prescription documenting medical necessity. Additionally, proper fitting and gait training by a physical therapist significantly reduces injury risk and improves outcomes. Self-prescription without professional guidance increases the risk of selecting incorrect crutch type, improper sizing, and dangerous technique errors.
What to look for when buying crutches?
When buying crutches, verify the weight capacity exceeds your body weight. Choose appropriate material—aluminum for most users under 250 lbs, steel for bariatric needs. Select comfortable, ergonomic grips with adequate padding to reduce hand fatigue. Ensure adjustment mechanisms are secure and easy to operate. Check that anti-slip tips have deep tread and that replacement tips are readily available. For forearm crutches, evaluate cuff comfort and ensure proper sizing around your forearm. Consider shock absorption features if you’ll use crutches extensively. Verify your insurance covers the selected model and supplier. Most importantly, ensure proper professional fitting and gait training before independent use to prevent injury.
Conclusion
Crutches are highly effective assistive devices that enable mobility during lower extremity injury recovery when properly selected, fitted, and used. Understanding the biomechanical principles of weight transfer, recognizing the distinct advantages and limitations of different crutch types, and mastering proper gait technique are essential for safe and therapeutic outcomes.
Forearm crutches offer superior energy efficiency, reduced injury risk, and better long-term comfort compared to underarm crutches, which remain appropriate for short-term use and initial gait training. Proper sizing—maintaining 2-3 finger widths of axillary clearance and 20-30 degrees of elbow flexion—is critical to prevent compressive neuropathy and optimize function.
Patients must receive comprehensive instruction in appropriate gait patterns (non-weight-bearing, partial weight-bearing, three-point, or four-point) based on their specific weight-bearing restrictions and functional status. Common complications including axillary nerve palsy, carpal tunnel syndrome, and falls are largely preventable through proper technique, equipment selection, and environmental modification.
Recovery expectations should be realistic. Crutch use requires significant upper body strength, causes hand and wrist discomfort, restricts carrying capacity, and presents challenges with stairs and adverse weather. However, these limitations are temporary inconveniences that enable protected healing and prevent more serious long-term complications.
Consultation with your healthcare professional remains essential. Your physician determines appropriate weight-bearing status, crutch duration, and progression timeline based on your specific injury, healing progress, and individual risk factors. Physical therapists provide crucial gait training, equipment fitting, and technique refinement that cannot be replicated through written instructions alone. This guide provides comprehensive information to support informed decision-making and safe crutch use, but cannot replace individualized professional medical care.