In laboratory microscopy, the quality of your image is determined more by your slide preparation than by the cost of your microscope. A student with a $2,000 research microscope will see nothing but blur if the specimen is too thick or the mount is filled with air bubbles. Conversely, a skilled technician can produce publication-quality images on a standard student microscope simply by mastering the art of the wet mount.
This is because microscopy is an optical system that requires light to pass through the specimen. If the preparation disrupts the light path-through refractive errors, thickness, or debris-the objective lens cannot resolve the image. This guide focuses on the fundamental skills required to prepare professional-quality microscope slides, a core competency for every biology student and laboratory professional.
Section 1: What Is a Microscope Slide?
A microscope slide is a thin, flat piece of glass used to hold objects for examination under a microscope. While they may appear simple, their dimensions and optical properties are standardized to ensure compatibility with high-precision lenses.
The international standard (ISO 8037-1) defines the typical slide size as 76 mm x 26 mm (approx. 3 x 1 inches) with a thickness of roughly 1 mm. Glass is the preferred material because it is chemically inert, scratch-resistant, and has a refractive index (approx. 1.515) that matches the immersion oils and mounting media used in advanced microscopy.
A critical companion to the slide is the coverslip (or cover glass). This is a much thinner square or circle of glass (typically 0.17 mm thick for standard #1.5 coverslips) placed over the specimen. The coverslip serves two vital functions: it flattens the specimen to a uniform thickness and protects the microscope’s objective lens from contacting the liquid sample.
Section 2: Types of Microscope Slides
Different specimens require different glass geometry. Choosing the wrong type is a common setup error.
- Flat Slides: The standard slide used for 95% of routine lab work, including wet mounts, dry mounts, and smears. The surface is perfectly planar, ideal for thin specimens like bacteria, blood cells, or plant sections.
- Concave (Depression) Slides: These feature a central indentation or “well.” They are designed for holding thicker liquids or living aquatic organisms (like Daphnia or algae) without crushing them. They are essential for “hanging drop” preparations where the organism needs room to swim.
- Specialized Slides:
- Frosted slides have a sandblasted edge for easy labeling with a pencil.
- Graticule slides contain a microscopic grid etched into the glass, allowing the observer to measure the physical size of the specimen.
Section 3: Types of Microscope Mounts
There are three primary methods to secure a sample onto a slide mount, each serving a distinct purpose.
Dry Mount
A dry mount is the simplest technique, requiring no liquid interface. The specimen is placed directly on the slide, often with a coverslip simply resting on top to protect the lens.
- When to use: Inanimate objects that do not need hydration, such as insect legs, hair, pollen, or manufactured fibers.
- Advantages: Quick setup; specimen does not decay rapidly.
- Limitations: Poor optical resolution for transparent biological tissues due to light refraction at the air-specimen interface.
Wet Mount (Temporary Mount)
The wet mount involves suspending the specimen in a drop of liquid (usually water or stain) between the slide and the coverslip.
- Why “Temporary”: The liquid will eventually evaporate, meaning these slides generally last only 15–30 minutes unless sealed.
- Specimens: Living cells, pond water organisms, cheek cells, and plant tissues. The liquid improves optical clarity by reducing refraction and allows living cells to function normally.
Smear Mount
A smear involves spreading a liquid sample thinly across the glass to separate individual cells.
- When used: Viscous bio-fluids like blood or bacterial cultures.
- Why thinness is critical: In a blood smear, cells must be spread in a “monolayer” (one cell thick) so they do not overlap, allowing distinct observation of red and white blood cells.
Section 4: How to Prepare a Wet Mount Slide (Step-by-Step)
Mastering the wet mount slide is the most important skill for a biology student. Follow this procedure exactly to minimize artifacts.
Materials Required:
- Clean glass slide and coverslip (cleanliness is non-negotiable).
- Distilled water (tap water contains minerals that dry into distracting crystals).
- Pipette or dropper.
- Forceps/Tweezers.
- Paper towel (for wicking).
Step 1: Clean and Stage
Hold the slide by its edges to avoid fingerprints. Place it on a flat, clean surface. Ensure your specimen is thin enough to transmit light. If using a plant stem or tissue, it must be sliced translucent (ideally one cell layer thick).
Step 2: Apply the Liquid
Place one single drop of water (or stain) in the exact center of the slide.
- Instructor Note: Beginners often use too much water. A flood of water causes the coverslip to “float” and drift, making it impossible to keep the specimen in the field of view.
Step 3: Position the Specimen
Using forceps, gently place your specimen into the water droplet. It should be fully submerged. If the specimen is folded, gently tease it flat with a dissection needle.
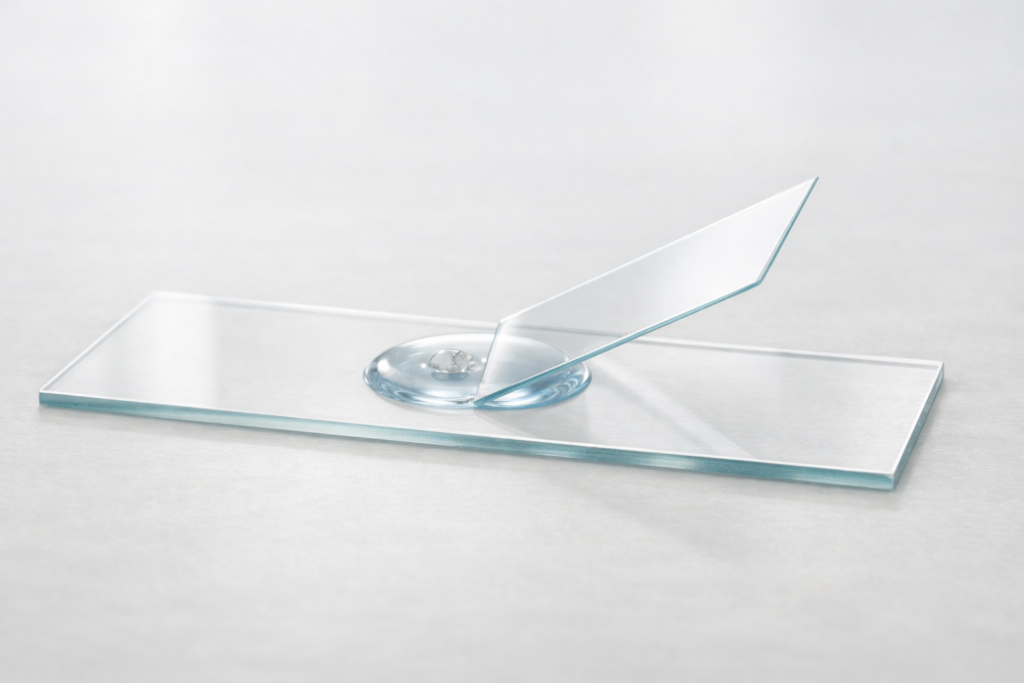
Step 4: The 45-Degree Angle Placement (Critical Step)
Hold the coverslip by its edges. Place one edge of the coverslip against the slide surface, just touching the edge of the water droplet.
- Wait for the water to spread along that edge of the glass.
- Slowly lower the upper edge of the coverslip like a closing hinge.
- Do not drop it flat.
Step 5: Inspect and Adjust
Once the coverslip is down, check for excess liquid. If water is spilling out the sides, touch a small piece of paper towel to the edge to “wick” (absorb) the excess. The coverslip should stick firmly to the slide via surface tension, not float loosely.
Section 5: Why the 45-Degree Coverslip Method Prevents Air Bubbles
Students often ask why they cannot simply drop the coverslip flat onto the sample. The answer lies in fluid physics.
If you drop a coverslip flat, you trap a pocket of air directly between the glass and the water, creating large bubbles that obstruct the view. By using the 45-degree angle technique, you utilize surface tension. When the edge of the coverslip touches the droplet, the water “latches” onto the glass. As you slowly lower the angle, this contact line moves forward across the slide, physically pushing the air out ahead of the water.
This “shearing” action ensures that the space between the microscope slides and coverslips is filled entirely with liquid, providing a continuous optical medium for the light.
Section 6: Common Wet Mount Mistakes and How to Fix Them
Section 7: Staining Microscope Slides
Many biological specimens, such as bacteria or epithelial cells, are transparent. Staining introduces contrast, allowing you to see internal structures like nuclei, cell walls, or starch granules.
Stains can be vital (non-toxic to living cells) or non-vital (kills the cells). Always handle stains with gloves, as many, like methylene blue, are difficult to remove from skin and clothing.
- Note: Toluidine blue is a “metachromatic” stain, meaning it changes color depending on what it binds to-a highly useful property for advanced slide preparation.
Section 8: Safety and Best Practices in Slide Preparation
Laboratory safety starts with glass handling.
- Glass Hazards: Microscope slides break easily. Never force a slide onto a microscope stage. If a slide breaks, do not use your hands; use a brush and dustpan. Dispose of shards in a dedicated “Sharps” container, not the general trash.
- Chemical Safety: Stains like crystal violet and iodine can be toxic or irritants. Wear safety goggles and gloves when pouring or dropping stains.
- Microscope Protection: Never allow liquid from a wet mount to touch the objective lens. This can dissolve the lens glue or damage the coating. If using oil immersion, ensure the slide is fully sealed or dry.
- Clean Up: Wash reusable slides with warm soapy water and dry with a lint-free cloth. Do not reuse coverslips-they are too fragile and difficult to clean effectively.
Section 9: Wet Mount vs Dry Mount vs Smear Mount
| Feature | Wet Mount | Dry Mount | Smear Mount |
|---|---|---|---|
| Liquid Medium | Water, saline, or stain | None (Air) | The sample itself (blood/culture) |
| Specimen State | Living or hydrated | Dead / Inanimate | Dead (usually fixed by heat/alcohol) |
| Lifespan | Temporary (mins to hours) | Permanent | Permanent (if fixed/stained) |
| Difficulty | Moderate (bubble risk) | Easy | Moderate (requires steady hand) |
| Best For | Pond water, plant cells, cheek cells | Hair, fibers, insect parts | Blood, bacteria |
Section 10: Who Uses Wet Mount Slides?
While this guide is essential for biology teachers and students, these techniques are used professionally every day.
- Medical Labs: Urinalysis involves a wet mount of sediment to check for kidney crystals or bacteria.
- Veterinary Clinics: Fecal floats (a type of wet mount) are used to detect parasite eggs in pets.
- Environmental Science: Researchers use wet mounts to assess water quality by counting plankton populations.
- Hobby Microscopists: Enthusiasts use these skills to explore the hidden world of moss, fungi, and protozoa in their own backyards.
Frequently Asked Questions (FAQ)
1. How long does a wet mount last?
A standard water-based wet mount lasts about 15 to 30 minutes before evaporation ruins the slide. You can extend this by sealing the edges of the coverslip with clear nail polish or petroleum jelly (valap).
2. Can a coverslip be reused?
Technically yes, but it is not recommended. Coverslips are extremely fragile and difficult to clean without leaving streaks or lint. In professional and educational settings, they are considered disposable.
3. Why can’t I see anything under the microscope?
This is usually due to contrast or focus. If the specimen is transparent and unstained, close the microscope’s iris diaphragm to increase contrast. Also, check that you are focused on the specimen plane, not the dust on top of the coverslip.
4. Can tap water be used instead of distilled water?
For casual observation, yes. However, for serious work, tap water is discouraged because dissolved minerals and chlorine can damage sensitive cells or leave crystalline artifacts on the glass as it dries.
5. Do all specimens require staining?
No. Many specimens, like pond water organisms or pigmented plant leaves (e.g., Elodea), have natural contrast. Staining is only required when the specimen is transparent or when you need to identify specific organelles like nuclei.
6. What are the five basic steps of a wet mount slide?
The five core steps are: 1) Clean the slide, 2) Prepare/slice the specimen, 3) Add a drop of water, 4) Place the specimen in the water, 5) Lower the coverslip at a 45-degree angle.
7. How thin should the specimen be?
The specimen should be translucent. Ideally, it should be a single layer of cells thick (approximately 10–50 micrometers). If it is opaque, light cannot pass through, and the image will appear as a black silhouette.
8. What is the most common beginner mistake?
Trapping air bubbles is the #1 error. This happens when the student drops the coverslip flat instead of using the 45-degree angle technique. These bubbles appear as black rings that obscure the sample.
Conclusion
Excellent microscopy begins at the bench, not the eyepiece. By mastering the 45-degree angle for wet mounts, understanding when to use a dry mount, and knowing which stain highlights your target, you elevate your work from simple observation to scientific inquiry. Do not rush the slide preparation process. Take pride in creating a clean, bubble-free mount. Your patience will be rewarded with a clear, crisp view of the microscopic world that no expensive equipment can replicate on its own.