A wet mount is the most fundamental preparation method in microscopy, serving as the primary technique for observing living specimens, aquatic organisms, and transient biological events like motility or cytoplasmic streaming. Unlike permanent mounts, which use chemical fixatives and hard resins, a wet mount preserves the specimen in a liquid medium-usually water or saline-sandwiched between a slide and a coverslip.
Mastering this technique is critical. A poorly prepared slide results in optical artifacts, crushed specimens, or rapid drying that ends the observation session prematurely. A correct preparation ensures a uniform refractive index, minimizing light scattering and allowing for sharp, high-contrast images. This guide details the standard operating procedure (SOP) used in professional teaching labs to produce gallery-quality views of living samples.
Quick Overview: The Goal
Before you begin, know what “success” looks like. A perfect wet mount should be:
- Planar: The coverslip lies flat and parallel to the slide, not tipped at an angle.
- Thin: The liquid layer is just deep enough to cover the specimen without floating the coverslip.
- Clear: There are no fingerprints, dust fibers, or interfering debris.
- Stable: The specimen does not drift across the field of view.
When NOT to use it: Do not use a standard wet mount for thick, opaque objects (like whole insects or sand grains) that prevent the coverslip from sitting flat. For those, use a depression slide or a stereomicroscope.
Materials & Setup
You do not need expensive gear, but you do need impeccable cleanliness. Oil from fingers is the enemy of clear optics.
Essential Equipment:
- Glass Microscope Slides: Standard 25 x 75 mm.
- Coverslips: Square (22 x 22 mm) are standard. Pro-tip: Use No. 1.5 thickness (0.17mm) for the best resolution with high-power objectives.
- Transfer Tool: Disposable pipette, eye dropper, or forceps.
- Mounting Medium: Distilled water (for general use) or Saline (0.9% NaCl) to prevent cell swelling/bursting.
- Wicking Material: Kimwipes, filter paper, or clean paper towel edge.
- Lint-free Cloth: For cleaning optical surfaces.
Workspace Prep:
- Clear a flat surface near your microscope.
- Hold slides and coverslips only by the edges.
- Check glass for factory “haze” or oil; wipe with lens paper and a drop of alcohol if necessary.
Step-by-Step SOP
Follow this procedure to minimize artifacts and maximize observation time.
- Clean the Slide: Even a “clean” slide from the box may have dust. Wipe it gently with a lint-free tissue. Place it flat on your workspace.
- Add the Medium: Using your pipette, place a single small drop (approx. 20–30 µL) of water or saline directly in the center of the slide. Technique Note: Better to under-fill slightly than over-fill.
- Place the Specimen:
- Liquid samples: If your specimen is already in the liquid (e.g., pond water), the drop is the specimen. Skip to step 4.
- Solid samples: Using forceps, place the specimen (e.g., onion skin, leaf peel) into the drop. Ensure it lies flat and is not folded.
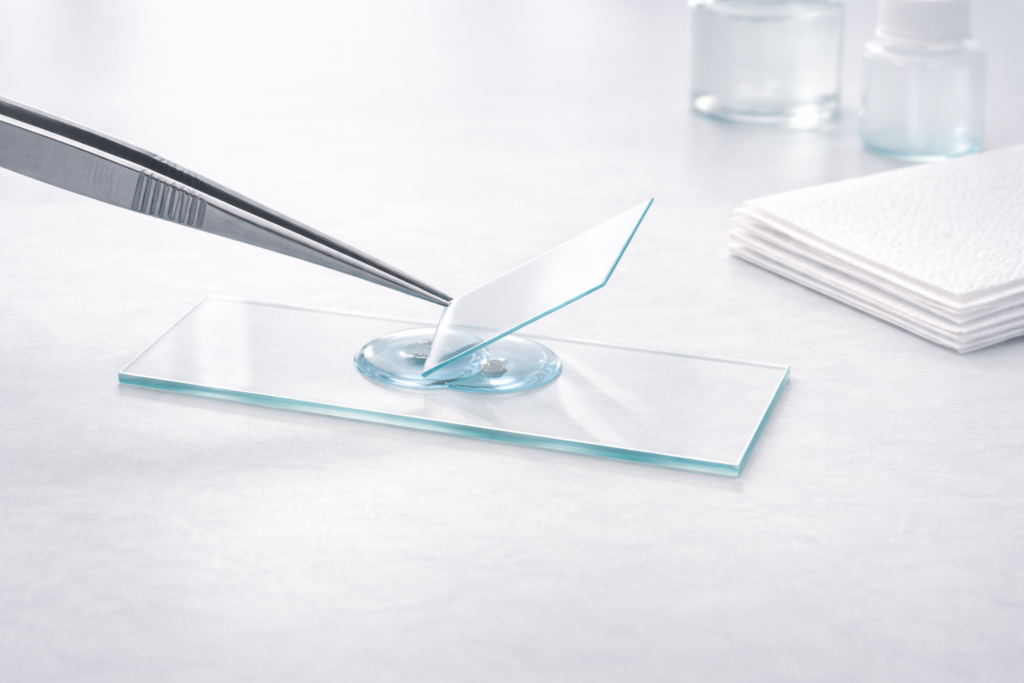
- Orient the Coverslip: Pick up a coverslip by its edges. Touch one edge of the coverslip to the slide surface, right next to the drop of liquid.
- The 45° Angle: Tilt the coverslip so it makes a roughly 45-degree angle with the slide. The liquid should “wick” along the edge of the glass where it touches the slide.
- Lower Gently: Slowly lower the upper edge of the coverslip. You can support it with a mounting needle, toothpick, or pipette tip to control the descent. This controlled lowering pushes air out ahead of the liquid front.
- Let It Settle: Once flat, wait 5–10 seconds. The liquid will spread to the edges.
- Wick Excess Fluid: If liquid is squeezing out from the sides, touch a piece of paper towel to the edge of the coverslip (do not slide it over the top). Draw out just enough liquid so the coverslip stops floating and grips the slide.
- Initial Focus: Place the slide on the stage. Always start focusing with the lowest power objective (4x or 10x) to locate the specimen plane before moving to high power.
Technique Notes
The difference between a beginner and an expert lies in these subtle controls.
The “Goldilocks” Drop
The volume of your medium dictates the success of the mount.
- Too Much: The coverslip floats high on a “cushion” of water. The specimen will drift out of view (micro-currents), and you cannot use high-power (40x/100x) objectives because the focal distance is too deep.
- Too Little: Large air gaps form under the glass. The sample dries out in roughly 2–3 minutes, shrinking cells and creating saline crystals that ruin the image.
- Just Right: The water fills the square area of the coverslip exactly, with no excess spilling onto the stage.
Specimen Thickness
Light must pass through the sample, not just bounce off it. If your specimen is thick (opaque to the naked eye), the microscope will only show a black silhouette. You must tease apart tissues with needles or slice them thinner (razor blade) until they are translucent.
Controlling Motility
Fast-moving protozoa (like Paramecium) often zoom out of the field of view. To slow them down without killing them, you can add a “viscosity agent” to your drop before adding the coverslip. Common safe options include a drop of methyl cellulose (Protoslo) or even a few fibers from a cotton ball, which create “cages” that trap the organisms.
Common Mistakes
Review this table to diagnose why a slide looks “wrong” before you blame the microscope.
| Mistake | What You See | Why It Happens | How to Fix |
|---|---|---|---|
| The “Floating” Slip | Specimen drifts; cannot focus sharply. | Too much liquid creates a deep water column. | Touch a paper towel to the edge to wick out excess water. |
| Fingerprints | Foggy, textured haze that focuses in/out. | Touching the face of the coverslip. | Clean glass before mounting. Hold by edges only. |
| Dark Field | Image is very dark or grainy. | Condenser iris is fully open (low contrast). | Close the iris diaphragm to increase contrast for transparent samples. |
| Drying Artifacts | Specimen shrivels; black lines grow from edges. | Water evaporation. | Add a tiny drop of water to the edge of the coverslip to re-hydrate. |
| Cracked Glass | “Crunch” sound; fractured view. | Lowering objective lens too far. | Never course-focus up while looking through the eyepiece. Watch from the side. |
Managing Air Bubbles
Air bubbles are the most persistent annoyance in wet mount preparation. They appear as black, donut-shaped rings with bright centers.
- Prevention: The only reliable defense is the “45-degree angle” technique (Step 5 above). Dropping a coverslip flat traps air every time.
- Removal: If air bubbles are trapped away from your specimen, you can ignore them. If they obscure the sample, try gently tapping the coverslip with a pencil eraser to move them. If that fails, it is often faster to make a new slide than to fight a stubborn bubble field.
Troubleshooting Guide
Use this symptom map to fix issues during observation.
Blurry Image at High Power
- Cause: You may have oil on the objective lens, or the slide is upside down (thick slide glass is between the sample and the lens).
- Fix: Ensure the thin coverslip is facing up. Clean the 40x/100x objectives with lens paper.
Drifting Specimen (“River Effect”)
- Cause: The coverslip is floating on too much liquid, creating convection currents.
- Fix: Wick excess fluid from the edge until the movement stops.
Low Contrast (Invisible Sample)
- Cause: Most living cells are transparent and have a refractive index similar to water.
- Fix: Do not turn up the light brightness. Instead, close the condenser diaphragm (aperture iris). This increases depth of field and contrast, making transparent edges “pop.”
Drying Too Fast
- Cause: Hot microscope lights evaporate the tiny water drop.
- Fix: For longer viewing sessions (15+ minutes), seal the edges of the coverslip with melted VALAP (Vaseline/Lanolin/Paraffin) or clear nail polish. This creates a semi-permanent wet mount.
Quality Checklist (QA)
Before submitting a slide for grading or starting a long observation, verify:
- Center: Specimen is in the middle of the glass.
- Fluid Level: Water reaches all four edges of the coverslip but does not flood over top.
- Clarity: No fingerprints on top or bottom surfaces.
- Flatness: Coverslip is not “tented” up by a thick chunk of debris.
- Safety: No liquid is in danger of touching the objective lenses.
FAQ / People Also Ask
How to prepare a wet mount slide step by step?
To prepare a wet mount, clean a glass slide and place a drop of water in the center. Place your specimen into the water drop. Hold a coverslip at a 45-degree angle against the slide surface and gently lower it over the sample to avoid trapping air. Blot any excess liquid from the edges.
What are common errors in wet mount preparation?
The most frequent errors are using too much liquid (causing the sample to swim), trapping air bubbles by dropping the coverslip flat, and using a specimen that is too thick/opaque for light to pass through. Another common issue is failing to close the condenser iris, resulting in low contrast.
Which step is incorrect when preparing a wet mount slide?
Dropping the coverslip straight down flat onto the liquid is incorrect. This traps a layer of air. You must always anchor one edge first and lower it like a hinge (the “trapdoor” method) to push air out.
What are the steps in preparing and observing a wet mount?
First, clean the slide and add your medium and specimen. Second, apply the coverslip carefully to minimize bubbles. Third, place the slide on the stage and start observing with the lowest power objective (Scanning or Low Power) to find the focal plane. Finally, adjust the light contrast and move to higher magnification.
Conclusion
A high-quality wet mount is the invisible foundation of good microscopy. By controlling the three variables of cleanliness, liquid volume, and coverslip angle, you eliminate the distractions of artifacts and air bubbles. This allows you to focus entirely on the biology of the specimen. Start with a thin sample, lower the glass slowly, and troubleshoot systematically to ensure clear, stable results every time.