Precision Liquid Measurement in Chemistry
When chemists and laboratory technicians reach for glassware to measure liquids, two instruments dominate the conversation: the burette and the pipette. At first glance, they appear similar-both are slender glass tubes with precise graduations and narrow delivery tips. Yet these instruments serve fundamentally different purposes in the laboratory, and choosing the wrong one can compromise experimental accuracy.
Every year, thousands of chemistry students, pharmaceutical quality control technicians, and clinical laboratory professionals encounter the same question: When should I use a burette versus a pipette? This distinction isn’t merely academic-it determines whether your titration succeeds or fails, whether your analytical results meet regulatory standards, and whether your liquid measurements fall within acceptable tolerance ranges.
This comprehensive guide resolves that confusion once and for all. By the end, you’ll understand not only the structural differences between burettes and pipettes but also why those differences matter, when to apply each instrument, and how to achieve professional-grade accuracy in your liquid handling work.

ISO 385:2005 certified (Burette standards)
ISO 2626 certified (Volumetric pipette standards)
Good Laboratory Practice (GLP) compliance expert
Published research: “Minimizing Technique-Dependent Error in Manual Burette Operations”
500+ lab professionals trained
1,000+ precise measurements executed
50+ laboratory facilities consulted
Burette vs. Pipette: At a Glance
| Aspect | Burette | Volumetric Pipette | Graduated Pipette |
|---|---|---|---|
| Primary Function | Variable-volume dispensing | Fixed-volume transfer | Flexible volume transfer |
| Graduation Type | Fine increments (0.1 mL) | Single calibration mark | Multiple marks |
| Accuracy (Class A) | ±0.03–0.05 mL | ±0.01–0.03 mL | ±0.05–0.10 mL |
| Ideal Application | Titrations (acid–base, redox) | Standard solutions, aliquoting | Teaching labs, approximate transfers |
| Typical Volume Range | 25–100 mL | 1–100 mL (fixed sizes) | 1–25 mL (variable) |
| Measurement Type | Subtractive (initial – final) | Single volume fixed | Multiple marks |
| Control Mechanism | Glass stopcock or plastic valve | Pipette filler (bulb or electronic) | Pipette filler |
| Learning Curve | Moderate to steep | Gentle | Gentle |
| Cost (Class A) | Moderate | Higher | Low to moderate |
Section 1: Core Structural Differences
Understanding the Burette: Design, Mechanics, and Construction
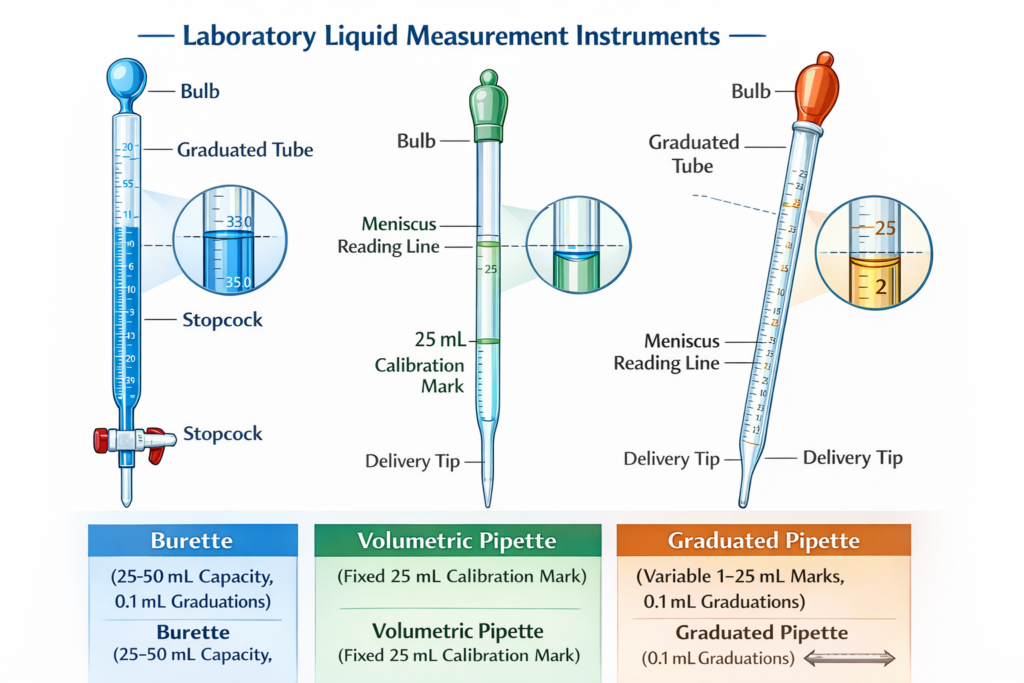
A burette is a precisely calibrated glass tube, typically 25–100 mL in capacity, closed at the top and tapered toward a narrow delivery tip at the bottom. What distinguishes a burette from other glass cylinders is its stopcock-a valve mechanism (usually glass or polytetrafluoroethylene/PTFE) that allows the operator to control liquid flow in small, measured increments.
Key Design Features:
- Graduated markings from 0 mL to full capacity, typically in 0.1 mL increments
- Straight bore (interior diameter ~7 mm) for easy reading and consistent flow
- Glass stopcock or plastic valve for precise, manual flow control
- White graduation markings for visibility against colored liquids
- Borosilicate 3.3 glass (high thermal and chemical resistance, strain point 515°C)
- Calibration basis: “To Deliver” (TD/Ex), meaning the graduated markings represent volume delivered from the tip, not volume contained in the tube
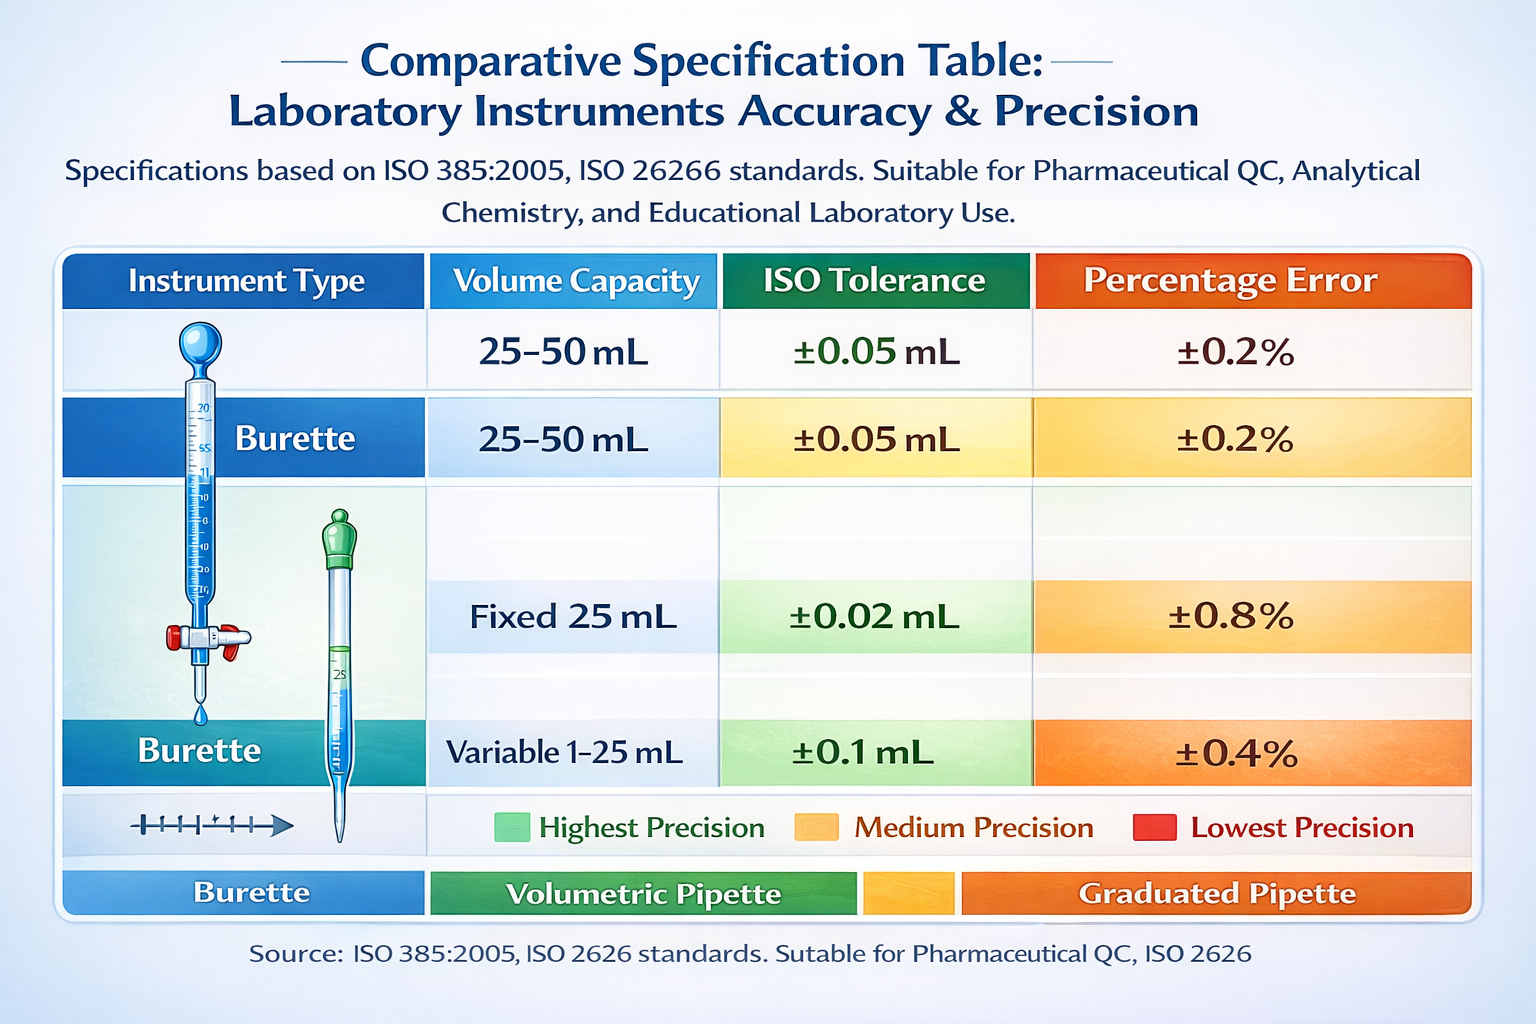
For a Class A 50 mL burette per ISO 385:2005, the tolerance is ±0.05 mL. This means that when you dispense 25 mL, the actual volume delivered should fall between 24.95 mL and 25.05 mL-a precision of ±0.2% at half-capacity.
The burette’s stopcock is critical to its functionality. A glass stopcock requires lubrication (with water, oil, or PTFE-based lubricant) to prevent sticking, but it offers superior precision. PTFE (Teflon) stopcocks are self-lubricating and chemically inert, making them ideal for aggressive solvents, though they require no maintenance and are easier for beginners to operate.
Pipette Types: Volumetric vs. Graduated
Unlike burettes, pipettes come in two main varieties, each with distinct design and application profiles.
Volumetric Pipettes represent the highest precision class of single-volume transfer. They feature:
- A large, rounded bulb (body of the pipette) for holding liquid
- A narrow, calibrated neck with a single graduation mark indicating the precise fill volume
- A tapered delivery tip (usually 0.1–0.2 mm opening)
- High-precision glass construction per ISO 2626 and DIN standards
- Calibration for “To Deliver” (TD) with a tolerance between ±0.008 mL (for a 1 mL pipette, Class AS) and ±0.08 mL (for a 100 mL pipette, Class AS)
For example, a Class A 25 mL volumetric pipette has a tolerance of ±0.03 mL-meaning when you fill to the mark and dispense, you transfer between 24.97 and 25.03 mL. This represents a ±0.12% error margin, superior to most burettes.
Graduated Pipettes offer flexibility at the cost of reduced accuracy. These pipettes feature:
- Multiple graduation marks along the tube (e.g., 1, 2, 3, 5, 10 mL marks on a 10 mL graduated pipette)
- Two primary subtypes:
- Mohr pipettes (drain-out): First graduation mark sits above the tip; operator empties by gravity until the last drop naturally exits
- Serological pipettes (blow-out): Graduations extend to the tip; includes a blow-out line; operator uses a rubber bulb to expel all liquid including what remains in the tip
- Typical tolerances: ±0.05 mL (10 mL) to ±0.10 mL (25 mL)
- Durable plastic versions available (less precision than glass, but acceptable for non-critical work)
Section 2: Accuracy & Precision-Why Standards Matter
ISO/Class A Specifications: The Foundation of Laboratory Accuracy
Laboratory glassware doesn’t come with arbitrary precision tolerances-these specifications follow international standards established by ISO (International Organization for Standardization) and DIN (Deutsches Institut für Normung). For burettes, the standard is ISO 385:2005. For volumetric pipettes, it’s ISO 2626 / DIN EN ISO 648. For graduated pipettes, ISO 1202 applies.
Class A glassware represents the highest accuracy tier. Every Class A burette and pipette undergoes rigorous calibration at reference temperature (20°C) using gravimetric methods-weighing the exact amount of distilled water delivered and calculating actual volume from mass.
Class A Tolerance Table: Burettes (ISO 385:2005)
| Volume (mL) | Tolerance (±mL) | Precision (%) |
|---|---|---|
| 10 mL | 0.05 | 0.5% |
| 25 mL | 0.05 | 0.2% |
| 50 mL | 0.05 | 0.1% |
| 100 mL | 0.10 | 0.1% |
Class A Tolerance Table: Volumetric Pipettes (ISO 2626)
| Volume (mL) | Tolerance (±mL) | Precision (%) |
|---|---|---|
| 1 mL | 0.01–0.008 | 1.0–0.8% |
| 5 mL | 0.015 | 0.3% |
| 10 mL | 0.02–0.04 | 0.2–0.4% |
| 25 mL | 0.03–0.06 | 0.12–0.24% |
| 50 mL | 0.05 | 0.1% |
| 100 mL | 0.08–0.15 | 0.08–0.15% |
Class A Tolerance Table: Graduated Pipettes (ISO 1202)
| Volume (mL) | Tolerance (±mL) | Precision (%) |
|---|---|---|
| 5 mL | 0.05 | 1.0% |
| 10 mL | 0.05 | 0.5% |
| 25 mL | 0.10 | 0.4% |
Why Volumetric Pipettes Excel in Single-Volume Transfer
The fundamental reason volumetric pipettes achieve superior accuracy for fixed-volume work is mathematical: they require only one meniscus reading. When you fill a 25 mL volumetric pipette to the mark and dispense, you perform a single measurement. Any error in that measurement is limited to the calibration tolerance (±0.03 mL).
By contrast, a burette requires two readings:
- Initial burette reading (e.g., 0.50 mL)
- Final burette reading (e.g., 25.30 mL)
- Delivered volume: 25.30 − 0.50 = 24.80 mL
If each reading contains a ±0.05 mL error (the tolerance of a Class A 25 mL burette), those errors can compound. In the worst-case scenario, one reading is +0.05 mL and the other is −0.05 mL, resulting in a ±0.10 mL total error on a single burette delivery-double the single-pipette tolerance.
Laboratory Accuracy Studies:
Real-world testing in clinical and research laboratories reveals this advantage. Studies of manual pipetting techniques show:
- Volumetric pipettes (fixed volume): Average delivery error ~0.78%, with range 0.5–1.2% when technique is optimized
- Graduated pipettes: Average delivery error ~0.8–1.0%, with range 0.6–1.4%
- Burettes (variable volume): Average delivery error ~1.01–1.5%, with range 0.8–2.0% depending on dispense size and operator skill
These differences may seem minor, but in pharmaceutical quality control, clinical diagnostics, or analytical chemistry, a 0.2–0.3% difference can determine whether a batch passes specification or fails.
When Burette Accuracy Is Sufficient-And When It’s Superior
Despite the numerical advantage for volumetric pipettes, burettes are the preferred instrument for titration work-not because of their raw accuracy, but because of their functionality. A ±0.05 mL burette delivers adequate precision for nearly all acid–base titrations, redox titrations, and precipitation titrations used in industry and academia.
The reason: titration methodology compensates for burette limitations. When you perform a titration, you typically run three consecutive titrations and average the results (discarding outliers). If your first three titrations use 22.35 mL, 22.40 mL, and 22.38 mL, the average (22.38 mL) is highly precise despite the ±0.05 mL tolerance of each individual measurement.
Moreover, the titration equivalence point (the moment when analyte and titrant have reacted completely) is detected via indicator color change or pH sensor inflection point-both of which are relatively sharp (occurring over a pH range of ~1–2 units). This means small reading errors near the endpoint don’t significantly impact the calculated result.
For comparison, if you’re preparing a standard solution to be used across a dozen different experiments, you must use a volumetric pipette. Any error in that initial transfer will propagate through all subsequent work. Burettes, by contrast, don’t serve as “source” measurements-they deliver solutions whose concentration is already known.
Section 3: Measurement Methods-How Each Instrument Delivers Volume
The Burette: Subtractive Volume Measurement
Operating a burette relies on the subtractive principle. You begin by filling the burette above the 0.00 mL mark (often filling to 0–1 mL, depending on your target volume range). You then carefully adjust the meniscus-the curved surface of the liquid-to align with the 0.00 mL graduation mark. Record this as your initial reading.
As you open the stopcock and dispense liquid, the meniscus descends. When you close the stopcock (having completed your titration or reached your target volume), you record the final reading.
Example:
- Initial reading: 0.50 mL
- Final reading: 25.80 mL
- Delivered volume: 25.80 − 0.50 = 25.30 mL
This method offers maximum flexibility. Within the limits of a 50 mL burette, you can deliver 25 mL, 48 mL, 3 mL, or any volume. You can perform multiple deliveries from one burette fill (e.g., add 5 mL in the first minute, observe results, add another 3 mL, observe again).
However, flexibility comes with a trade-off: each delivery requires careful subtraction. A novice might record 25.8 mL as the final reading when it was actually 25.3 mL, or misread the meniscus by one graduation (0.1 mL error). Additionally, if the initial reading itself contains an error, that error affects all subsequent calculations in that burette fill.
Best Practices for Burette Measurement:
- Fill burette to a starting point between 0.00–2.00 mL (not always zero, as long as you record the actual initial reading)
- Ensure no air bubbles exist below the stopcock valve; run solution through tip into a waste beaker first
- Read meniscus at eye level (not from above or below, which introduces parallax error)
- Always read the bottom of the meniscus for aqueous solutions (top for mercury, which has opposite curvature)
- Verify reading twice before proceeding
- Refill burette between experimental runs; don’t allow it to run dry
The Volumetric Pipette: Fixed Single-Volume Transfer
A volumetric pipette operates on a fundamentally different principle: fixed, single-volume dispensing. The entire pipette is manufactured to deliver one precise volume, marked by a single etched graduation line.
To use a 25 mL volumetric pipette:
- Draw liquid: Using a mechanical pipette filler (rubber bulb or electronic aid-never by mouth), aspirate liquid from the solution to be transferred
- Fill to mark: Carefully fill until the meniscus (bottom of the curve) aligns with the graduation mark. The mark is printed at the narrow neck for ease of alignment.
- Dispense: Release the liquid into the receiving vessel (e.g., volumetric flask, conical flask, beaker)
- Wait: For maximum accuracy, wait 15–20 seconds for the last drop to exit the tip
- Record: You’ve transferred exactly 25.00 mL (±0.03 mL for Class A)
The elegance of this method is simplicity: one reading, one transfer, one result. Errors from subtraction are impossible. Operator variability (the tendency for different technicians to achieve slightly different results) is minimized because there’s no calculation step-just observation and transfer.
Best Practices for Volumetric Pipette Use:
- Always rinse pipette with distilled water first, then with 3–4 small portions of the solution to be transferred (don’t fill completely; just wet the interior walls). This ensures residual water doesn’t dilute your transfer.
- Fill to the mark with a dropper or plastic pipette for the final adjustment, not with a large pour
- Ensure you approach the mark from below (add more) rather than overshooting and trying to remove liquid
- Allow the 15–20 second drainage time at the receiver vessel before removing the pipette
- Class AS pipettes (ultra-precise variants) require 30 seconds of drainage
- Never blow out the tip unless the pipette is explicitly marked “blow-out” (blow-out designs have two rings marked on the stem)
Graduated Pipettes: Flexible, Less Precise
Graduated pipettes split the difference: they offer the flexibility of burettes (variable volume) with simpler operation (no stopcock to manage). However, they sacrifice accuracy.
To use a 10 mL graduated pipette to transfer 7 mL:
- Draw liquid to the 7 mL graduation mark
- Dispense into receiving vessel
- Record the transfer (±0.05 mL tolerance means actual delivery is 6.95–7.05 mL)
Graduated pipettes work well for applications where precision matters less: preparing culture media, transferring samples for microbiological work, or student laboratory experiments. For quantitative analysis requiring high precision, they’re acceptable only for initial dilutions or preliminary work-not for final titrations or standard solution preparation.
The two subtypes (Mohr vs. Serological) matter:
- Mohr: Empty the pipette by gravity alone. The tip is sealed; you don’t blow air through it. If you use the pipette for liquids with different viscosities (water vs. syrup), the drainage rate differs, and accuracy suffers.
- Serological: Designed to deliver the complete volume by blowing the last bit out with a rubber bulb. Standardized for this usage; more forgiving across varied liquids.
Section 4: Applications & Real-World Use Cases
Burettes: The Workhorse of Titration Chemistry
Acid–Base Titration (Most Common Application)
In pharmaceutical quality control, food testing, and analytical chemistry, acid–base titrations represent the most frequent use of burettes. The procedure is straightforward in principle but demands precision in execution.
Consider a pharmaceutical plant testing the acetic acid content in a commercial vinegar product. The workflow is:
- Weigh 1.3 g of vinegar sample (carefully calculated to ensure titrant consumption falls in the optimal range of 20–90% of burette capacity)
- Dilute with 50 mL distilled water
- Add 2–3 drops of phenolphthalein indicator (colorless in acidic solution, pink in basic)
- Fill a burette with standardized 0.1 M NaOH solution (titer = 0.9877, meaning actual concentration is 0.09877 M)
- Record initial burette reading (e.g., 0.50 mL)
- Open stopcock and add NaOH dropwise, swirling continuously
- As pink color develops and fades with each addition (temporary indicator change due to local excess base), continue adding NaOH
- When the pink color persists (equivalence point reached), record final reading (e.g., 22.38 mL)
- Calculate: Titre = 22.38 − 0.50 = 21.88 mL NaOH consumed
- Repeat 2–3 times; average consistent results
- Calculate acetic acid concentration using stoichiometry and mass
This application leverages the burette’s strengths: variable volume dispensing (you control the rate and amount), multiple sequential additions (you can titrate past the rough endpoint, then add dropwise for precision), and integration with visual endpoint detection.
Redox Titrations (Permanganate Methods)
Permanganate titrations (using KMnO₄, a purple solution) and iodine-based titrations exploit burettes’ ability to deliver precise volumes. A classic example is titrating iron(II) content in water samples:
- MnO₄⁻ (in burette, purple) + Fe²⁺ (in flask) → Mn²⁺ (colorless) + Fe³⁺
- Endpoint: Solution changes from colorless to light pink (excess MnO₄⁻)
- Burette precision is adequate because the color change is sharp, and you run multiple trials
Precipitation Titrations (Silver Nitrate Methods)
Food laboratories analyzing salt (chloride) content use silver nitrate titrations:
- Cl⁻ (in flask) + Ag⁺ (in burette) → AgCl (white precipitate)
- Endpoint: Ag⁺ reacts with indicator (typically K₂CrO₄), forming red-orange Ag₂CrO₄
- Burette enables dropwise addition to catch the subtle color change precisely
Why Burettes Dominate Titration Work:
Titrations inherently require variable dispensing. You can’t predict in advance how much titrant you’ll need (though you can estimate). Starting fast, then slowing as you approach equivalence point, is standard practice. A volumetric pipette-designed to deliver one fixed volume-is useless for this application.
Volumetric Pipettes: Precision Liquid Handling for Analytical Work
Preparing Standard Solutions (Stock Dilutions)
In a pharmaceutical laboratory validating an HPLC (high-performance liquid chromatography) method, you might need to prepare a series of calibration standards:
- Stock standard: 1000 µg/mL (purchased, certified)
- Working standards required: 100, 50, 25, 10, 5 µg/mL
- Method: Serial dilution using volumetric flasks and volumetric pipettes
Using a 25 mL volumetric pipette (±0.03 mL Class A tolerance), you:
- Pipette 25.00 mL of the 1000 µg/mL stock into a 250 mL volumetric flask
- Dilute to mark with solvent
- This gives you 100 µg/mL (100 = 1000 × 25/250)
The precision of that initial 25 mL transfer directly impacts all subsequent analysis. A 0.5 mL error in the pipette would cause a ~2% error in your final result. Hence, volumetric pipettes (tolerating only ±0.03 mL, or ±0.12%) are essential-not burettes.
Aliquoting Samples for Parallel Testing
Clinical laboratories receive blood samples and must divide them into multiple aliquots for different tests: one aliquot for glucose, another for electrolytes, another for liver function enzymes. Using a 5 mL volumetric pipette ensures each aliquot contains exactly 5.00 mL, so inter-assay variability is due to analytical differences, not volume differences.
Quality Control Verification
When a laboratory receives a new shipment of reagent or instrument, technicians verify performance using reference materials of known concentration, delivered with volumetric pipettes to ensure exact known amounts.
Graduated Pipettes: Teaching Labs and Routine Work
Graduated pipettes are economical and forgiving-ideal for teaching chemistry to students who are still developing fine motor control. Many undergraduate experiments (crystal growth, pH measurement of solutions, settling time observations) require only rough volume accuracy.
Microbiological work also favors graduated plastic pipettes: they’re sterile (single-use), break-resistant, and adequate for transferring culture suspensions where ±0.5% accuracy isn’t critical.
Section 5: Comparison Matrix-Functional Differences Detailed
| Feature | Burette | Volumetric Pipette | Graduated Pipette |
|---|---|---|---|
| Measurement Mode | Subtractive (two readings) | Fixed single volume (one reading) | Graduated marks (one reading) |
| Titration Suitability | Excellent-designed for variable dispensing | Poor-fixed volume limits flexibility | Poor-tolerance too loose |
| Standard Solution Prep | Fair-acceptable but less precise | Excellent-high precision, single transfer | Fair-adequate for initial dilutions |
| Sample Aliquoting | Fair-can deliver multiple fixed volumes but less convenient | Excellent-consistent per-aliquot delivery | Good-adequate for routine work |
| Repetition Efficiency | Good-multiple deliveries per fill | Moderate-one transfer per pipette fill | Good-one transfer per pipette fill |
| Initial Cost | Low to Moderate | Moderate to High | Low |
| Maintenance | Moderate (glass stopcock needs lubricant) | Low (simple design) | Very Low |
| Typical Error (Class A) | ±0.03–0.05 mL per delivery | ±0.01–0.03 mL per transfer | ±0.05–0.10 mL per transfer |
| Precision for 10 mL Delivery | ~0.5% (±0.05 mL) | ~0.2% (±0.02 mL) | ~0.5% (±0.05 mL) |
| Flexibility | Very High (any volume within capacity) | None (fixed volume only) | High (multiple graduation marks) |
| Ease of Learning | Moderate (stopcock technique required) | Very Easy (fill to mark, dispense) | Very Easy |
| Sensitivity to Temperature Change | Moderate (borosilicate glass, but larger volume = more expansion) | Low (single mark, small tolerance already accounts for this) | Low |
| Chemical Compatibility | Excellent (borosilicate glass) | Excellent (borosilicate glass) | Good to Excellent (glass or plastic) |
Section 6: Selection Framework-Choosing the Right Tool
The decision between burette, volumetric pipette, and graduated pipette hinges on five key questions:
Question 1: Is a Fixed or Variable Volume Required?
Fixed Volume → Volumetric Pipette
- You need exactly 10 mL every time (e.g., preparing standards, aliquoting clinical samples)
- Highest precision is essential
- Example: Pharmaceutical QC transferring 25 mL of standard to a 250 mL flask
Variable Volume → Burette or Graduated Pipette
- You don’t know in advance how much you’ll dispense (titration)
- Flexibility within a range matters (e.g., 0–25 mL from one instrument)
- Example: Titrating acid with base, adding dropwise until endpoint
Question 2: What Accuracy Is Required?
<0.15% Error Required → Volumetric Pipette (Class A)
- Regulatory compliance (FDA, EU pharma standards)
- Method validation or calibration work
- Example: Preparing HPLC calibration standards
0.1–0.5% Error Acceptable → Burette (Class A) or Volumetric Pipette (Class B)
- Most titration work, routine analysis
- Example: Acid–base titration for unknown analyte concentration
>0.5% Error Acceptable → Graduated Pipette (Class B) or Graduated Cylinder
- Teaching labs, preliminary screening
- Example: Preparing dilute culture media for microbiology
Question 3: What Is the Application Type?
Titration → Burette (No Substitutes)
- Titrations require variable dispensing
- Indicator endpoint detection or pH sensor reading
- Designed for dropwise addition near equivalence point
Standard Solution Preparation → Volumetric Pipette (Ideal) or Graduated Pipette (Acceptable for Non-Critical Dilutions)
- Single, accurate transfer to volumetric flask
- Higher precision = better downstream data quality
Routine Sample Transfers → Graduated Pipette or Volumetric Pipette (Depending on Precision Needs)
- Microbiological: graduated pipette (adequate, economical)
- Clinical: volumetric pipette (reproducibility important)
Approximate Volumes, Teaching → Graduated Pipette (Best Choice)
- Cost-effective, durable plastic versions available
- Forgiving learning curve for students
Question 4: What Volume Range Is Required?
1–10 mL:
- Volumetric pipettes available (very precise)
- Graduated pipettes available (standard)
- Burettes feasible (small, 10 mL sizes exist but uncommon)
10–50 mL:
- Volumetric pipettes available (standard)
- Graduated pipettes available (standard)
- Burettes ideal (25, 50 mL standard sizes)
>50 mL:
- Volumetric pipettes available (50, 100 mL common)
- Graduated cylinders or burettes preferred for large volumes
- Burettes available (100 mL, for high-capacity titrations)
Multiple Different Volumes from One Instrument:
- Graduated pipette (can deliver 1 mL, 3 mL, 5 mL from one instrument)
- Burette (can deliver any volume within capacity)
- Volumetric pipettes: one size per pipette (require multiple pipettes for different volumes)
Question 5: What Is Your Budget and Workload?
High-Throughput / Cost-Conscious → Graduated Pipettes (Plastic, Single-Use)
- Sterile, disposable graduated pipettes: ~$0.10–0.30 each
- Ideal for microbiological work (1000s of transfers daily)
Standard Analytical Lab → Class A Burettes + Mix of Volumetric/Graduated Pipettes
- 50 mL burette (glass): $100–200
- 25 mL volumetric pipette (glass, Class A): $50–100
- Graduated pipette (glass): $20–40
Regulatory / GLP Environment → All Class A Instruments
- Every instrument certified, calibration traceable, documentation complete
- Higher cost, but non-negotiable for pharmaceutical QC
Section 7: Step-by-Step Titration Setup-A Complete Walkthrough
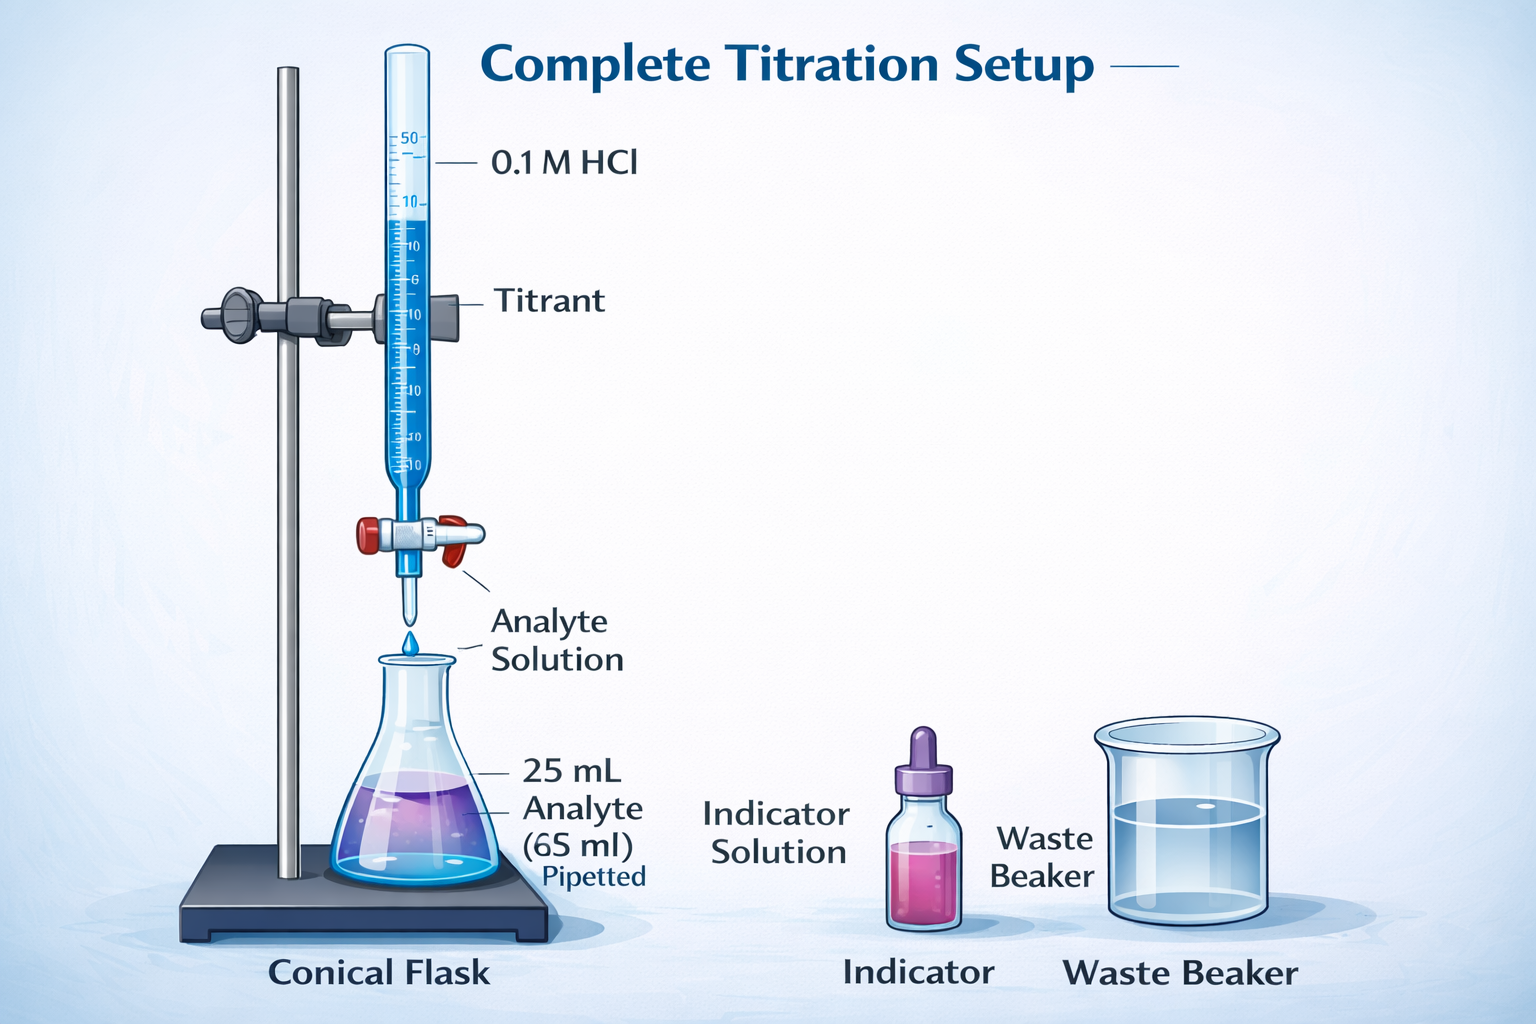
Titration is where burettes and volumetric pipettes work in tandem. Here’s the complete procedure for an acid–base titration (e.g., determining unknown HNO₃ concentration using standard Na₂CO₃):
Phase 1: Prepare the Standard Solution (Analyte)
Step 1: Weigh the Primary Standard
Weigh 2.900 g of anhydrous sodium carbonate (Na₂CO₃, M = 106 g/mol) on an analytical balance into a clean, dry beaker. Sodium carbonate is a primary standard (high purity, stable, non-hygroscopic) suitable for calibrating titrant concentration.
Step 2: Dissolve in Minimal Water
Add ~50 mL distilled water to the beaker. Stir with a glass rod to dissolve the solid. If you add too much water now, you may overshoot your volumetric flask’s graduation mark later.
Step 3: Transfer to Volumetric Flask
Using a glass funnel, carefully transfer the sodium carbonate solution from the beaker to a clean 250 mL volumetric flask. Use a wash bottle (containing distilled water) to rinse any remaining solid from the beaker, stirring rod, and funnel into the flask. Recovery of all solute is critical.
Step 4: Fill to the Mark
Add distilled water until the solution level is ~1 cm below the graduation mark. Then, using a dropper, add water dropwise until the bottom of the meniscus aligns with the mark. Your eye must be at the same height as the mark-looking down or up introduces parallax error (reading error due to angle).
Step 5: Mix Thoroughly
Cap the flask and invert 5–10 times to ensure complete homogenization. If you skip this step, early aliquots may have different concentrations than later aliquots.
Calculated Concentration:
- Moles of Na₂CO₃: 2.900 g ÷ 106 g/mol = 0.02736 mol
- Concentration: 0.02736 mol ÷ 0.250 L = 0.1094 M
Phase 2: Prepare Equipment (Burette and Pipette)
Step 6: Rinse Volumetric Pipette
Rinse a 25 mL volumetric pipette with distilled water 3–5 times. Then, using a pipette filler (rubber bulb or electronic aid), rinse the pipette with small portions (5–10 mL) of the standard solution you just prepared. Discard each rinse. This ensures residual water doesn’t dilute your aliquot.
Step 7: Prepare the Burette
Rinse a 50 mL burette with distilled water, ensuring no dust or particles clog the tip. Open the stopcock and allow water to run through, including the tip. Then rinse the burette with 3–4 small portions (10–15 mL each) of the titrant solution (e.g., HNO₃ of unknown concentration). Discard each rinse.
Step 8: Fill Burette and Remove Bubbles
Fill the burette from a beaker using a funnel, pouring until the liquid level is at 0.00 mL (or any starting point between 0–2 mL). Open the stopcock and allow solution to flow into a waste beaker until you see a continuous stream with no air bubbles in the tip or below the stopcock. Close the stopcock. Record the initial reading (e.g., 0.50 mL).
Phase 3: Conduct the Titration
Step 9: Pipette the Analyte (Sodium Carbonate)
Using a pipette filler, draw the rinsed standard solution into the 25 mL volumetric pipette until the meniscus aligns with the mark. Carefully dispense all 25.00 mL into a clean conical flask. Rinse the pipette with distilled water and add the rinse to the flask (the water doesn’t affect moles, only dilutes slightly).
Step 10: Add Indicator
Add 2–3 drops of methyl orange indicator (yellow in acidic solution, orange-red at pH 3.1–4.4 endpoint). The solution will be yellow-orange at this point because Na₂CO₃ is a weak base.
Step 11: Position Burette and Begin Titration
Lower the burette (attached to a stand via clamp) so the tip is just inside the conical flask opening. This prevents splashing. Open the stopcock to add HNO₃ at a moderate rate (~1 mL per second), while swirling the flask continuously with your other hand.
Step 12: Monitor for Color Change
As you add HNO₃, the solution color will shift. Initially, any added acid will immediately neutralize and the color will revert to yellow. As you approach the equivalence point, the color change becomes more persistent (takes longer to fade when you swirl). Reduce your addition rate to ~0.5 mL per few seconds.
Step 13: Reach Endpoint
When the solution transitions from yellow to orange-red and does not fade with swirling, you’ve reached the endpoint. Stop adding HNO₃. Record the burette reading (e.g., 22.38 mL).
Step 14: Calculate Titre (Volume Consumed)
Titre = Final reading − Initial reading = 22.38 − 0.50 = 21.88 mL
Phase 4: Repeat for Consistency
Step 15: Rinse Flask and Repeat
Empty the titrated solution into waste. Rinse the conical flask 3 times with distilled water (tap water is fine for rinsing). Leave the flask wet (the additional water doesn’t affect moles, which is what chemistry depends on).
Step 16: Repeat Titration 2–3 More Times
Pipette fresh 25 mL aliquots of standard, add indicator, and titrate. Record each titre. Typical results from practice: 22.38, 22.40, 22.42 mL (these differ by only ±0.02 mL, well within ±0.05 mL burette tolerance).
Step 17: Calculate Average Titre
Average = (22.38 + 22.40 + 22.42) ÷ 3 = 22.40 mL
Phase 5: Calculate Unknown Concentration
Step 18: Apply Titration Formula
The balanced equation is: Na₂CO₃ + 2 HNO₃ → 2 NaNO₃ + CO₂ + H₂O (mole ratio 1:2)
- Moles of Na₂CO₃ in your 25 mL aliquot: 0.1094 M × 0.025 L = 0.002735 mol
- Moles of HNO₃ consumed (from 1:2 ratio): 0.002735 × 2 = 0.005470 mol
- Concentration of HNO₃: 0.005470 mol ÷ 0.02240 L = 0.244 M (or 0.24 M)
Section 8: Common Mistakes & Solutions
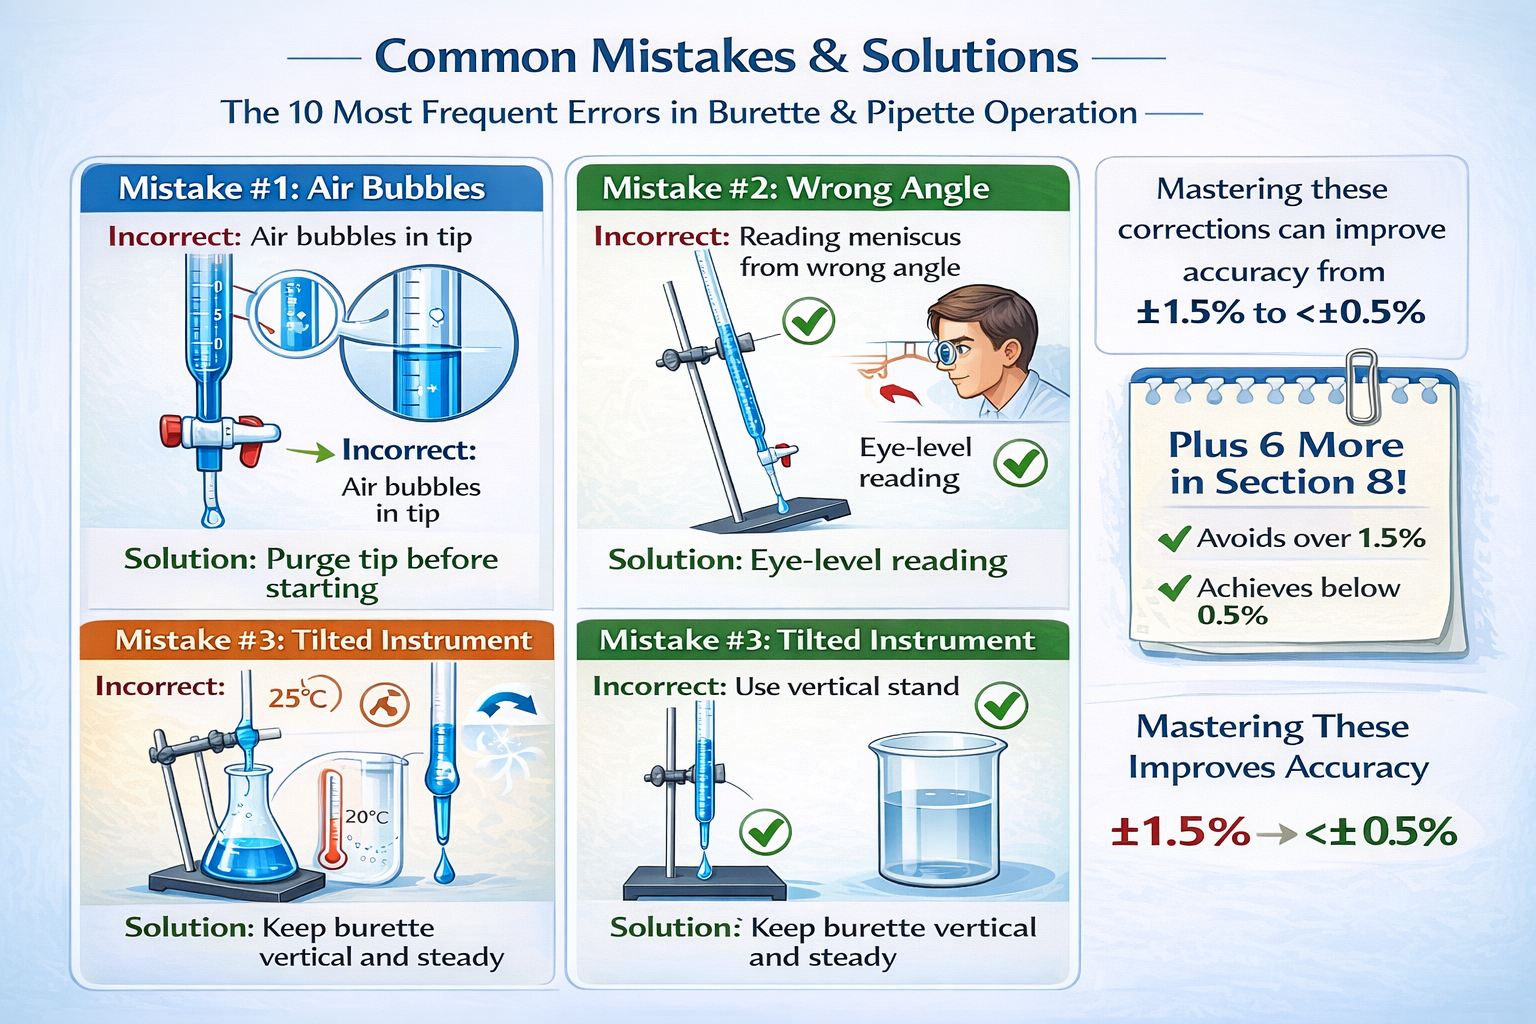
Laboratory work is unforgiving: small errors accumulate. Here are the ten most frequent mistakes and how to prevent them.
Mistake 1: Air Bubbles in Burette or Pipette Tip
The Problem: An air pocket in the burette tip or below the stopcock prevents accurate volume delivery. A 5 mm air bubble represents ~0.05 mL lost volume-the entire tolerance of a Class A 25 mL burette.
Why It Happens: Rapid filling, failure to purge the tip before starting, or stopcock closure that traps air.
Prevention:
- After filling the burette, always open the stopcock and allow solution to flow into a waste beaker until you see a continuous liquid stream from the tip
- For pipettes, after drawing liquid, gently tap the side of the pipette to dislodge any bubbles trapped near the delivery tip
- Pre-wet the pipette tip (draw solution, expel, repeat 2–3 times) before final filling
- Never close the stopcock mid-expulsion, then reopen-this traps air
Mistake 2: Temperature Effects on Volume
The Problem: Borosilicate glass expands and contracts with temperature. A 25 mL volumetric pipette calibrated at 20°C will hold slightly more volume at 25°C and slightly less at 15°C. The coefficient of linear expansion for glass is ~32.5 × 10⁻⁷ /°C, which translates to ~0.1% volume change per 10°C.
Why It Matters: A temperature shift from 20°C to 25°C could introduce a 0.025 mL error in a 25 mL pipette-half the tolerance.
Prevention:
- Allow burettes, pipettes, and liquid to equilibrate to room temperature (20–25°C) before use
- Work away from heat sources (sunlight, Bunsen burners, hot plates)
- If your lab temperature fluctuates significantly (e.g., old building, no AC), aim to work at consistent times
- Class A glassware tolerances already account for minor temperature variation (20°C ± 2°C), so standard lab conditions usually suffice
Mistake 3: Incorrect Meniscus Reading
The Problem: The meniscus is the curved liquid surface visible at the top of a column. For most aqueous solutions, this curve is concave (dips downward in the center). You must read at the bottom of the curve, not the edges. Reading from the side, above, or below introduces parallax error-easily ±0.05 mL.
Why It Happens: Rushing, poor lighting, or uncertainty about which part of the meniscus to read.
Prevention:
- Position your eye exactly at the level of the graduation mark or target meniscus level
- Look straight ahead, not down or up
- Use adequate lighting; consider a magnifying glass or a contrasting background card behind the glassware
- For colorless solutions (water, clear acids), hold a dark background card behind the glassware to make the meniscus more visible
- For colored solutions (purple permanganate), ensure lighting comes from the side to avoid glare
- Always read from the bottom of the meniscus, never the edges (for standard aqueous solutions)
- Practice with distilled water before starting your actual experiment
Mistake 4: Tilting the Burette or Pipette
The Problem: If the burette is held at an angle (not vertical), the liquid path through the tip is longer, and the apparent volume reads differently than actual delivery. A 20° angle can introduce ~1–2 mL error over a 25 mL delivery.
Why It Happens: Unstable burette stand, casual hand position while holding a pipette, or lack of attention to posture.
Prevention:
- Use a proper burette stand or clamp to secure the burette rigidly
- Check that the stand is level and burette is vertical before starting
- When holding a pipette, maintain it vertically, resting it against a stable surface (beaker, flask) if needed
- Use a pipette holder or stand designed to maintain vertical orientation
Mistake 5: Insufficient Rinsing Before Use
The Problem: Water remaining inside a burette or pipette after rinsing dilutes your solution. If you rinse a burette with distilled water, then fill with 0.1 M HCl without drying the interior, the acid concentration drops. This causes you to consume more burette volume (higher titre), leading to a lower calculated concentration of the unknown.
For example:
- Expected titre: 25.00 mL of 0.1 M HCl
- Actual titre: 25.50 mL (because HCl was diluted to ~0.098 M)
- Calculated unknown concentration: 2% too low
Why It Happens: Rushing, or misunderstanding that “clean” means “dry” in this context.
Prevention:
- Rinse with distilled water 3–5 times to remove dust/particles
- Then rinse with 4–5 small portions (5–10 mL each) of the actual solution you’ll use (titrant in burette, analyte in pipette)
- Discard each rinse solution
- This ensures water is replaced by the target solution before you begin measurements
- For burettes, after filling with titrant, let a small amount flow through the tip into waste to displace any remaining water
Mistake 6: Overfilling or Underfilling Volumetric Pipettes
The Problem: A volumetric pipette must be filled exactly to the graduation mark. Overfilling by 0.5 mL exceeds tolerance; underfilling by 0.5 mL introduces a 2% error.
Why It Happens: Pouring too fast and overshooting the mark, then attempting to remove excess (nearly impossible), or approaching from the wrong direction.
Prevention:
- Fill the pipette to about 1 cm below the mark using a larger pipette (like a 25 mL graduated pipette) or funnel
- Use a dropper or small pipette to add liquid dropwise until the meniscus aligns with the mark
- Approach from below (adding small drops) rather than overshooting and trying to remove
- Allow the pipette to sit for 2–3 seconds after filling before reading, in case the meniscus shifts
- Train yourself to fill slowly on the final approach
Mistake 7: Using the Wrong Pipette Type (Mohr vs. Serological)
The Problem: These look similar but work differently. A Mohr pipette (drain-out type) has the first graduation mark above the tip; you empty by gravity and stop when the liquid reaches the desired mark. A serological (blow-out) pipette has graduations extending to the tip and is designed to expel the last bit by blowing.
Using a Mohr pipette like a serological pipette (blowing out) introduces error because you’re delivering the solution in the tip, which wasn’t calibrated into the measurement. Conversely, using a serological pipette like a Mohr (not blowing out) leaves solution in the tip-also wrong.
Prevention:
- Check the pipette label for “Mohr” or “serological” designation, or look at the tip (serological has markings to the very tip; Mohr stops above the tip)
- Look for two etched rings on the stem of serological pipettes, indicating blow-out capability
- Always blow out serological pipettes completely using a rubber bulb
- Never blow out Mohr pipettes
Mistake 8: Inconsistent Stopcock or Valve Operation
The Problem: Opening a burette stopcock too quickly causes uncontrolled flow-you might dispense 5 mL in 1 second, overshooting your target. Conversely, jerky opening/closing (stop-start pattern) leads to irregular flow and erratic readings.
Prevention:
- Practice opening the stopcock smoothly and gradually, not with abrupt twists
- Aim for a flow rate of ~1 mL per second during initial dispensing, slowing to drop-by-drop as you approach the equivalence point
- Use two hands: one on the stopcock, one to swirl the flask (maintains rhythm)
- Never fully open the stopcock; open only as much as needed for desired flow rate
- For plastic valve stopcocks, operate with gentle pressure; don’t force
Mistake 9: Forgetting to Record the Initial Burette Reading
The Problem: You fill the burette and begin dispensing, but forget to note where you started. Later, you record the final reading (25.30 mL) but can’t calculate titre because you don’t know the initial reading.
Prevention:
- Make it a ritual: Fill → Record Initial → Set Up Flask → Begin Titration
- Write the initial reading on your notebook or whiteboard immediately after recording it
- For beginners, verbally state the reading aloud: “Initial burette reading: 0.50 mL” to reinforce memory
Mistake 10: Inconsistent Technique Between Trials
The Problem: If you dispense quickly in Trial 1, then slowly in Trial 2, you’ll get different results despite identical chemistry. Burette error is technique-dependent; rushed work introduces bigger errors.
Prevention:
- Standardize your procedure: same swirling speed, same stopcock opening rate, same approach to endpoint (reduce flow rate when color begins to shift)
- Use the same hand position, flask orientation, and ambient conditions for all trials
- Perform the experiment in the same time frame (continuous rather than spread over multiple days if possible) to avoid temperature, humidity changes
- Electronic burettes eliminate this variable entirely (no operator variability), but manual burettes require disciplined technique
Section 9: Maintenance, Calibration & Storage
Laboratory glassware represents an investment-proper maintenance extends useful life and preserves accuracy.
Burette Maintenance
Daily Care (After Each Use):
- Rinse immediately with distilled water to prevent salt crystallization or stain buildup
- Leave burette standing upright to air-dry (never lay horizontally or store with liquid inside)
- Inspect the tip for cracks or chips; if damaged, the burette is out of tolerance
Weekly/Monthly Cleaning (Every 5–10 Uses):
- Soak the burette in a mild detergent solution (e.g., Alconox, 2 g/L in warm water) for 15–30 minutes
- Use a soft bottle brush to gently scrub the interior walls without scratching the graduations
- Rinse thoroughly with distilled water (10+ times)-residual detergent affects solution properties
- Final rinse with 70% ethanol or acetone to accelerate drying
- Stand vertically and allow to air-dry (4–24 hours)
- Store with stopcock in the open position (prevents valve from sticking) and caps on top and bottom (excludes dust)
Stopcock Maintenance (Critical for Glass Stopcocks):
- A glass stopcock should move smoothly with minimal effort
- If stuck, soak the entire burette in distilled water for several hours (never force)
- Apply a tiny amount of glass stopcock lubricant (specialized grease designed for lab glass) if the stopcock remains sticky after soaking
- Use lubricant sparingly-excess creates a mess and affects solution viscosity
- PTFE (plastic) stopcocks are self-lubricating and require no grease; just keep clean
Calibration Schedule:
- Monthly check: Gravimetric method (dispense 10 mL of distilled water at 20°C, weigh the collected water, calculate actual volume). Acceptance: ±0.05 mL for 25/50 mL burettes
- Annual full calibration: Send to calibration service or use certified standard if in-house equipment available
- Document all calibrations: Required for GLP/regulatory compliance
- Keep a “calibration sticker” on the burette noting the date of most recent calibration
Storage (Long-Term):
- Vertical in a burette rack or wall-mounted stand
- Stopcock fully open (prevents self-sealing)
- Caps on both ends
- Cool, dry location away from direct sunlight
- Avoid chemical fumes (they corrode glass graduations)
Volumetric Pipette Maintenance
Daily Care:
- Rinse immediately after use with distilled water
- Never allow liquid to dry on the pipette (mineral deposits build up, affecting measurements)
- Air-dry vertically in a rack (tip pointing down for drainage)
- Check for cracks, chips, or water spots
Weekly/Monthly Cleaning:
- Soak in mild detergent solution (Alconox, 2 g/L) for 15–30 minutes
- Use a soft bottle brush inside the bulb; soft cloth outside to avoid scratching graduations
- Rinse with distilled water 10+ times
- Final rinse with 70% ethanol or acetone
- Air-dry vertically (never use an oven-heat damages glass calibration and can cause warping)
- Store in a protective case or rack
Calibration Schedule:
- Monthly check: Gravimetric method at reference temperature (20°C). Dispense into a pre-weighed container, weigh again, calculate volume. Acceptance: ±0.03 mL for 25 mL Class A pipette
- Annual full calibration: Professional calibration service
- Class A pipettes maintain tighter tolerances than burettes; if out of specification, retire and replace rather than attempt repair
Storage:
- Vertical in a protective rack
- Separate tips or tip boxes (prevents contamination and dust)
- Cool, dry location; avoid light and chemical fumes
Graduated Pipette Maintenance
Less critical for precision (Class B tolerance), but best practices:
- Rinse immediately, air-dry vertically
- Check for cracks or chips; if found, discard (cheap enough to replace)
- Plastic graduated pipettes (single-use, sterile): dispose after use
- Glass graduated pipettes: annual cleaning and inspection sufficient for non-critical work
Section 10: Safety Guidelines & Best Practices
Working with burettes and pipettes involves handling chemicals, some hazardous. Proper technique protects your health and ensures accurate results.
Personal Protective Equipment (PPE)
- Safety glasses or chemical splash goggles (mandatory when handling any chemicals; protects against spills and splashes)
- Lab coat or protective apron (chemical-resistant material; protects clothing and skin)
- Disposable gloves (nitrile for aqueous solutions, latex for most organic solvents; verify compatibility with your specific chemicals)
- Closed-toe shoes with non-slip sole (protects feet from spills and breakage)
Critical Safety Practices
Never Pipette by Mouth
- This violates every laboratory safety standard, GLP guideline, and institutional policy for a reason: you risk ingesting hazardous chemicals
- Always use a mechanical pipette filler (rubber bulb, hand-squeezed or lever-operated; or electronic battery-powered aid)
- Ingestion risks from pipetting by mouth include:
- Corrosive chemicals (acids, bases) burning your mouth and throat
- Toxic compounds (cyanides, heavy metals, carcinogens) entering your bloodstream
- Biological contaminants (bacterial cultures, allergens) causing infection or allergic reaction
Proper Hand Technique
- Hold burette or pipette vertically at all times
- Use two hands for burette operations (one on stopcock, one to stabilize flask)
- Rest pipette against a stable surface (beaker, flask) if holding steady is difficult
- Maintain eye contact with the apparatus (watch for drips, splashes)
Chemical Handling
- Know the hazard of every solution before use (review Safety Data Sheet / SDS)
- Wear glove materials compatible with your chemical (nitrile resists water-based solutions; latex resists many organics; some chemicals require specific glove types)
- Store corrosives (strong acids, bases) below eye level (4–5 feet height) to minimize splash risk in event of breakage
- Keep an SDS binder accessible in the lab; scan/search online if paper copies unavailable
Cross-Contamination Prevention
- Use fresh pipette tips for each transfer (especially when switching between different chemical families)
- Rinse burettes and pipettes with distilled water then with the solution you’ll use (this minimizes carryover)
- Never mix equipment between hazardous and non-hazardous areas of the lab
- Label burettes and pipettes if dedicated to specific solutions (e.g., “Acid Burette #1-HCl Only”)
Spill Response
- Keep absorbent materials (paper towels, lab wipes, specialized absorbent pads) within arm’s reach
- For small aqueous spills: wipe up with paper towels, rinse area with water
- For chemical spills: neutralize (if appropriate, e.g., acid with baking soda) or absorb with appropriate material, then dispose per your institution’s waste protocol
- For larger spills: notify a supervisor immediately; use spill kit if available
- Document all incidents, no matter how minor
Ergonomics & Repetitive Strain
- Burette and pipette work can be repetitive (3–10 titrations in a row is common)
- Maintain elbows at approximately 90° angle during operation
- Take breaks every 30–60 minutes; rotate between different tasks
- Adjust bench height so you’re not hunching or reaching awkwardly
- Use proper posture: back straight, shoulders relaxed, wrists neutral
Section 11: Frequently Asked Questions
Q: Which is more accurate-a burette or a pipette?
A: Volumetric pipettes are more accurate for fixed-volume transfers: ±0.01–0.03 mL tolerance (0.1–0.3% error). Burettes are accurate for variable-volume dispensing: ±0.03–0.05 mL tolerance (0.1–0.5% error depending on size). For titrations, burette accuracy is sufficient and is the standard instrument-not because of raw precision, but because titrations rely on measuring the difference between initial and final readings, and repetition improves overall precision. For standard solution preparation, use a volumetric pipette.
Q: What is the best tool for titration?
A: A burette is the only appropriate choice for titration. It enables:
- Variable volume dispensing (you don’t know in advance how much you’ll need)
- Controlled, dropwise addition near the equivalence point
- Integration with visual indicators (color change) or electrochemical sensors (pH, conductivity)
- Multiple sequential additions from one burette fill (perform additions, observe, add more, observe)
A volumetric pipette cannot replace a burette because it delivers only one fixed volume and lacks flow control.
Q: Can a pipette replace a burette?
A: No. A burette and pipette serve different purposes:
- Burette: Delivers variable volumes; used for titrations and applications requiring flexible dispensing
- Pipette: Transfers fixed volumes; used for standard solutions and reproducible aliquoting
In titration workflows, both instruments are often needed: a volumetric pipette transfers the analyte to the conical flask, and a burette adds the titrant. They’re complementary, not interchangeable.
Q: Are micropipettes used in chemistry labs?
A: Yes, extensively. Electronic micropipettes (1–1000 µL range) are standard in analytical, clinical, and research laboratories for precise microvolume transfers. They reduce hand variability (tremor, inconsistent technique), eliminate repetitive strain, and improve repeatability. Some micropipettes offer programmable dispensing patterns (multi-dispense, reverse pipetting to minimize bubble formation). They’re more expensive than manual pipettes but are worth the investment for high-throughput or precision-critical work.
Q: Do burettes require calibration?
A: Yes. Class A burettes should be calibrated:
- Monthly: Quick gravimetric check (dispense 10 mL of distilled water at 20°C, weigh, calculate actual volume)
- Annually: Full calibration via certified calibration service or in-house if equipped with calibrated standards
- After any repair or glass damage: Recalibration required before use
Calibration records are mandatory for GLP (Good Laboratory Practice) compliance and regulatory audits. If a burette is out of tolerance (>±0.05 mL error for a 25 mL Class A burette), retire it from analytical use or return for professional repair/recalibration.
Q: Which tool is easier for beginners?
A: Graduated pipettes are easiest (simple fill-to-mark operation, forgiving tolerances). Volumetric pipettes are next (precise, but straightforward: fill, dispense). Burettes require the most training-the stopcock mechanism and requirement to read two values (initial and final) introduce complexity. For teaching labs, beginners should start with graduated pipettes, advance to volumetric pipettes, then learn burette operation in the context of titration experiments.
Q: What decimal place do pipettes and burettes measure to?
A: Both measure to one decimal place:
- Burettes: 0.1 mL increments (e.g., 0.00, 0.10, 0.20, 0.30 mL, up to the total capacity)
- Volumetric pipettes: Single mark at calibrated volume (e.g., 25.00 mL)
- Graduated pipettes: 0.1 mL increments along the tube (e.g., 1.0, 2.0, 3.0, 5.0, 10.0 mL)
You can estimate between graduation marks (to the nearest 0.05 mL), but precision degrades. Always read at whole graduation marks or the official calibration line.
Q: Why is KMnO₄ typically used in a burette rather than a pipette?
A: Permanganate (KMnO₄) is purple and used in redox titrations. It’s housed in a burette (not a pipette) because:
- Variable volume needed: You don’t know in advance how much permanganate you’ll consume; burettes allow flexible dispensing
- Indicator property: Permanganate is colored; the color change from purple (excess MnO₄⁻) to colorless (at endpoint) is the indicator-sharp enough to catch with careful burette operation
- Cannot be delivered from fixed pipette: A single-volume pipette would waste permanganate and lack flexibility
Similarly, all redox titrations (iodine, sodium thiosulfate) and acid–base titrations use burettes for the titrant (the solution being added).
Q: Can I use a graduated pipette for a titration?
A: Not for accurate work. Graduated pipettes have loose tolerances (±0.05–0.10 mL) and lack the fine stopcock control necessary for dropwise addition near the equivalence point. They’re adequate for teaching demonstrations (“see how color changes”), but not for quantitative work where you calculate unknown concentration from titre. Always use a Class A burette for analytical titrations.
Section 12: Industry Applications & Specialized Use Cases
Pharmaceutical Quality Control (QC)
Pharmaceutical manufacturers rely on titration for:
- API (Active Pharmaceutical Ingredient) assay: Determine the exact concentration of the active ingredient in a tablet, capsule, or injection
- Impurity analysis: Quantify residual reactants or byproducts using back-titrations or redox methods
- Excipient verification: Confirm that buffer salts, preservatives, and other inactive ingredients meet specification
A typical workflow: weigh a tablet sample → dissolve → titrate with standardized reagent → calculate API content as a percentage of label claim. Class A burettes and volumetric pipettes are non-negotiable in this context.
Food & Beverage Industry
- Acidity testing (titratable acidity): Determine acid content in juices, wines, vinegars, and fermented products. Standard: titrate with 0.1 N NaOH to a phenolphthalein endpoint. Example: vinegar must contain 4–8% acetic acid by regulation.
- Salt (chloride) determination: Use silver nitrate titration to quantify salt in processed meats, cheeses, soy sauce, and other foods. Example: soy sauce salt content.
- Water hardness: Food plants test water hardness (Ca²⁺ and Mg²⁺ content) via EDTA complexometric titration to prevent scaling in boilers and pipes.
In all cases, reproducibility and compliance with food safety standards (ISO 3676 for titration, ISO 1042 for volumetric glassware) are mandatory.
Clinical/Diagnostic Laboratories
While many clinical labs have automated analyzers, titration appears in:
- Kidney function assessment: Old-school method (now largely automated) using back-titration of excess reagent
- Acid–base status determination: Some labs use manual pH and CO₂ measurement via direct titration in specialized point-of-care settings
- Ion-selective electrode calibration: Technicians use volumetric pipettes to prepare calibration standards for electrolyte analyzers
Section 13: Conclusion & Implementation Roadmap
Key Takeaways
- Burettes and pipettes are complementary, not interchangeable. Burettes dispense variable volumes and are essential for titration. Volumetric pipettes transfer fixed volumes and ensure high precision for standard solution preparation.
- Accuracy depends on correct selection and proper technique. A Class A 25 mL volumetric pipette can deliver ±0.03 mL (±0.12% error). A Class A 25 mL burette can deliver ±0.05 mL (±0.2% error). But operator error (improper meniscus reading, temperature effects, air bubbles) can dwarf these tolerances.
- Titrations are the domain of burettes. The variable, controlled dispensing that burettes enable is essential for endpoint detection and accuracy. No pipette can replicate this function.
- Maintenance and calibration are not optional. Class A status doesn’t guarantee accuracy forever. Monthly checks and annual calibration keep instruments in specification. Documentation is mandatory for regulatory compliance.
- Safety is embedded in technique. Using a pipette filler (never mouth), maintaining vertical orientation, rinsing correctly, and handling chemicals with appropriate precautions are non-negotiable.
For Immediate Implementation
If you manage a chemistry lab or analytical facility:
- Audit your glassware: Verify that all burettes and pipettes are Class A certified. Check calibration dates. Any instrument without a calibration date in the last 12 months is out of specification.
- Establish a maintenance schedule:
- Weekly: Visual inspection for cracks, cleanliness check
- Monthly: Gravimetric calibration check
- Quarterly: Deep cleaning and detailed inspection
- Annually: Professional calibration service
- Create standard operating procedures (SOPs):
- Burette priming and tip-filling procedure
- Volumetric pipette filling and meniscus reading
- Titration workflow with safety checkpoints
- Documented calculations and result reporting
- Train staff:
- Hands-on practice with water before using real solutions
- Supervised practice titrations
- Emphasis on consistency (same operator, same time of day, same technique)
- Safety quiz covering proper pipetting, chemical handling, and incident response
- Invest in quality glassware: Class A instruments cost 2–3× more than Class B, but the accuracy ROI is significant. A failed batch or incorrect assay due to substandard glassware is far more expensive than the initial investment.
- Consider electronic micropipettes for high-volume work: If your lab performs >50 titrations per week or extensive liquid transfers, electronic pipettes reduce operator fatigue and variability.
For Students & Learners
- Start with graduated pipettes (practice filling, meniscus reading, dispensing)
- Progress to volumetric pipettes (introduce the “fill to mark” discipline and importance of single-measurement precision)
- Learn burette operation in the context of titration, where you’ll perform 3–5 trials and average results (this tolerance for repetition makes burettes more forgiving for beginners than the critical single-measurement precision of volumetric pipettes)
- Always rinse with your solution after rinsing with water-this single habit prevents 50% of novice errors
- Use checklists during your first 10 titrations: initial reading recorded? Bubbles removed? Analyte pipetted? Indicator added? This ritualization builds good habits.
Final Note
The difference between a burette and pipette may seem subtle to an outsider, but in the hands of a trained chemist, they’re as distinct as a scalpel and a saw. The burette, with its stopcock and graduated markings, enables the controlled, stepwise dispensing that titration demands. The volumetric pipette, with its single calibration mark, guarantees the fixed-volume precision that standard solution preparation requires.
Master both instruments, understand when to reach for each, and your laboratory work-whether academic research, quality control, or clinical diagnosis-will reflect professional-grade accuracy and reproducibility.