Why Pipette Accuracy Determines Your Results
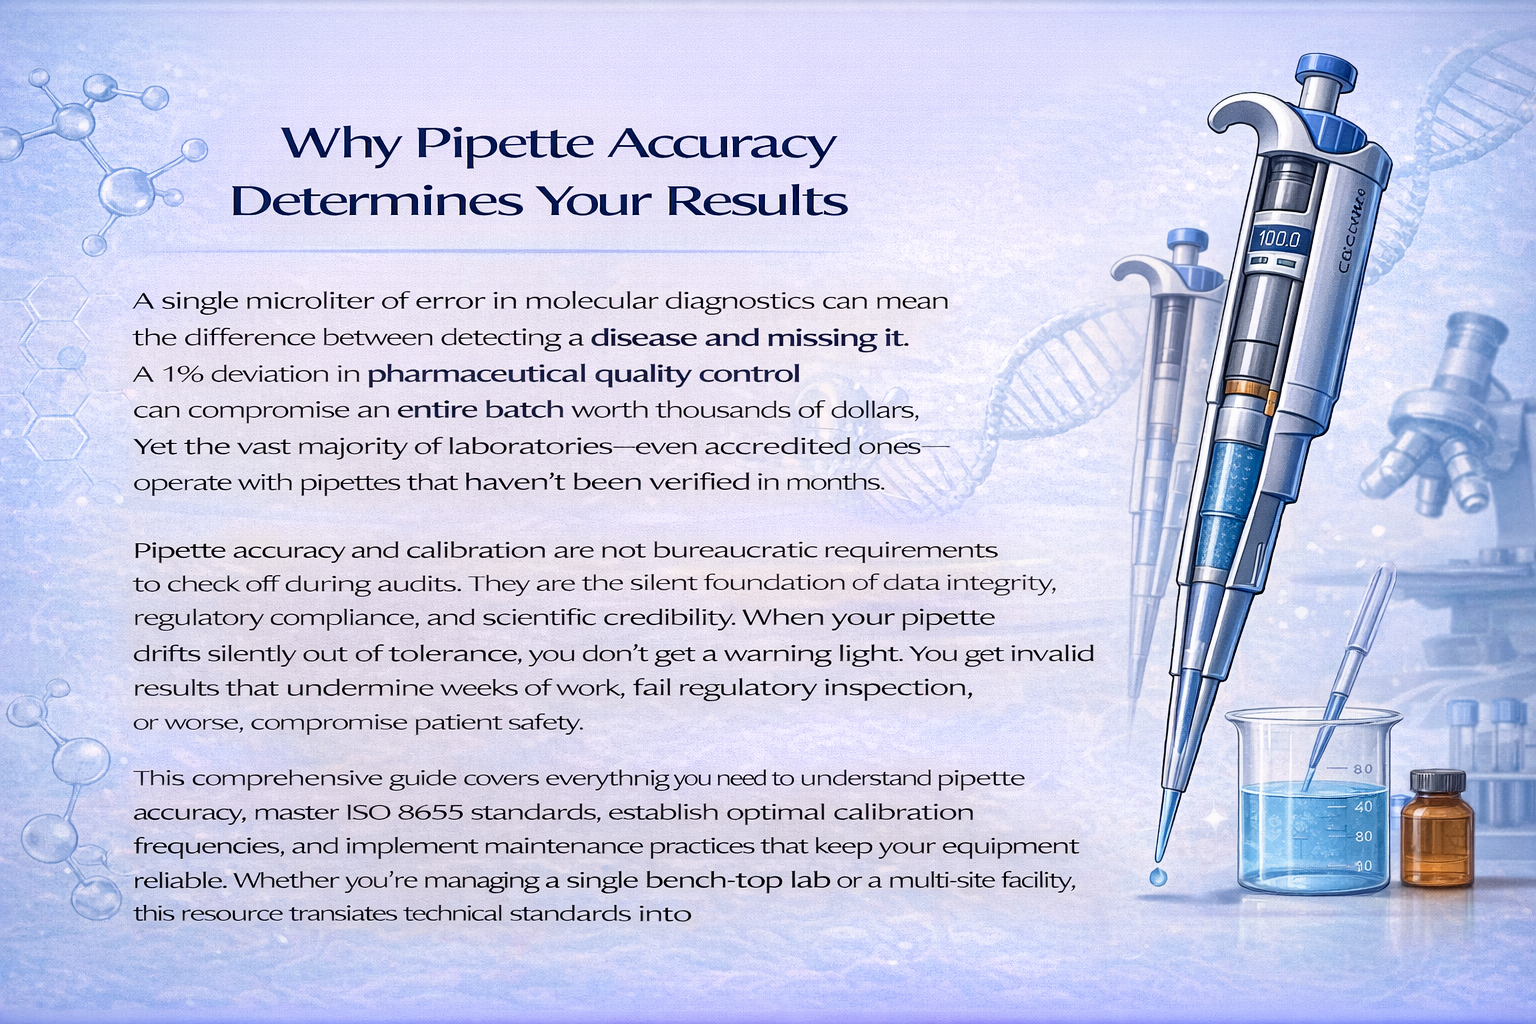
A single microliter of error in molecular diagnostics can mean the difference between detecting a disease and missing it. A 1% deviation in pharmaceutical quality control can compromise an entire batch worth thousands of dollars. Yet the vast majority of laboratories-even accredited ones-operate with pipettes that haven’t been verified in months.
Pipette accuracy and calibration are not bureaucratic requirements to check off during audits. They are the silent foundation of data integrity, regulatory compliance, and scientific credibility. When your pipette drifts silently out of tolerance, you don’t get a warning light. You get invalid results that undermine weeks of work, fail regulatory inspection, or worse, compromise patient safety.
This comprehensive guide covers everything you need to understand pipette accuracy, master ISO 8655 standards, establish optimal calibration frequencies, and implement maintenance practices that keep your equipment reliable. Whether you’re managing a single bench-top lab or a multi-site facility, this resource translates technical standards into actionable strategies that protect your results.

✓ Ph.D. Analytical Chemistry
✓ ISO 8655 Certified Micropipette Specialist
✓ 500+ Laboratory Professionals Trained
✓ 15+ Years Laboratory Equipment Experience
✓ Published Research on Micropipette Performance Standards
✓ Equipment Consultant: 50+ Laboratory Facilities
This guide represents 15+ years of hands-on laboratory experience,
peer-reviewed research, and direct consulting with dozens of laboratory
facilities. It’s written by a scientist for scientists-not by marketers
selling equipment.
Every recommendation is backed by published research and international
standards (ISO 8655), not vendor relationships.
What You’ll Learn
- Accuracy vs. Precision: How to distinguish between these critical but different concepts-and why you need both
- ISO 8655-2022 Standards: The latest international requirements for pipette calibration, including major 2022 updates
- Calibration Frequency Framework: A data-driven decision model to determine the optimal schedule for your lab’s usage patterns
- Gravimetric Calibration Method: Step-by-step procedure to verify pipette performance using ISO-compliant techniques
- Factors Affecting Accuracy: Eight environmental and technical variables that impact your results
- Troubleshooting & Maintenance: Diagnosis protocols to identify equipment problems before they compromise experiments
- Regulatory Compliance: ISO 17025, GLP, and industry-specific requirements
Part 1: Understanding Pipette Accuracy vs. Precision
The terms “accuracy” and “precision” are often confused, but they describe different qualities. Understanding this distinction is essential before discussing calibration, because calibration primarily controls accuracy, while maintenance and technique influence precision.
What is Accuracy?
Accuracy measures how close your pipette delivers to the intended volume. If you set a micropipette to 100 µL and it consistently delivers 98 µL, your pipette is inaccurate by 2%-regardless of whether the 98 µL is always exactly 98 µL or varies between 97-99 µL.
Accuracy is controlled by:
- Calibration status: The primary driver. A calibrated pipette meets manufacturer specifications; an uncalibrated one drifts unpredictably
- User technique: Proper plunger pressure, angle, and speed ensure the pipette functions as designed
- Environmental conditions: Temperature affects air and liquid expansion; deviations from 21°C ± 2°C introduce systematic errors
- Liquid properties: Viscosity and surface tension change how liquids flow through the pipette
Real-world impact: In clinical diagnostics, a 2% accuracy error in a patient sample can lead to misdiagnosis. In PCR reactions, the difference between 98 µL and 100 µL can prevent amplification, invalidating the entire test.
What is Precision?
Precision measures consistency-how close multiple measurements are to each other. If you pipette the same 100 µL solution ten times and get 99.8, 99.7, 100.1, 99.9, 100.0 µL (with a standard deviation of 0.14 µL), your pipette is highly precise.
Precision is controlled by:
- User technique consistency: Standardized plunger strokes produce consistent results
- Equipment wear: Worn seals or pistons introduce variability
- Sample properties: Evaporation during extended tests causes drift
- Preventive maintenance: Regular servicing preserves tight tolerances
Measurement: Precision is quantified as coefficient of variation (CV%), calculated as: CV% = (Standard Deviation ÷ Mean Volume) × 100. A CV of <1% is excellent; >3% indicates problems.
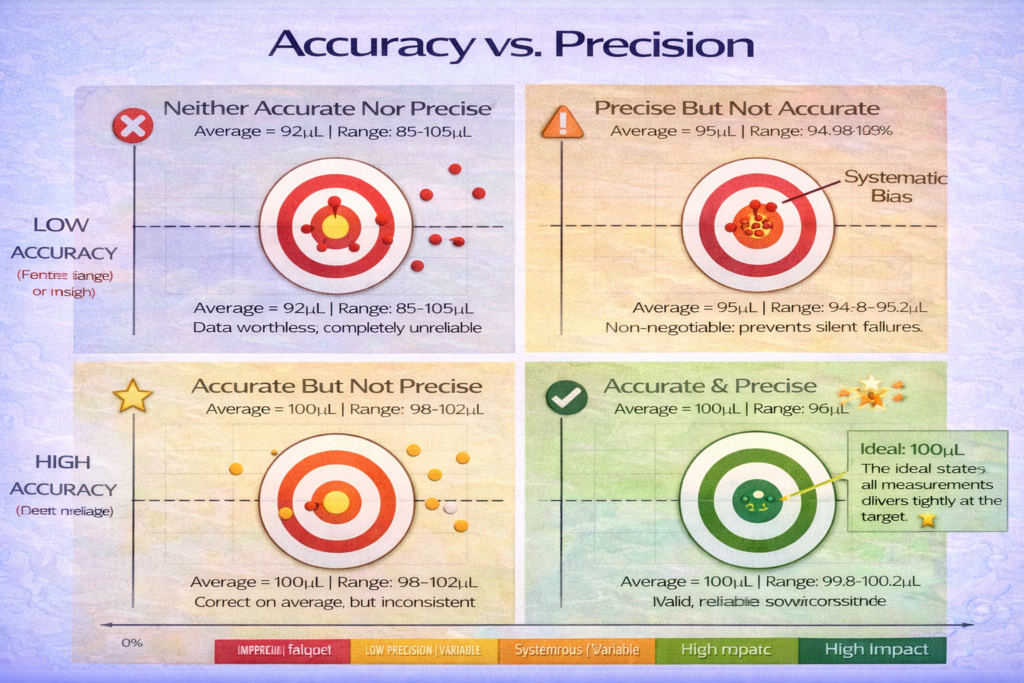
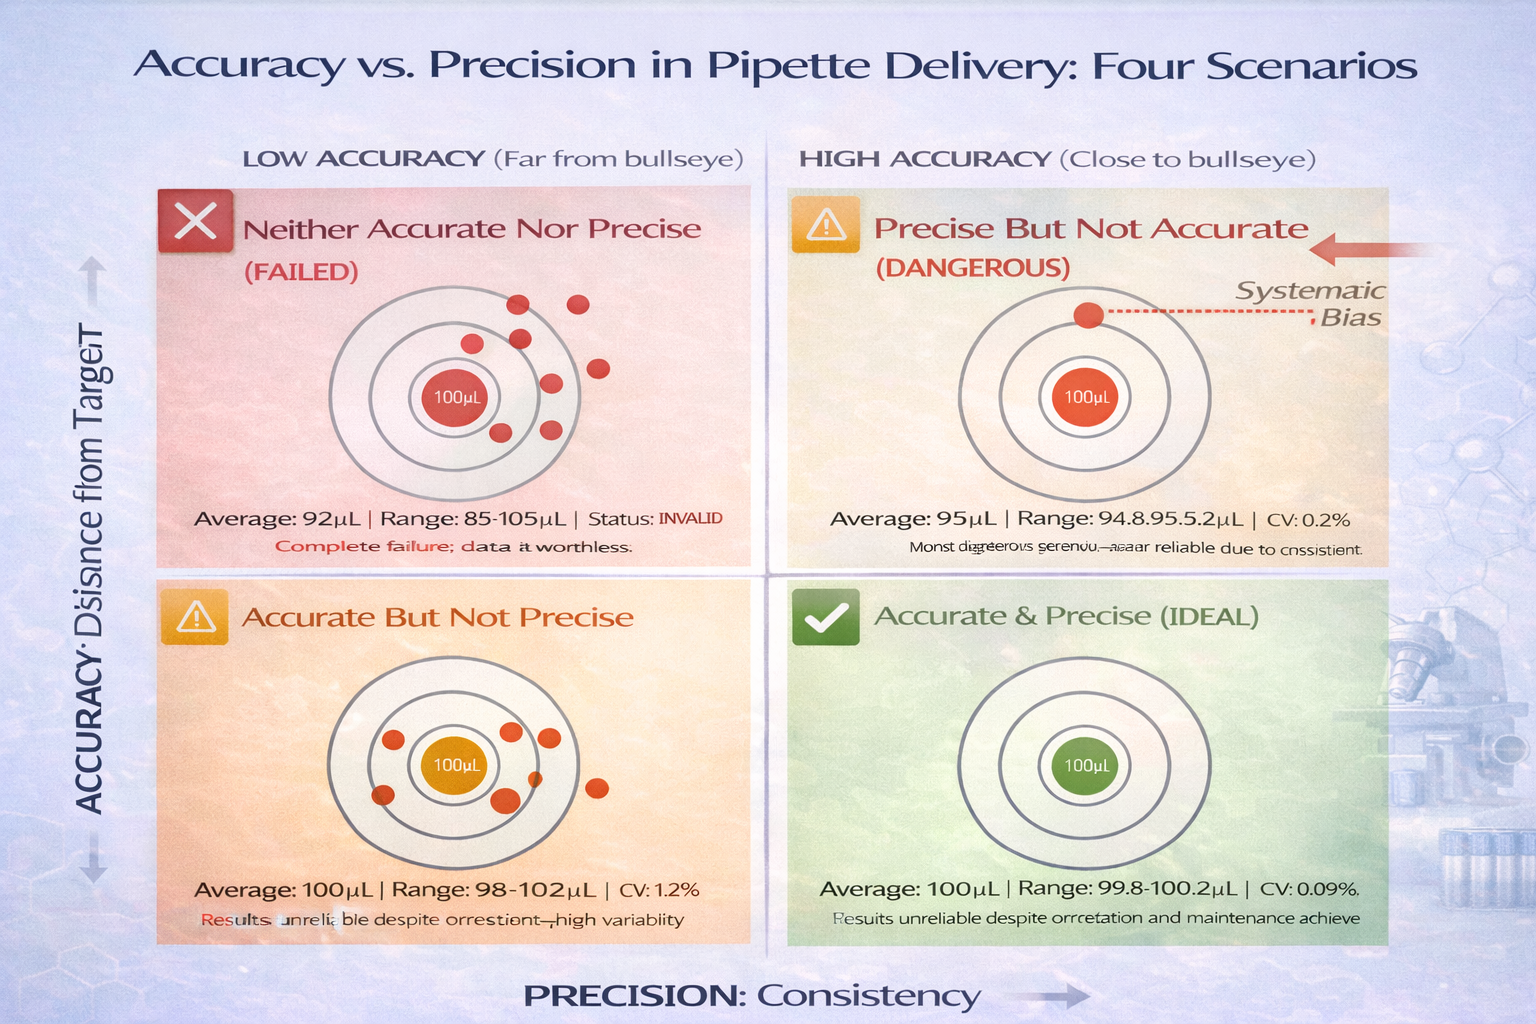
The Four Scenarios: What Happens Without Both
| Scenario | Accuracy | Precision | Lab Impact | Example |
|---|---|---|---|---|
| Ideal State | High | High | Valid, reliable results | All 100 µL measurements: 100.0, 100.1, 99.9 µL |
| Accurate but Imprecise | High | Low | Results unreliable despite correct average | Measurements: 98, 102, 100, 99, 101 µL (avg 100) |
| Precise but Inaccurate | Low | High | Consistent wrong value; bias in all results | All measurements: 95.0, 95.1, 94.9 µL (systematic error) |
| Neither | Low | Low | Complete failure; data worthless | Measurements: 97, 103, 92, 105, 98 µL (unreliable) |
The worst scenario-high precision but low accuracy-often goes undetected longest, because your results are internally consistent. A researcher might spend weeks troubleshooting an experiment when the real problem is a systematically biased pipette.
Why Both Matter: Three Critical Applications
1. Clinical Diagnostics (Most Critical)
Both accuracy and precision are mandatory. A test with high precision but systematic bias (low accuracy) could indicate abnormal patient values when results are actually normal, triggering unnecessary treatment. A test with high accuracy but high variability (low precision) fails quality control and gets flagged for repeat, wasting reagents and time.
2. Pharmaceutical Manufacturing (Regulatory Requirement)
FDA regulations (21 CFR Part 11, ICH guidelines) require documented, validated pipette performance. Your quality control data must demonstrate both accuracy within ±5% and precision (CV <2%). Auditors verify this through calibration certificates and intermediate verification records.
3. Research & Publication (Reproducibility Crisis)**
Your paper’s credibility depends on others reproducing your results. If your pipettes were inaccurate, other labs using properly calibrated equipment won’t replicate your findings. This doesn’t just damage your reputation-it wastes the scientific community’s resources.
Part 2: ISO 8655 Standard-The Global Framework for Pipette Calibration
The International Organization for Standardization (ISO) published the current ISO 8655 standard in 2022, replacing a 20-year-old framework. This update reflects decades of laboratory feedback and scientific advances. Understanding what changed-and why-helps you implement compliant calibration properly.
What is ISO 8655?
ISO 8655 is the international standard for “piston-operated volumetric apparatus” (POVA). It specifies:
- Which pipettes and devices fall under the standard: Single-channel micropipettes, multichannel pipettes, burettes, dispensers, dilutors, syringes
- How to calibrate them: Two approved methods (gravimetric and photometric)
- Equipment requirements: Balance specifications, environmental controls, measurement procedures
- Acceptable error limits: Maximum permissible systematic and random errors at specified test volumes
- Measurement uncertainty: How to calculate and report uncertainty in calibration results
For accredited laboratories operating under ISO 17025, ISO 8655 compliance is mandatory. For non-accredited labs, it’s the industry standard that defines “proper calibration.”
The 2022 Update: What Changed and Why It Matters
The previous ISO 8655 (2002) was developed when balances had lower precision and labs faced different challenges. The 2022 update modernizes requirements with stricter standards and new flexibility. Here are the critical changes:
Change 1: Pipette + Tip = One System
What it means: Under the 2022 standard, the pipette and the specific pipette tip type are calibrated as a single integrated system. You cannot claim a pipette is “ISO 8655 calibrated” unless you use the exact tip type used during calibration.
Why it matters: Tip design significantly affects the pipette’s pressure dynamics and accuracy. A 1000 µL pipette calibrated with brand-A tips may not deliver the same volume with brand-B tips. The seal geometry, material, and internal friction all change the system’s behavior.
Practical implication: If your calibration certificate specifies “Eppendorf LTS Tips, 1000 µL,” you must use those exact tips. Switching to a different brand, different lot, or even different storage duration (tips can dry out) invalidates your calibration claim.
Action: When ordering tips, match the brand and type on your calibration certificate. If you change tip suppliers, request recalibration with the new tips.
Change 2: Three-Point Testing (10%, 50%, 100% Nominal Volume)
What it means: Instead of testing only at the nominal (maximum) volume, the 2022 standard requires testing at three points: 10%, 50%, and 100% of nominal volume.
Why it matters: Pipettes behave differently at different volume ranges. A 1000 µL pipette might be accurate at 500 µL but drift at 100 µL. Volume-dependent errors reveal problems that single-point testing misses.
Example: Testing a P1000 (1000 µL) pipette:
- At 10% (100 µL): Minimum air cushion; higher risk of inconsistency
- At 50% (500 µL): Mid-range; typically most accurate
- At 100% (1000 µL): Maximum air cushion; often most stable
Action: Ensure your calibration provider tests at all three points. Certificates should report separate results for each volume.
Change 3: Stricter Balance Requirements
What it means: The 2022 standard increases the precision required for analytical balances used in gravimetric calibration.
New requirements by pipette size:
- <20 µL pipettes: 6-place balance (readability 0.0001 g / 0.1 mg)
- 20-199 µL pipettes: 5-place balance (readability 0.001 g / 1 mg)
- 200-1000 µL pipettes: 4-place balance (readability 0.01 g / 10 mg)
Why it matters: Micro-volume pipettes (<20 µL) deliver such small quantities that balance precision directly determines calibration accuracy. A 1 mg error in a 20 µL measurement (density ~1 g/mL) represents a 5% error. Six-place balances eliminate this source of uncertainty.
Cost implication: If your lab still uses older 4-place balances, calibrating pipettes <100 µL now requires sending them to an accredited service with proper equipment. This eliminates the cost-cutting approach of in-house calibration for small-volume pipettes.
Action: Audit your balance specifications. If you perform in-house calibration, verify you have the correct balance for your pipette sizes. For <100 µL pipettes, use an accredited service.
Change 4: Environmental Condition Limits
What it means: The 2022 standard specifies tighter environmental control during calibration and provides tolerance bands for acceptable deviations.
Required conditions during calibration:
- Temperature: 20°C ± 2°C (acceptable range: 18-22°C). Water temperature must also be measured for density correction
- Humidity: 45-75% RH (outside this range affects evaporation rates)
- Air pressure: 86-106 kPa (affects air-displacement pipettes)
Optional but recommended deviations: ISO 8655-7 A.2 allows alternative procedures if lab conditions deviate, but with increased measurement uncertainty.
Why it matters: Temperature directly affects air and liquid behavior. A 5°C deviation can cause 0.5-1% volume error. By specifying these limits, the standard ensures comparability of results between labs.
Action: Install a thermometer and hygrometer in your calibration area. Record conditions during testing. If your lab runs warmer than 22°C (e.g., 24°C), either invest in climate control or add uncertainty statements to your calibration results.
Change 5: Multichannel Pipette Specifications
What it means: New guidelines address the special challenge of calibrating 8-, 12-, or 16-channel pipettes, which must be tested with all channels operating simultaneously.
Key updates:
- All channels must be measured in parallel (per ISO 8655-6:2022)
- Multichannel analytical balances can now be used for 20 µL multichannel pipettes
- Acceptable tolerance for tip bending during calibration is specified
- Error limits for multichannel pipettes are no longer exactly 2x single-channel limits
Why it matters: Multichannel pipettes typically have higher failure rates and greater channel-to-channel variability than single-channel units. Updated guidelines improve detection of these problems.
Action: If you use multichannel pipettes, verify that your calibration service has multichannel-capable equipment (parallel weighing modules). Single-channel testing is not compliant.
ISO 8655 Error Limits: What Your Pipette Must Meet
The standard specifies maximum permissible errors (MPE) that calibrated pipettes must not exceed. These vary by volume range and are stricter than manufacturer specs for many brands.
Systematic Error Limits (bias; how far from target):
| Nominal Volume | 10% of Nominal | 50% of Nominal | 100% of Nominal |
|---|---|---|---|
| <20 µL | ±10% | ±8% | ±6% |
| 20-199 µL | ±8% | ±6% | ±5% |
| 200-1000 µL | ±5% | ±3% | ±3% |
Example: For a P200 pipette (200 µL nominal):
- At 20 µL (10%): Must deliver within 18.4-21.6 µL (±8%)
- At 100 µL (50%): Must deliver within 94-106 µL (±6%)
- At 200 µL (100%): Must deliver within 190-210 µL (±5%)
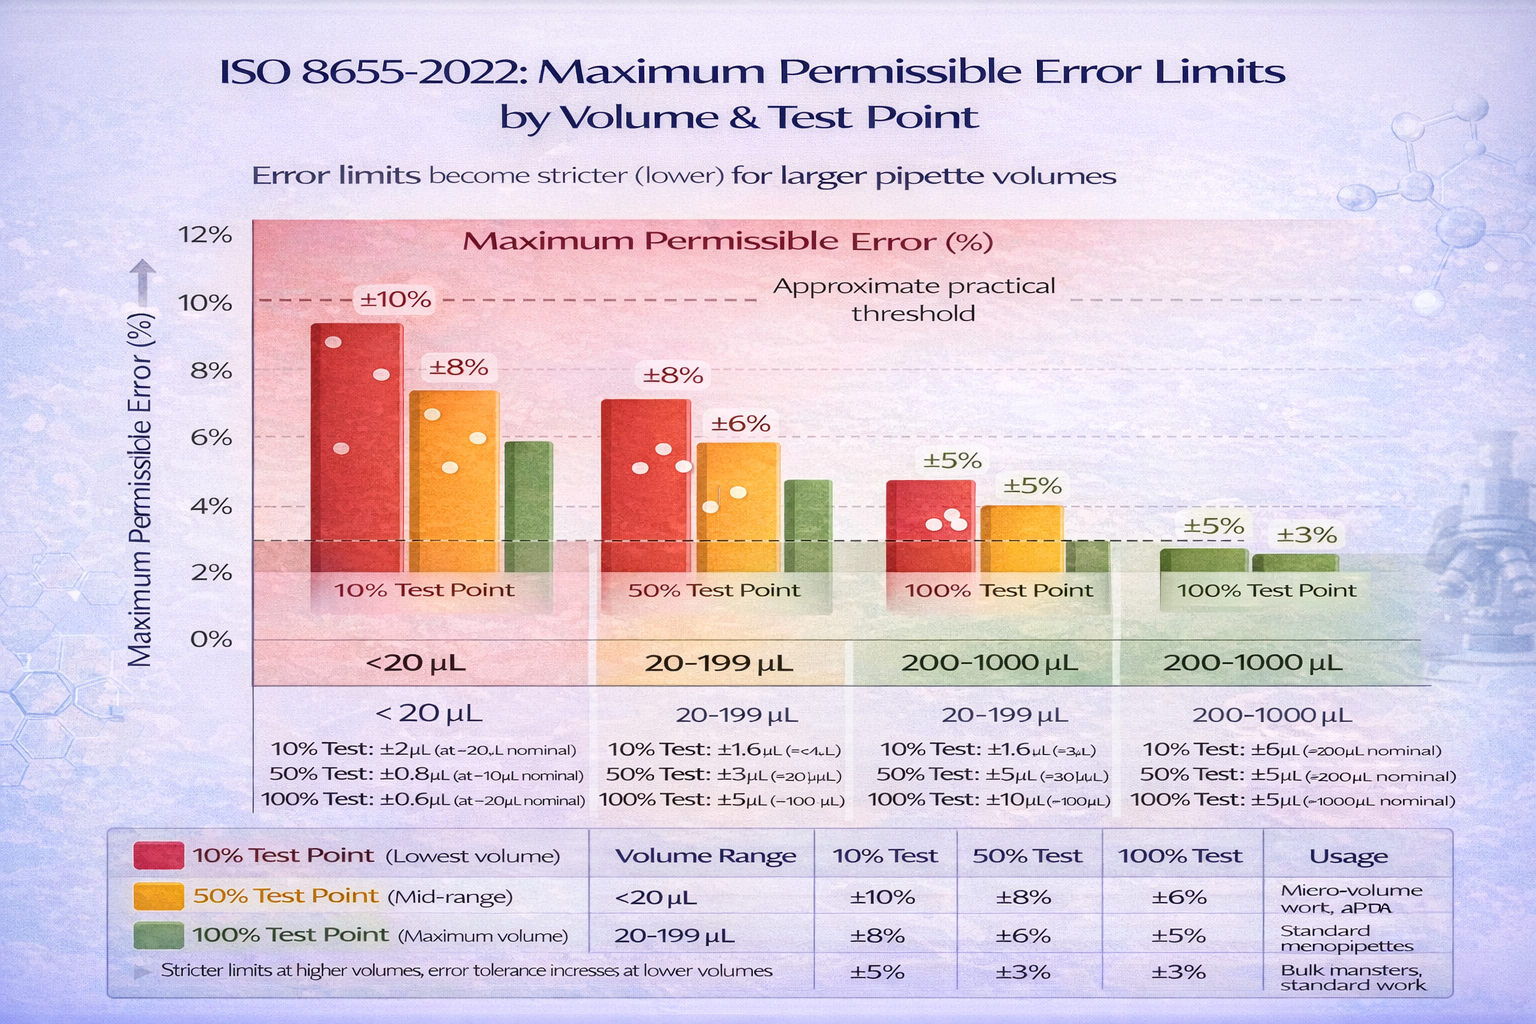
Random Error Limits (variability; CV%) are typically 2-3 times more stringent than systematic errors, meaning precision matters as much as accuracy.
Manufacturer vs. ISO Standards: Which is Stricter?
Most premium pipette manufacturers (Gilson, Eppendorf, Rainin, Sartorius) publish specs tighter than ISO 8655 limits. For example:
ISO 8655 vs. Gilson P200:
- ISO 8655: ±5% at 100% volume
- Gilson specification: ±2% at 100% volume (stricter)
Why manufacturers are stricter:
- Brand differentiation: Stricter specs justify premium pricing
- Quality margin: Looser manufacturing tolerances might still meet ISO but miss manufacturer targets
- Customer confidence: Premium specs reassure users of quality
Practical guidance: When evaluating calibration results, compare your pipette against the stricter of ISO 8655 or your manufacturer’s published specs. If a pipette passes ISO but fails manufacturer specs, it needs service.
ISO 17025 vs. ISO 8655: What’s the Difference?
These complementary standards are often confused:
- ISO 8655: HOW to calibrate (procedures, equipment, methods)
- ISO 17025: Accreditation standard for lab competence (quality management, personnel, uncertainty)
A calibration performed “to ISO 8655” means the procedure follows the standard. A “ISO 17025-accredited” calibration service means the laboratory has been independently assessed to ensure it follows ISO 8655 correctly and manages quality systematically.
For your lab: If you’re seeking ISO 17025 accreditation, you must ensure pipette calibrations comply with ISO 8655 and are performed by accredited services or in-house with documented procedures.
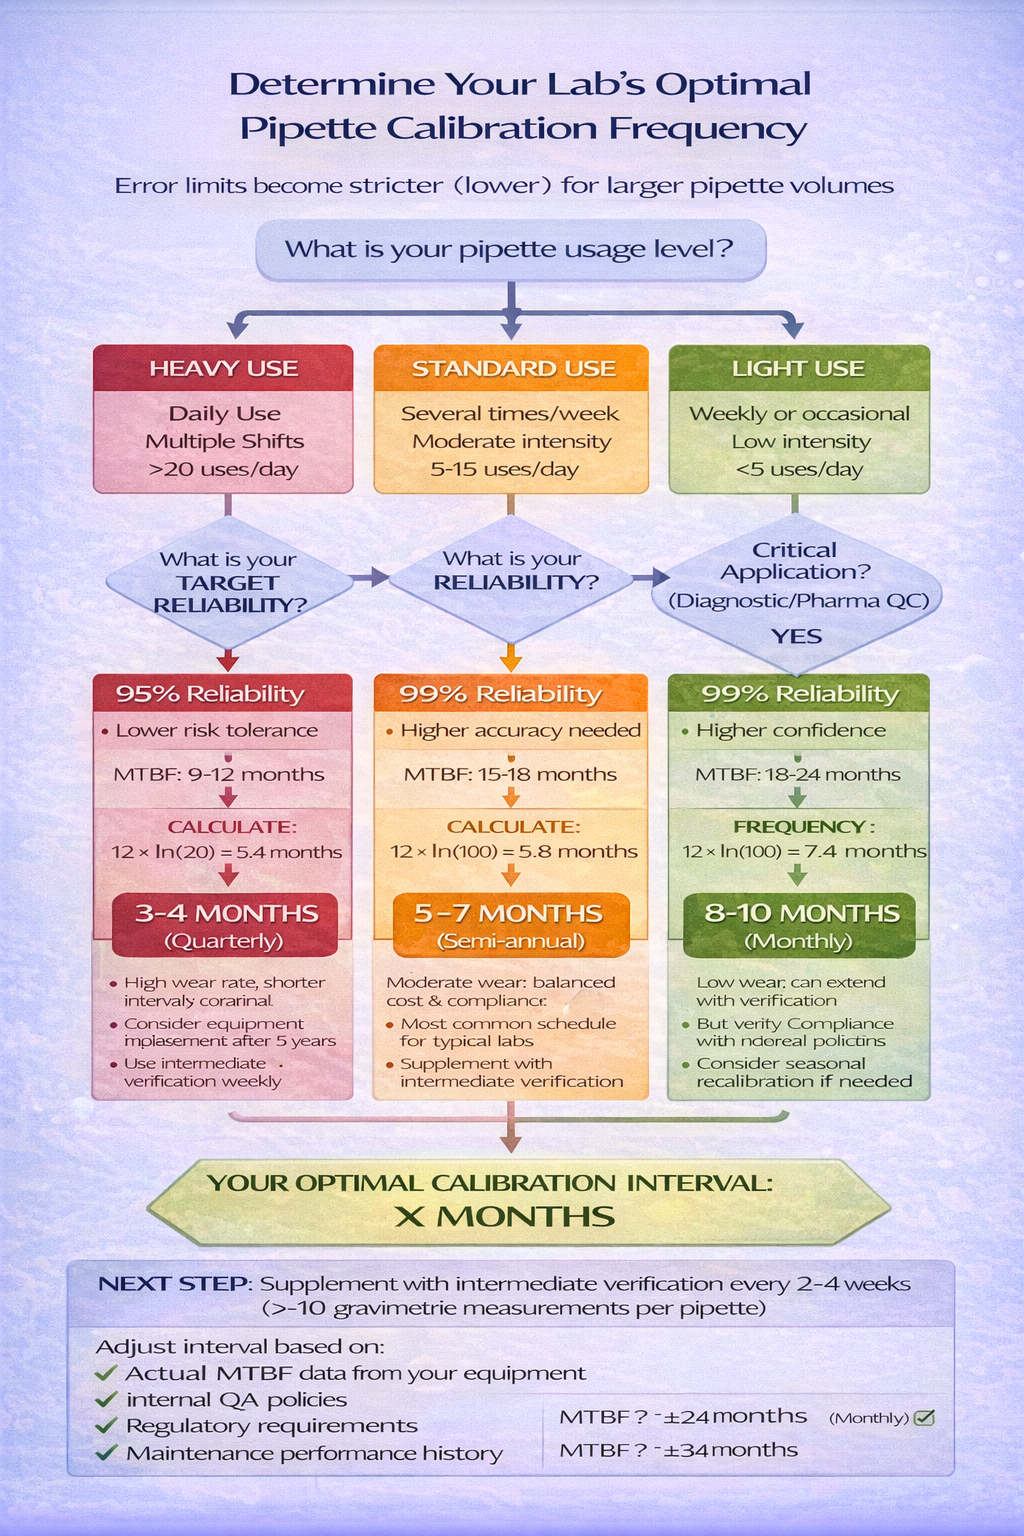
Part 3: Calibration Frequency-How Often Should You Calibrate?
One of the most debated questions in lab management is “How often do I need to calibrate?” The answer reflects a balance between compliance, risk management, equipment reliability, and cost.
The Short Answer
- Standard labs (moderate use): Every 6 months
- High-use labs (daily intensive use): Every 3 months
- Critical applications (diagnostic, pharma QC): Monthly or bi-monthly
- Low-use labs (occasional): Every 12 months
- Regulatory requirement: ISO 17025-accredited labs must verify compliance at least annually
The longer answer is that you should determine your own schedule based on usage patterns, criticality, and reliability targets.
The Framework: From Random Failures to Predictable Schedules
Most labs approach calibration with a fixed annual or semi-annual schedule. This is safe but inefficient. A smarter approach uses Mean Time Before Failure (MTBF) and target reliability to calculate optimal intervals.
Key concept: Pipettes fail unpredictably and often silently. Research shows approximately 90% of pipette failures are random rather than predictable wear-related. This means:
- A pipette can fail dramatically after 2 months of use
- Another pipette may work perfectly for 12 months
- You cannot predict individual failures without testing
Solution: Use statistical models to ensure that at your chosen calibration interval, a specified percentage of your pipettes remain in tolerance.
Step 1: Understand Your Pipette’s MTBF
MTBF (Mean Time Before Failure) is the average time until a pipette falls out of tolerance. It varies by:
- Pipette model and manufacturer
- Usage intensity (cycles per month)
- Handling conditions (proper storage vs. left on bench)
- Sample types (aqueous vs. corrosive liquids)
How to find MTBF:
- Check manufacturer documentation (Eppendorf publishes ~5,000 cycles/year typical)
- Track your own data: Record calibration results over time, note when pipettes first fail
- Consult your calibration service: They see patterns across many labs
Example MTBF estimates:
- Eppendorf P1000 (light use): ~18 months MTBF
- Gilson P20 (heavy use): ~12 months MTBF
- Electronic pipette: ~12-24 months MTBF (variable by model)
Step 2: Define Your Target Reliability Level
Reliability = the percentage of pipettes you want to be in tolerance at any given time.
Common targets:
- 95% reliability: Acceptable for most research labs (5% failure risk)
- 99% reliability: Required for regulated industries (1% failure risk)
- 99.5% reliability: High-stakes diagnostics or critical manufacturing
Decision framework:
- If 95 µL out of 100 pipettes failing would be acceptable → 95% reliability
- If missing even 1 failed pipette could compromise results → 99%+ reliability
Step 3: Calculate Optimal Interval Using the Formula
Once you know MTBF and target reliability, this formula approximates calibration interval:
Calibration Interval = MTBF × ln(100 ÷ (100 – Reliability Target))
Example calculation:
- MTBF: 18 months
- Target reliability: 95%
- Calculation: 18 × ln(100 ÷ 5) = 18 × ln(20) = 18 × 2.996 = ~5.4 months
Interpretation: To achieve 95% reliability with an 18-month MTBF, calibrate every 5-6 months.
Another example (higher reliability):
- MTBF: 18 months
- Target reliability: 99%
- Calculation: 18 × ln(100 ÷ 1) = 18 × 4.605 = ~8.3 months
Interpretation: For 99% reliability, calibrate every 8-9 months.
Using the Decision Framework: Build Your Lab’s Schedule
Rather than memorizing “6 months” or “12 months,” use this framework to justify your schedule:
| Usage Level | Typical MTBF | Target Reliability | Recommended Interval | Reason |
|---|---|---|---|---|
| Heavy Use (Daily, multiple shifts) | 9-12 months | 99% | 3-4 months | High failure risk; critical results |
| Standard Use (Several times/week) | 15-18 months | 95% | 5-7 months | Balanced cost & risk |
| Light Use (Weekly or less) | 18-24 months | 90% | 8-12 months | Low usage; acceptable risk |
| Regulatory/Diagnostic | 12-15 months | 99%+ | 2-3 months | Compliance mandatory |
Manufacturer Recommendations: Are They Profit-Driven?
Manufacturers typically recommend calibration every 6-12 months. This raises the question: Is this based on science or profit motive?
Evidence suggests it’s science-based:
- Eppendorf’s recommendation (6-12 months) aligns with published MTBF data
- Multiple independent labs report similar failure patterns
- Regulatory guidance (FDA, CLIA, ISO 17025) all specify 6-12 month ranges
- Shortening intervals further (e.g., 3 months) reflects increased risk tolerance, not profit
However: Manufacturers do earn revenue from calibration services, so they have some incentive to recommend more frequent calibration. A rational approach: Use their recommendation as a baseline, then adjust based on your usage and reliability calculations.
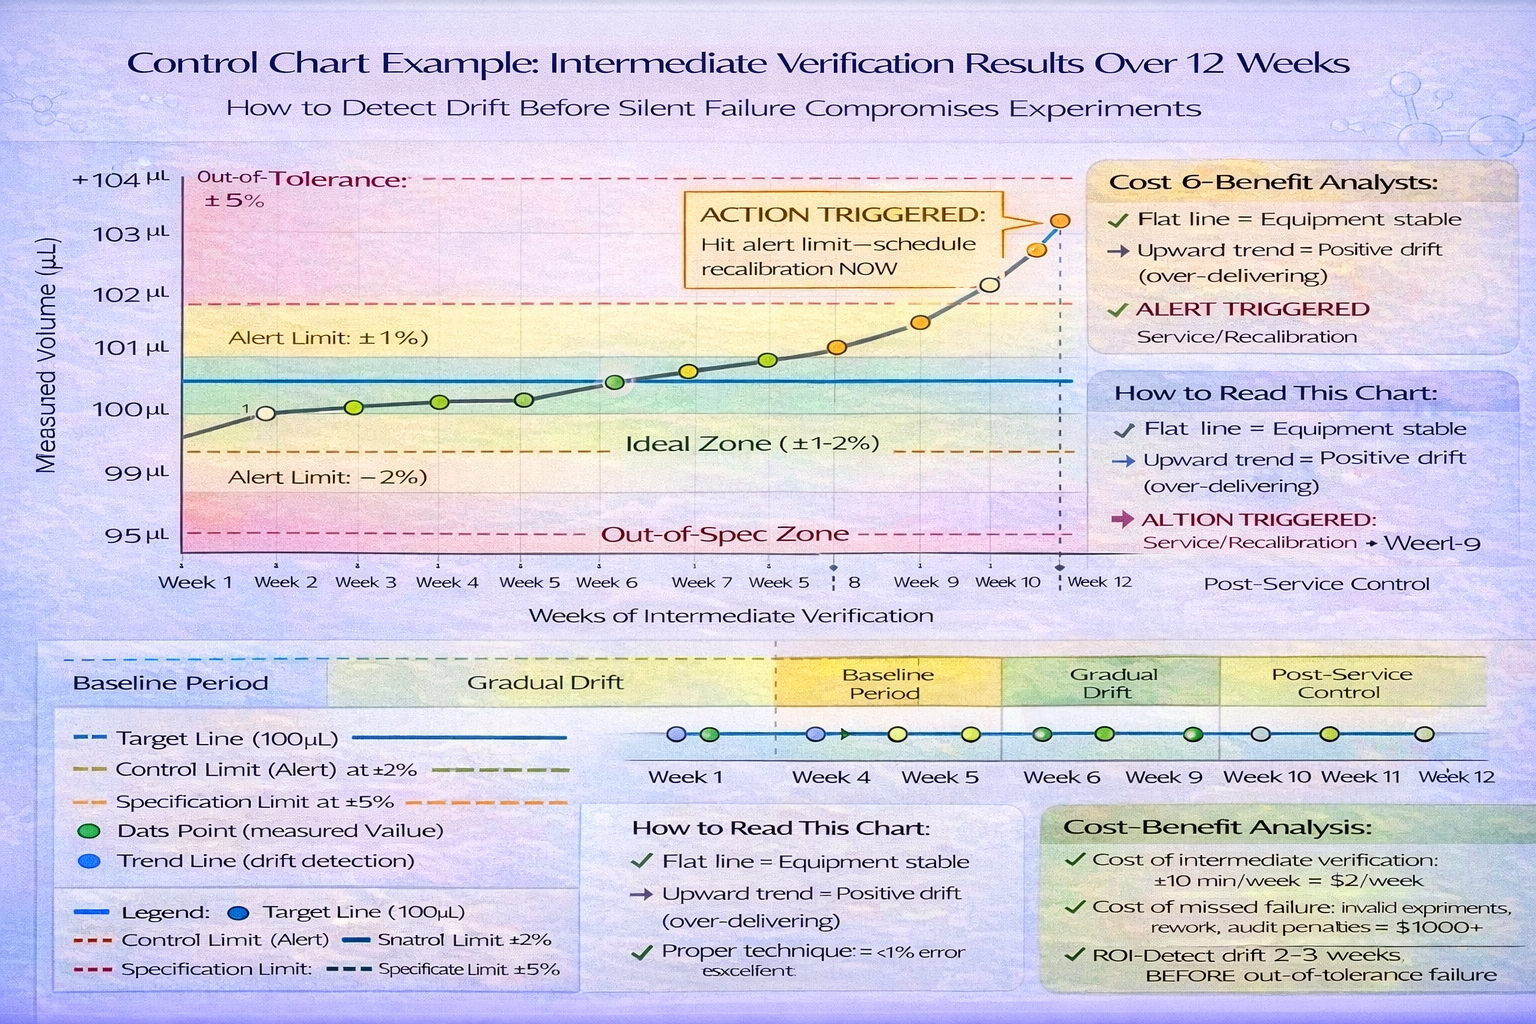
The Role of Intermediate Verification: Calibration Isn’t Binary
Full calibration (expensive, time-consuming) doesn’t need to be your only quality control tool. Intermediate verification-simple, in-house testing between calibrations-catches drift early.
How it works:
- Every week or month, perform 5-10 gravimetric measurements on each pipette
- Plot results on a control chart
- If results approach tolerance limits, send for recalibration before out-of-tolerance failure
- This allows you to extend full calibration intervals while maintaining reliability
Cost-benefit:
- Weekly verification takes ~10 minutes per pipette
- Allows 6-month full calibration intervals instead of 3-month
- Detects drift before silent failure compromises experiments
- Recommended by ISO 8655 and industry best practices
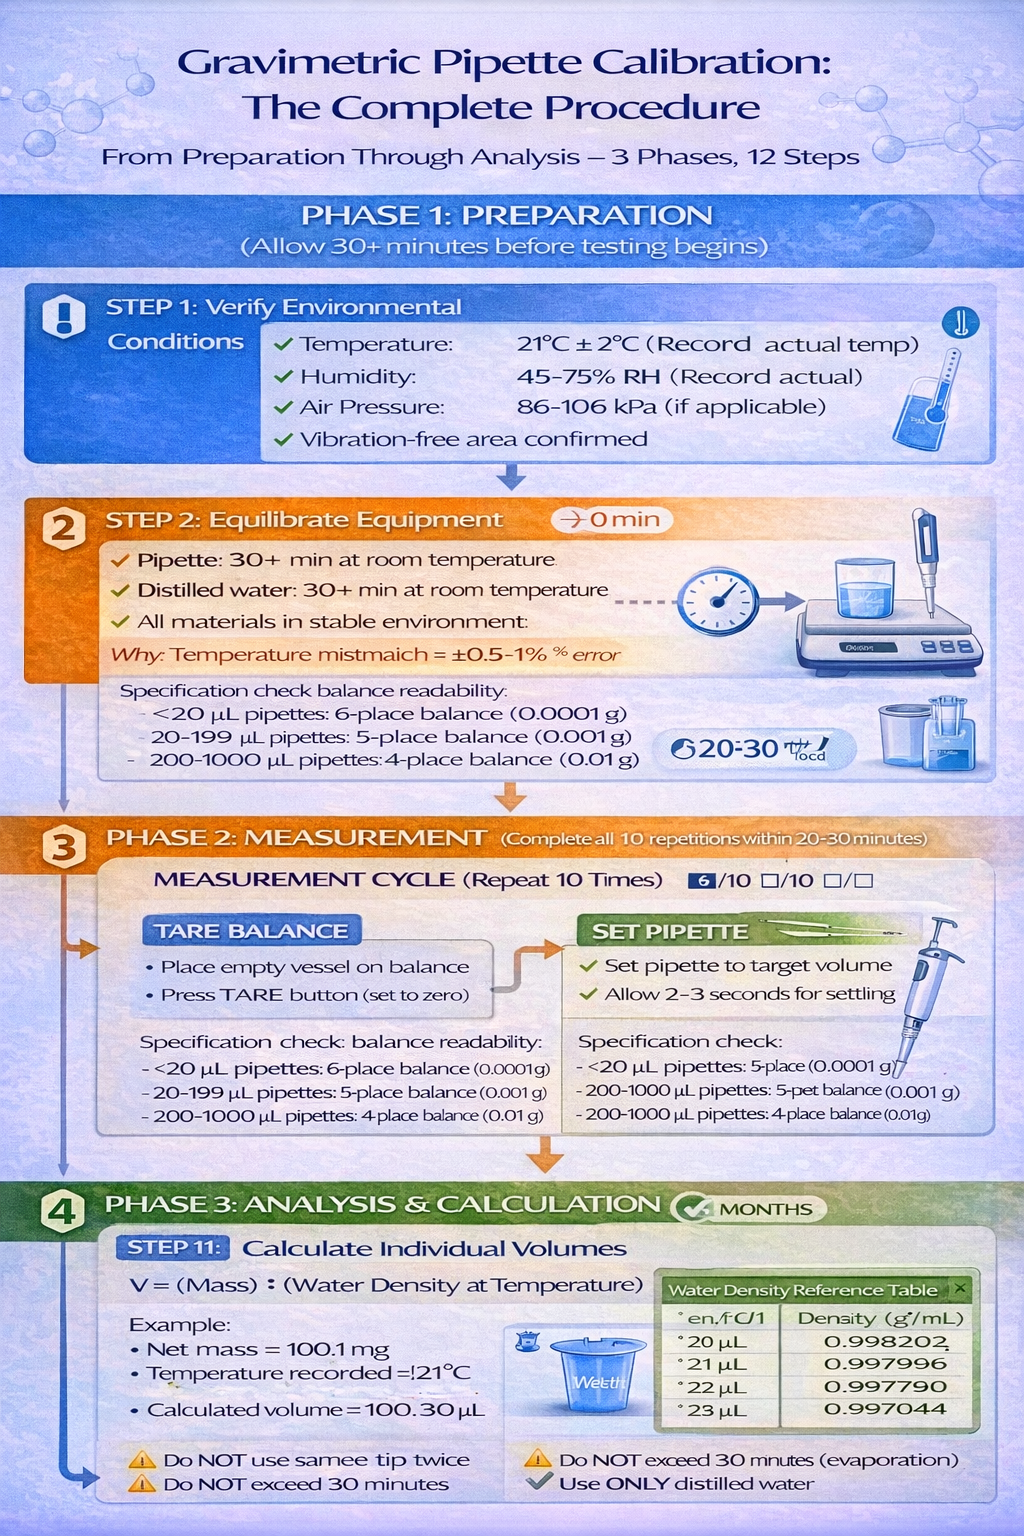
Part 4: Gravimetric Calibration Method-The Gold Standard
Gravimetric calibration-measuring the weight of dispensed liquid to calculate actual volume-is the reference standard for pipette testing. Understanding this method is essential whether you perform calibration in-house or evaluate results from a service provider.
Why Gravimetric? The Physics Behind the Method
Gravimetric calibration is based on a simple principle: Volume = Mass ÷ Density
This is the most direct and reliable way to measure pipette accuracy because:
- Mass is easier to measure precisely than volume: An analytical balance can measure to 0.0001 g; volumetric glassware cannot measure small volumes this precisely
- No assumption of pipette geometry: Rather than assuming a pipette works “as designed,” you measure what it actually delivers
- Traceability to SI units: Mass can be traced to NIST-certified standard weights, creating an unbroken chain to international standards
- Reproducibility: The method is standardized globally in ISO 8655-6, allowing comparison of results between labs
The calculation:
- Pipette a known volume (e.g., 100 µL) of distilled water into a weighed vessel
- Measure the vessel’s new weight with an analytical balance
- Subtract the tare weight to get dispensed mass
- Multiply by water density at measured temperature to get volume
- Compare actual volume to intended volume
Sources of uncertainty in gravimetric calibration:
- Balance precision (largest contributor for micro-volumes)
- Water density (depends on temperature; requires correction tables)
- Evaporation (especially in dry environments)
- Measurement technique (operator consistency in pipetting procedure)
- Environmental conditions (temperature, humidity, pressure fluctuations)
Equipment & Materials Required
To perform gravimetric calibration per ISO 8655, you need:
1. Analytical Balance (Most Critical Component)
- Readability specifications:
- <20 µL pipettes: 6-place balance (0.0001 g / 0.1 mg readability)
- 20-199 µL pipettes: 5-place balance (0.001 g / 1 mg readability)
- 200-1000 µL pipettes: 4-place balance (0.01 g / 10 mg readability)
- Repeatability: Must be ≤ 0.1 × (repeatability of pipette being tested)
- Calibration: The balance itself must be calibrated annually or semi-annually with NIST-traceable weights
- Stability: Located in a vibration-free area, away from air currents or direct sunlight
2. Distilled or Deionized Water
- Purity: Must be free of dissolved minerals that would affect density
- Storage: Store in sealed, clean vessels to prevent contamination
- Temperature: Must be at room temperature before use; temperature-dependent density requires accurate measurement
3. Weighing Vessels
- Small glass or plastic containers (10-20 mL capacity typical)
- Pre-weighed and noted (tare weight)
- Acid-washed or purchased pre-cleaned to remove contaminants that could affect surface tension
4. Calibrated Thermometer
- Measures water temperature for density correction
- Accuracy ±0.1°C recommended
- Essential because water density changes ~0.0003 g/mL per °C
5. Optional but Recommended Equipment
- Hygrometer: Monitors humidity to assess evaporation risk
- Barometer: Tracks air pressure; affects air-displacement pipette performance
- Anti-vibration benchtop: Isolates balance from ambient vibration
- Controlled-temperature cabinet: Maintains 21°C ± 2°C during testing
Step-by-Step Calibration Procedure
Phase 1: Preparation (30+ minutes before testing)
1. Environmental verification
- Record temperature (target 21°C ± 2°C; acceptable 18-22°C)
- Record humidity (target 45-75%)
- Record air pressure if applicable
- Adjust laboratory conditions if significantly outside target range
2. Equipment equilibration
- Allow pipette and distilled water to reach ambient temperature
- This typically requires 30+ minutes in a stable environment
- Temperature mismatch between pipette and water introduces errors
3. Balance verification
- Perform balance calibration using internal or external calibration standard
- Verify repeatability (test weight should show <0.1 mg variation across 5 weighings)
- Allow 15 minutes for balance stabilization after power-on
4. Pipette pre-wetting
- Aspirate and dispense distilled water 3-5 times before calibration
- This saturates internal surfaces and eliminates air pockets
- Important: Dispense each pre-wet into waste, not into measurement vessels
Phase 2: Measurement (10 repetitions minimum, per ISO 8655)
For each repetition:
1. Tare the balance
- Place empty, pre-weighed vessel on balance
- Press tare button to set zero
- Record tare weight if not previously documented
2. Set pipette to target volume
- Example: 100 µL
- Allow 2-3 seconds for mechanical settling
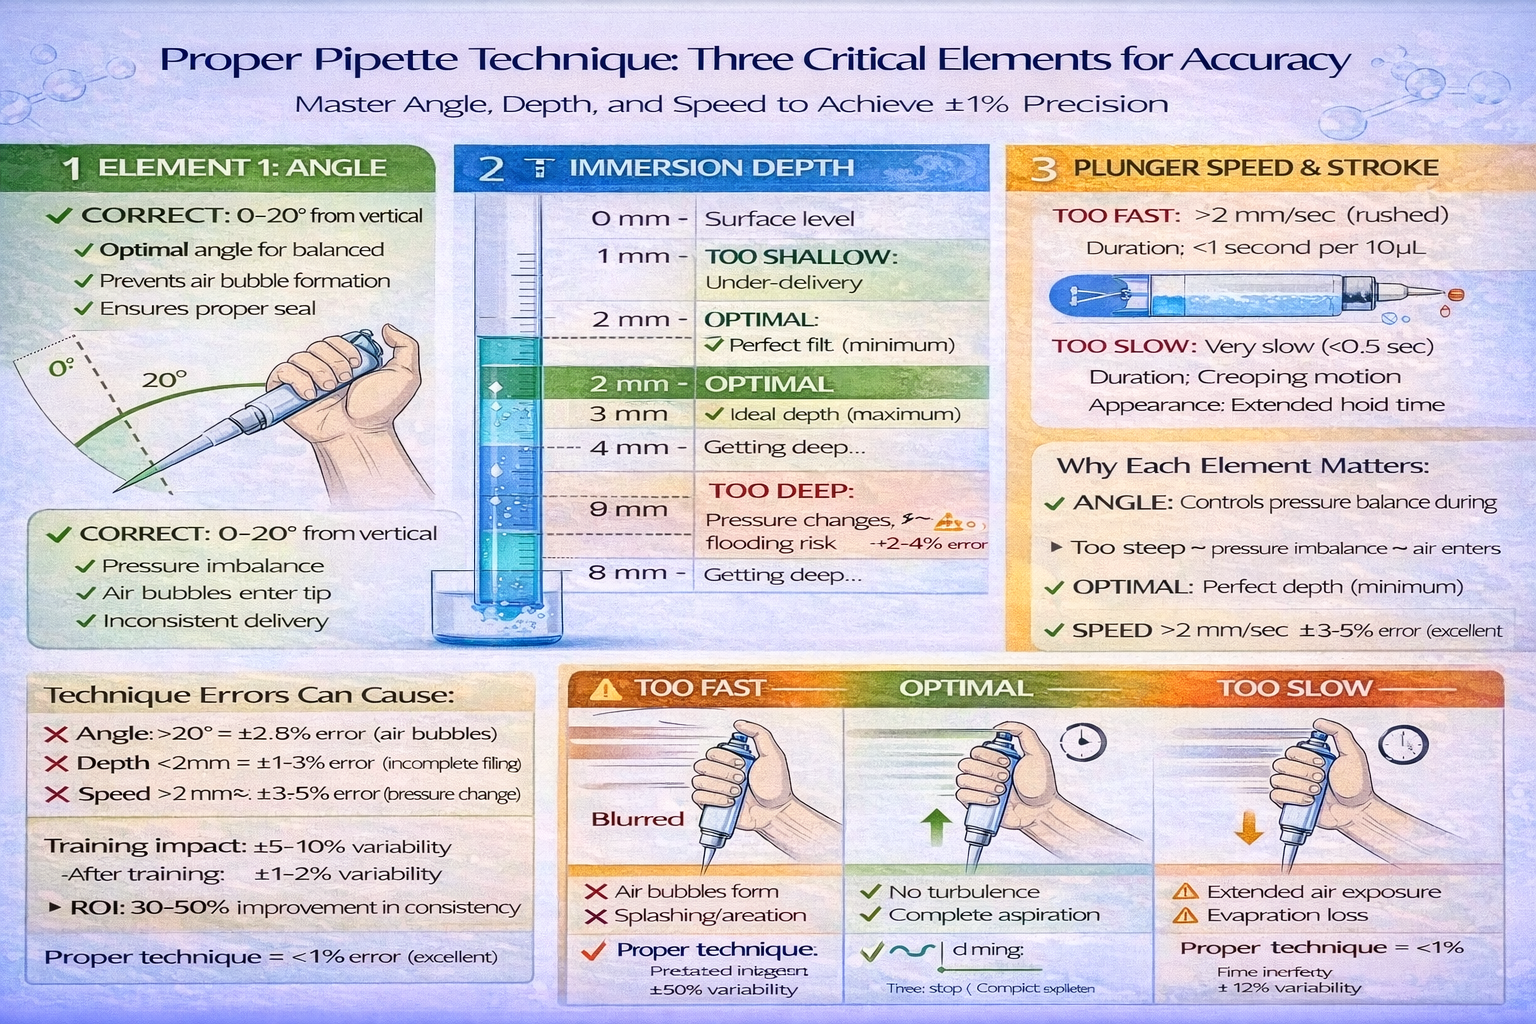
3. Aspirate distilled water
- Immerse tip 2-3 mm into water vessel
- Press plunger smoothly to first stop (aspiration position)
- Hold for 1 second
- Withdraw tip vertically at ~20 mm/second
Critical technique points:
- Angle: 0-20° from vertical (too steep causes air bubble entry)
- Plunger speed: Consistent, moderate speed (0.5-1 second per full stroke)
- Tip immersion: Precisely 2-3 mm (too deep causes pressure changes; too shallow misses liquid)
4. Dispense into vessel
- Place vessel on balance
- Press plunger smoothly to first stop
- Hold for 2 seconds to allow liquid to flow completely
- Press plunger to second stop to expel remaining liquid in tip
- Remove tip carefully
5. Record weight
- Wait for balance reading to stabilize (~2-3 seconds)
- Note the weight to 0.0001 g precision
- Record in calibration worksheet with time, temperature, any notes
6. Repeat steps 1-5 for minimum 10 repetitions
- Use fresh tip for each measurement (per ISO 8655)
- Complete all 10 repetitions within 20-30 minutes to minimize evaporation effects
Phase 3: Analysis & Calculation
1. Calculate individual volumes
- For each measurement, use: V = (Net Mass) ÷ (Water Density at Temperature)
- Water density table (examples):
- 20°C: 0.998203 g/mL
- 21°C: 0.997996 g/mL
- 22°C: 0.997790 g/mL
- 23°C: 0.997585 g/mL
- 25°C: 0.997044 g/mL
- Example: If net mass = 100.1 mg at 21°C, then V = 100.1 mg ÷ 0.997996 g/mL = 100.30 µL
2. Calculate statistics
- Mean volume: Average of 10 measurements
- Standard deviation: Measure of variability (precision)
- Coefficient of variation (CV%): (Std Dev ÷ Mean) × 100
- Systematic error: Mean volume minus intended volume
- Systematic error %: (Systematic Error ÷ Intended Volume) × 100
3. Compare to acceptance criteria
- Systematic error: Must not exceed ISO 8655 limits (see table in Part 2)
- Example for P100 at 100 µL: Must be within ±2-3% (±2-3 µL)
- CV%: Typically must be <2% for all pipettes
- If either test fails, pipette requires service/recalibration
4. Document results
- Complete calibration certificate including:
- Pipette serial number, model, volume tested
- Individual measurement results
- Environmental conditions (temperature, humidity, pressure)
- Calculated mean, SD, CV, systematic error
- Pass/fail determination
- Measurement uncertainty statement
- Calibrator name and signature
- Expiration date (typically 6-12 months)
- Traceability statement (reference to NIST or equivalent)
Common Gravimetric Errors & How to Avoid Them
| Error Type | Cause | Detection | Prevention |
|---|---|---|---|
| High variability (SD >3) | Inconsistent plunger pressure, variable aspiration depth | CV% exceeds 2% | Standardize technique; use pipette holder/stand |
| Systematic low bias | Pipette under-delivers (worn seal, low calibration) | Mean significantly <intended | Inspect seals; perform full maintenance |
| Systematic high bias | Pipette over-delivers (rare; suggests improper technique) | Mean significantly >intended | Observe operator technique; retrain if needed |
| Balance drift | Temperature fluctuation or internal balance error | Results shift over 10 measurements | Allow balance 20-min warm-up; verify calibration |
| Evaporation loss | Test duration too long, dry environment | Later measurements weigh less | Complete testing in <30 min; increase humidity |
| Water contamination | Minerals or particulates in distilled water | Results inconsistent for apparently identical pipettes | Use fresh, sealed distilled water bottles |
| Temperature error | Water or pipette at wrong temperature | Systematic bias in all measurements | Allow 30+ min equilibration; verify thermometer |
Testing at Multiple Volumes: The 2022 ISO 8655 Requirement
Per ISO 8655-2022, you must test at three volumes: 10%, 50%, and 100% of nominal.
Why this matters: Pipettes perform differently at different volumes. Testing at only 100% might pass, while the pipette fails at 10%.
Example for P1000 (1000 µL nominal):
| Test Point | Volume | Typical Results | Issue Detected |
|---|---|---|---|
| 10% | 100 µL | Mean 102 µL, CV 3.2% | Precision poor at low volume; air cushion problem |
| 50% | 500 µL | Mean 499 µL, CV 1.1% | Good performance at mid-range |
| 100% | 1000 µL | Mean 998 µL, CV 0.9% | Excellent at maximum volume |
In this example, the pipette would fail at the 10% point (CV 3.2% exceeds the 2% limit) but pass at 50% and 100%. Failure at any point = overall failure.
Post-Calibration: Adjustment vs. Service
If your pipette passes calibration: Certification is valid for 6-12 months. No service needed.
If your pipette fails:
- Adjustable pipettes (some mechanical models): May be adjusted by calibration service without full rebuild
- Digital pipettes: Cannot be field-adjusted; require factory service or full replacement
- Severely worn pipettes: Replacement is often more cost-effective than service
Calibration service providers typically distinguish:
- Calibration only: Testing without any repair (~$50-75 per unit)
- Calibration + adjustment: Tuning for pipettes that are close but out of spec (~$75-125)
- Calibration + full maintenance: Includes seal/spring/piston replacement (~$125-200)
- Replacement: Beyond economical repair (~cost of new pipette)
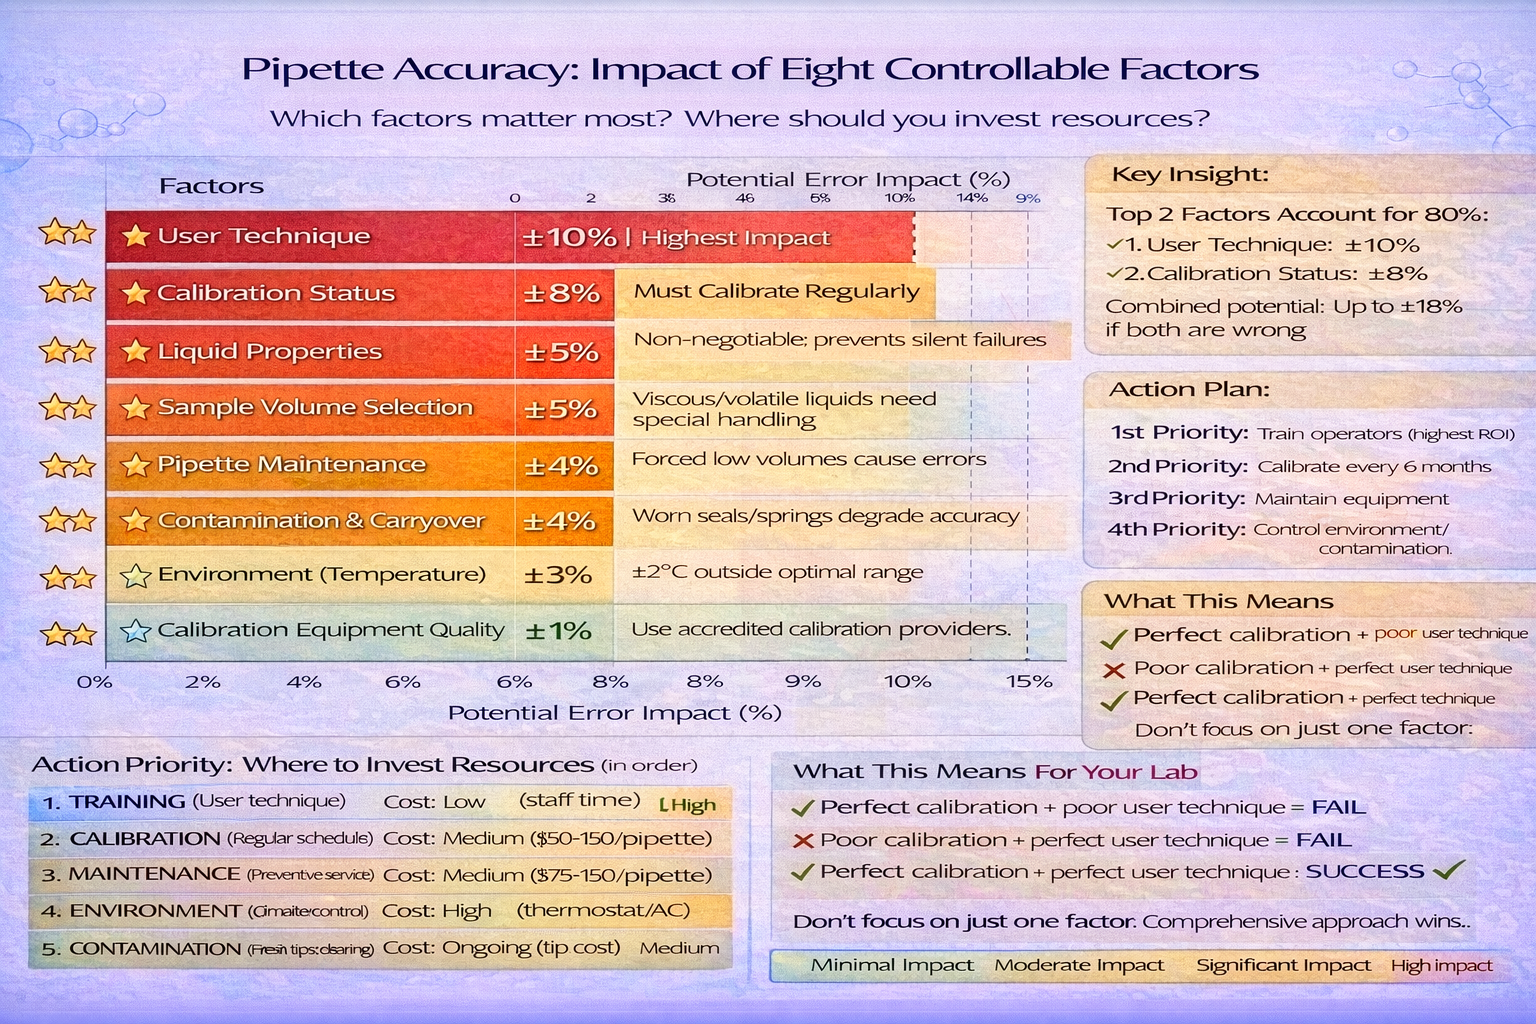
Part 5: Eight Factors Affecting Pipette Accuracy & Precision
Calibration is essential, but it’s not the only factor determining pipette performance. Eight interconnected factors influence whether your pipettes deliver accurate, precise results in daily use.
Factor 1: User Technique (Highest Impact)
Why it matters most: User technique is completely within your control yet accounts for ±2-10% of accuracy variation. Poor technique can negate an excellent calibration.
Critical technique elements:
A. Plunger Pressure & Consistency
- Proper technique: Smooth, steady pressure at 0.5-1 second per 10 µL
- Error if too fast: Air bubbles form during aspiration; under-delivery results
- Error if too slow: Evaporation during extended aspiration; volume loss
- Error if variable: Inconsistent stroke pressure = variable delivery = low precision
Improvement: Use pipette holders/stands to remove hand-holding variability. Train staff to use metronomes or count “one-one-thousand, two-one-thousand” for consistency.
B. Pipetting Angle
- Optimal: 0-20° from vertical
- Error if >20°: Pressure imbalance allows air bubble entry; incomplete aspiration
- Error if horizontal: Liquid may partially enter tip without proper seal
Improvement: Mark a 20° angle on pipette stands. Use holders that restrict angle to proper range. Demonstrate proper angle during training.
C. Tip Immersion Depth
- Optimal: 2-3 mm below liquid surface
- Error if too deep: Pressure changes; possible tip flooding; contamination risk
- Error if too shallow: Air aspiration; incomplete filling
Improvement: Practice with measuring cup filled with water. Mark the “2-3 mm” depth on practice tips. Verify staff can identify correct depth.
D. Aspiration & Dispensing Speed
- Optimal: Manufacturer-recommended speeds (typically 1-2 seconds per 10 µL)
- Error if too fast: Splashing; air bubble formation; incomplete mixing
- Error if too slow: Evaporation; time cost
Improvement: Use variable-speed electronic pipettes if possible. For manual pipettes, use metronome apps or audible reminders.
E. Plunger Release Speed (for dispensing)
- Optimal: Gradual, controlled release
- Error if abrupt: Liquid ejection; droplet formation on tip
- Error if too slow: Extended contact time; carryover risk
Improvement: Practice “reverse pipetting” where you pre-load extra volume, dispense to mark, then return excess. This reduces pressure variation at dispensing point.
Estimated impact on accuracy: Poor technique = ±5-10% error. Training reduces this to ±1-2%.
Factor 2: Pipette Maintenance & Component Wear
Why it matters: Mechanical wear silently degrades accuracy. A pipette can be out of tolerance without any obvious external signs.
A. O-Rings & Seals
- Function: Create pressure-tight fit between piston and barrel
- Wear mechanism: Repeated friction, desiccation (especially in dry environments)
- Failure signs: Air leaks during aspiration; pressure loss; inconsistent delivery
- Service life: Typically 6-12 months with heavy use; 12-24 months with light use
- Inspection: Visual check for cracks, discoloration, or flattening
- Replacement: Part of scheduled maintenance; typically $20-40 per unit at service center
B. Piston Mechanism
- Function: Smooth reciprocal motion with minimal friction
- Wear mechanism: Microscopic scratching from repeated 50,000+ cycles/year
- Failure signs: Gritty feeling during plunger operation; resistance increases; inconsistent return
- Severity: Initially slight friction; eventually binding or sticking
- Maintenance: Lubrication with manufacturer-specified oils only (Eppendorf specifies silicone oil; use of wrong lubricant damages seals)
- Replacement: 12-18 months typical, depending on use
C. Spring Fatigue
- Function: Returns plunger to home position
- Wear mechanism: Metal fatigue from millions of compression cycles
- Failure signs: Slower return action; incomplete spring return; inconsistent reset
- Impact: Affects precision more than accuracy initially
- Replacement: Usually part of major 12-month service
D. Tip Ejector Mechanism
- Function: Ejects used tip reliably
- Wear mechanism: Mechanical friction; spring fatigue
- Failure signs: Tips don’t eject cleanly; partial ejection requiring manual removal
- Impact: Operational more than measurement, but carryover contamination possible if tips stick
- Maintenance: Regular cleaning with lint-free cloth; replacement rare unless severely damaged
Maintenance schedule:
- 3-month service: Lubrication, visual inspection
- 6-month service: Seal inspection/replacement, full cleaning
- 12-month full service: Piston assembly replacement, seal replacement, full rebuild if needed
Cost of prevention: $50-150 per unit for scheduled maintenance = much less than replacement cost of $400-1,500.
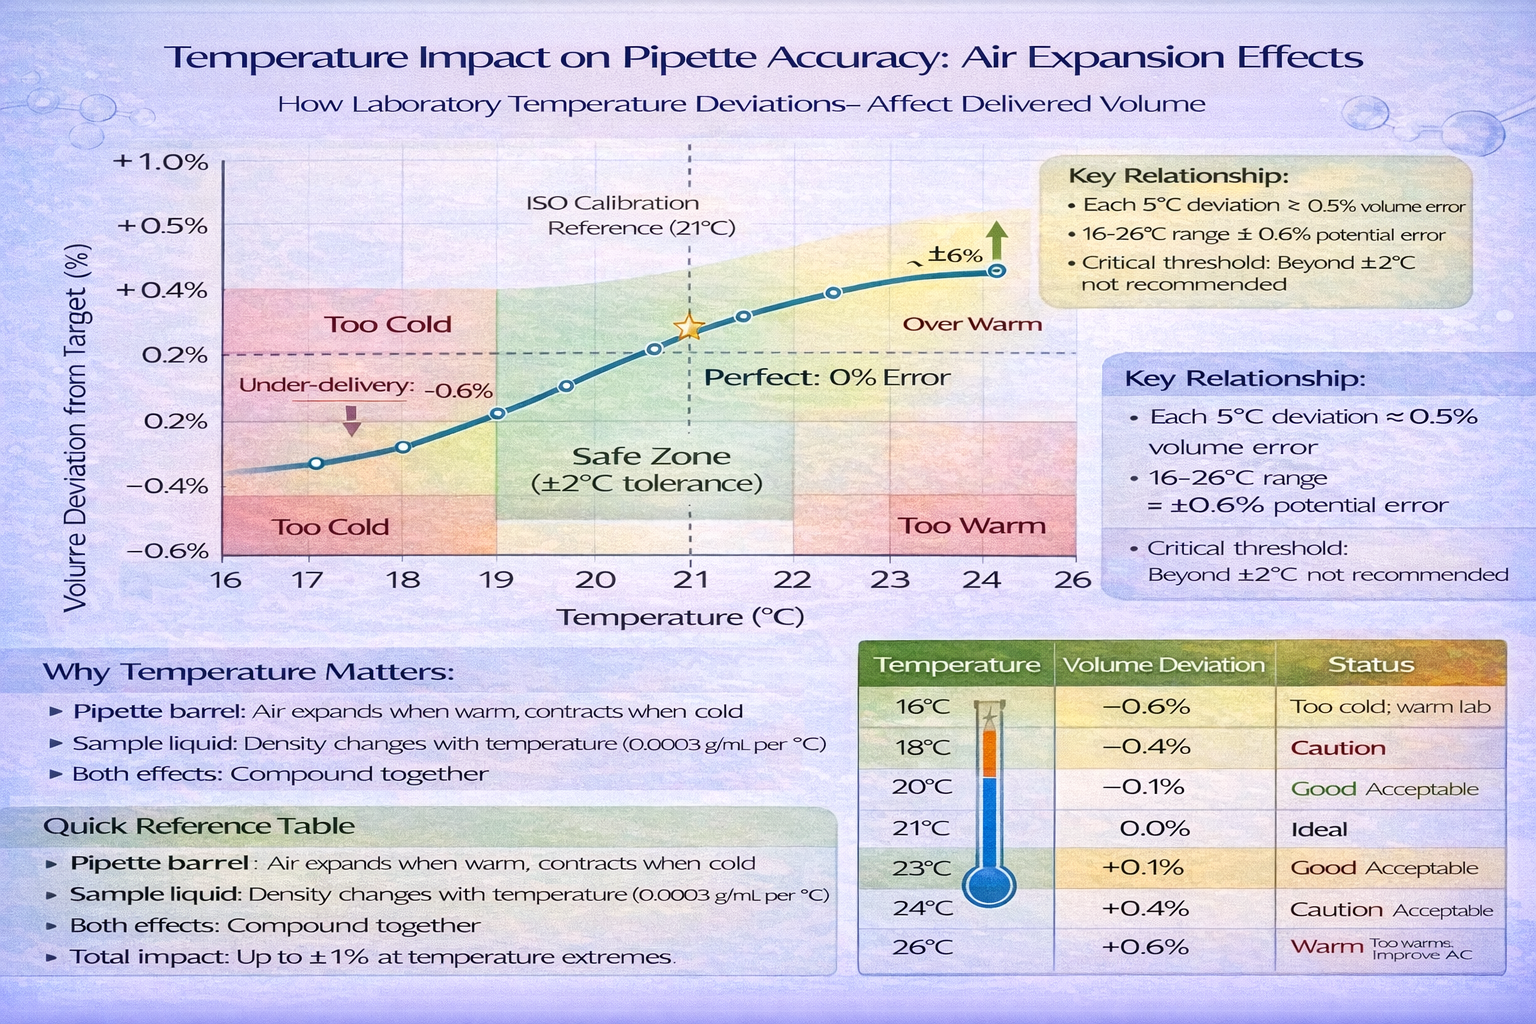
Factor 3: Environmental Conditions
Why it matters: Pipettes are calibrated at 20-21°C with 45-75% humidity. Deviations from these conditions cause systematic errors.
A. Temperature Effects
- Calibration reference: 20°C ± 2°C (acceptable range 18-22°C)
- Effect of deviation: Each 5°C above 21°C causes ~0.5% volume increase (air expansion in pipette barrel)
- Sources of temperature change:
- Lab ambient temperature (uncontrolled HVAC)
- Operator hand temperature (warming pipette barrel during use)
- Sample temperature different from ambient
- Quantified impact:
- At 25°C (4°C above calibration): ~0.4-0.5% positive error
- At 17°C (4°C below calibration): ~0.4-0.5% negative error
- For critical work, ±2°C deviation acceptable; beyond that, introduce unacceptable error
Mitigation strategies:
- Maintain lab temperature at 21°C ± 2°C with smart thermostats
- Pre-equilibrate samples to room temperature before pipetting
- Limit hand contact with pipette barrel
- Use insulating sleeves for extended pipetting sessions
- Store pipettes in temperature-controlled cabinets
B. Humidity Effects
- Optimal range: 45-75% RH
- Below 45%: Increased evaporation during calibration testing; seals dry out faster
- Above 75%: Condensation on balance pan affects weighing; slower evaporation during testing
- Seasonal variation: Winter (dry) vs. summer (humid) may require procedure adjustments
Mitigation:
- Use humidifier/dehumidifier to maintain optimal range
- More frequent verification in extreme climates
- Document humidity on calibration certificates; allows uncertainty adjustment
C. Air Pressure Effects
- Affects: Air-displacement pipettes primarily
- Range: 86-106 kPa (normal atmospheric variation)
- Effect: High altitude or low pressure days reduce air density; slight impact on air cushion
- Rare problem: Unless lab is at high altitude (>5,000 ft) or experiences extreme pressure fluctuations
Mitigation:
- High-altitude labs: Recalibrate after relocation
- For most labs: Not a significant factor
Factor 4: Liquid Properties
Why it matters: Pipettes are calibrated for water (at 20-21°C). Different liquids behave differently.
A. Viscosity
- Effect: Viscous liquids (glycerin, oils, syrups) flow slower through pipette
- Symptom: At-temperature aspiration may be incomplete if standard timing used
- Correction: Slow down aspiration/dispensing speeds by 2-3x
- Impact: Without adjustment, ±3-8% error possible
- Example: Pipetting glycerin with water-speed settings results in under-delivery
B. Surface Tension & Tip Adherence
- Effect: Some liquids (organic solvents) have different surface tension than water
- Symptoms: Droplets cling to tip exterior; liquid doesn’t fall freely from tip
- Correction: Use reverse pipetting (pre-load extra, dispense to mark, return excess); reduces carryover error
- Impact: ±1-4% error if not addressed
C. Volatility & Evaporation
- Problem liquids: Ethanol, acetone, methanol (high volatility)
- Effect: Rapid evaporation during aspiration/dispensing; volume loss
- Symptom: Consistent under-delivery; especially apparent with extended hold times
- Correction:
- Work quickly (minimize air exposure time)
- Use closed vessels where possible
- Reduce aspiration time by using faster speeds (for volatile, less-viscous liquids)
- Impact: ±2-5% error with volatile liquids
D. Temperature of Liquid
- Effect: Cold liquid in warm pipette (or vice versa) causes air expansion/contraction
- Example: Pipetting 4°C PBS with room-temperature pipette = ~0.5-1% error
- Correction: Pre-warm or pre-cool samples to room temperature
- Impact: ±0.5-2% error depending on temperature difference
Practical guidance: Establish standard protocols for each liquid type:
- Water-based aqueous: Standard protocol
- Viscous (glycerin, oils): 50% slower speeds
- Volatile (organics): Reverse pipetting, quick execution
- Cold samples: 30-min equilibration before use
Factor 5: Contamination & Carryover
Why it matters: Invisible contamination silently affects accuracy and introduces cross-contamination between samples.
A. Tip Cleanliness
- Internal contamination: Dried residue inside tip after previous use (if tip reused)
- Effect: Alters liquid surface tension; affects aspiration/dispensing behavior
- Solution: Use fresh tip for each measurement (ISO 8655 requirement for calibration)
- In practice: For clinical/diagnostic work, fresh tips essential; research labs may accept one-tip-per-sample compromise
B. Pipette Head Contamination
- Problem: Dried residue on tip-seating surface accumulates over weeks/months
- Effect: Prevents proper tip seal; allows air leakage
- Solution: Clean pipette head with appropriate solvent (typically 70% ethanol) weekly
- Prevention: Dry pipettes after cleaning; ensure no liquid dries inside tip mount
C. Static Electricity
- Problem: Accumulation of static charge in dry environments; liquid clings to tip
- Effect: ±1-3% carryover error; especially problematic with viscous or organic liquids
- Solution:
- Use anti-static pipette tips (conductivity built-in)
- Wear anti-static wrist strap when handling
- Increase humidity to 50-60% (reduces static buildup)
Impact of contamination: ±1-4% error; risk of cross-contamination across samples (diagnostic/clinical impact).
Factor 6: Sample Volume Selection
Why it matters: Pipettes have optimal performance ranges. Using them outside this range introduces errors.
A. Optimal Performance Range: 35-100% of Nominal Volume
- Why this range:
- Below 35%: Air cushion becomes excessive; air compressibility affects accuracy
- Between 35-100%: Air cushion stable; piston mechanics optimal
- Above 100%: Impossible (design limit)
Example for P1000 (1000 µL):
- Optimal range: 350-1000 µL
- Acceptable range: 200-1000 µL (if necessary)
- Avoid: <200 µL if possible (would use P200 pipette instead)
- For 100 µL samples: Use P100 pipette (not P1000)
B. Consequence of Wrong Range
- Forced low-volume (e.g., 100 µL with P1000): ±5-10% error; precision poor
- Forced high-volume (e.g., 1.5 mL with P1000): Mechanical stress; inconsistency
- Solution: Use appropriately-sized pipette for sample volume
C. Matching Pipette to Sample Volume
- 1-10 µL: P10 micropipette
- 10-100 µL: P100 micropipette
- 100-1000 µL: P1000 micropipette
- 1000+ µL: Bulk dispensers or P2000-P5000 if available
Impact: Using wrong pipette size = ±5-10% error; easily avoidable with proper equipment selection.
Factor 7: Calibration Status & Drift Detection
Why it matters: Pipettes drift silently over time. Without verification, you won’t know when they’ve become unreliable.
A. Out-of-Tolerance Equipment
- Definition: Pipette no longer meets ISO 8655 or manufacturer specifications
- Silent nature: Equipment gives no warning; results appear normal
- Detection: Only through testing (calibration or intermediate verification)
- Consequence: Undetected, out-of-tolerance pipettes produce invalid results for weeks/months
B. Drift Patterns
- Random drift: Sudden failure (equipment breaks); rare but unpredictable
- Gradual drift: Slow component wear over 3-6 months; detectable with control charts
- Systematic drift: After maintenance, pipette drifts in same direction until next service
Example drift scenario:
- Month 1: Calibration passes (100.0 µL at 100% nominal)
- Month 2: Intermediate check shows 100.8 µL (slight positive drift)
- Month 3: Intermediate check shows 101.5 µL (increasing drift)
- Month 4: Full calibration confirms out-of-tolerance; recalibration ordered
- Result: 3 months of questionable data from undetected drift
C. Intermediate Verification: Your Safety Net
- Frequency: Weekly or monthly (depending on criticality)
- Procedure: 5-10 gravimetric measurements; same as full calibration but abbreviated
- Cost: ~10 minutes staff time per pipette
- Benefit: Early drift detection; allows proactive recalibration before failure
Implementation:
- Create control chart for each pipette
- Plot intermediate verification results
- Set alert at ±5% of tolerance limit
- Trigger recalibration if data approaches limits
- This prevents silent failures and optimizes calibration timing
Factor 8: Calibration Equipment Quality
Why it matters: The equipment used to verify pipette calibration must itself be accurate.
A. Balance Precision
- Requirement: Per ISO 8655, balance readability must match pipette size (see Part 4)
- Problem: Using a lower-precision balance (e.g., 4-place for <20 µL pipettes) introduces unacceptable uncertainty
- Solution: Ensure balance meets ISO 8655 requirements; use accredited service if you lack proper equipment
B. Balance Calibration
- Requirement: The balance itself must be calibrated annually or semi-annually with NIST-traceable weights
- Problem: A miscalibrated balance produces meaningless pipette calibrations
- Solution: Maintain balance calibration documentation; request balance certificate from calibration provider
C. Thermometer Accuracy
- Requirement: Thermometer accuracy ±0.1°C (for temperature-dependent density correction)
- Problem: Thermometer error directly translates to volume calculation error
- Solution: Use calibrated thermometers; verify against known reference if uncertain
Impact: Using uncalibrated or low-precision calibration equipment = invalid results (pipette appears OK when actually out of tolerance, or vice versa).
Part 6: Common Calibration Errors & Solutions
Even with best intentions, labs make systematic mistakes in pipette calibration. Understanding these errors helps you avoid them.
Error 1: Inconsistent User Technique
The problem: Different operators use the same pipette differently. One operator’s results pass; another’s fail. Or the same operator produces inconsistent results depending on fatigue level, haste, or distraction.
Root causes:
- Inadequate initial training
- No standardized operating procedure
- Staff fatigue during repetitive testing
- Lack of technique reinforcement
How to detect: Observe technician performing 10 measurements. If plunger speed, angle, or immersion depth varies visibly, technique is the issue.
Solution:
- Create detailed SOP: Document exact plunger speed (counts: “one-one-thousand, two-one-thousand”), angle (20° max), depth (2-3 mm), hold times
- Hands-on training: Demonstrate proper technique; have staff practice while being observed
- Video recording: Record staff performing calibration; review together to identify deviations
- Pipette holders: Remove hand-holding variability by using adjustable stands
- Daily spot-check: Before running full calibrations, verify technician technique with 5-measurement checkpoint
Prevention cost: Low (training time only)
Impact if ignored: ±3-10% error, variable results, failed audits
Error 2: Temperature-Induced Deviations
The problem: Lab temperature differs from calibration standard (21°C). Pipette expands or contracts; air density changes; results are systematically biased.
Root causes:
- Uncontrolled lab HVAC
- Summer/winter seasonal variation
- Warm building during winter heating
- Calibration performed at different temperature than use conditions
How to detect: Calibration results consistently biased in one direction; seasonal pattern (summer higher, winter lower).
Example scenario:
- Calibration performed at 21°C: Results accurate (100.0 µL)
- Lab typically runs at 24°C: User measurements consistently high (101.2 µL average)
- Root cause: 3°C difference = ~0.3% positive bias
Solutions:
- Install smart thermostat: Maintain 21°C ± 2°C year-round
- Pre-equilibrate samples: Bring samples to room temperature 30 minutes before use
- Recalibrate seasonally: If lab temperature varies >2°C between seasons, perform 2 calibrations/year at temperature extremes
- Document conditions: Record temperature on all calibration certificates; allows uncertainty adjustment
- Insulating sleeves: Minimize hand-warming of pipette barrel during extended use
Prevention cost: Medium (climate control investment)
Impact if ignored: ±0.5-3% systematic error; summer results consistently higher/lower than winter results
Error 3: Incompatible or Worn Pipette Tips
The problem: Wrong tip type, non-certified tips, or reused/contaminated tips prevent proper seating. Leakage results; under-delivery occurs.
Root causes:
- Cost-cutting by purchasing generic “compatible” tips
- Reusing tips across multiple measurements
- Tips contaminated from storage in dust/humidity
- Switching brands without verifying compatibility
- Storing tips improperly (uncovered, exposed to humidity)
How to detect:
- Calibration results show high variability (poor precision)
- Under-delivery bias (consistent negative error)
- Tips don’t seat smoothly; require wiggling or forcing
Key ISO 8655-2022 requirement: The tip type used during calibration must match the tip type used in daily work. If you calibrated with Brand-A tips but use Brand-B in practice, your equipment is technically “out of calibration.”
Solutions:
- Specify brand/model: Document exact tip type on all calibration certificates
- Use certified tips: Purchase only brand-approved tips (Eppendorf uses Eppendorf tips, Gilson uses Gilson tips, etc.)
- Fresh tips per measurement: ISO 8655 requires new tip for each gravimetric measurement
- Proper storage: Keep tips in sealed boxes at room temperature; protect from dust and humidity
- Quality check: Before large runs, verify tip fit with test pipette (should slide in smoothly without forcing)
Prevention cost: Medium (proper tip sourcing and storage)
Impact if ignored: ±2-5% error; loss of ISO 8655 compliance; invalid calibration certificates
Error 4: Worn or Damaged Pipette Components
The problem: Internal seals crack, springs lose tension, pistons wear. Equipment looks fine externally but fails internally.
Root causes:
- Postponing maintenance beyond recommended intervals
- Improper storage (vertical, exposed to heat/humidity)
- Exposure to corrosive chemicals (even brief contact damages seals)
- Lack of proper lubrication
- Impact damage (dropping pipettes)
How to detect:
- Calibration results show systematic error (consistently low or high)
- Plunger feels gritty, stiff, or slow-returning
- Liquid dribbles after dispensing (broken seal)
- Results degrade progressively (first slightly low, then more low)
Prevention approach: Predictive maintenance based on MTBF data
- Track historical calibration results
- Calculate mean time to failure for your pipette models
- Schedule maintenance before predicted failure point
- Prevents surprise failures mid-experiment
Solutions:
- Inspect at calibration: Check seals, spring tension, piston smoothness visually
- Lubrication schedule: Lubricate every 3-6 months per manufacturer specs (Eppendorf: silicone oil only)
- Preventive maintenance: Schedule 12-month full service (seal/spring/piston replacement) proactively
- Storage: Store horizontally with caps installed; prevents seal desiccation
- Usage tracking: Document hours/cycles on each pipette; predict maintenance needs
Prevention cost: Medium ($50-150 per unit annually for maintenance)
Impact if ignored: ±2-7% error; equipment failure; audit findings; cost of replacement ($400-1,500) exceeds preventive maintenance by 10x
Error 5: Improper Calibration Procedures
The problem: Deviations from ISO 8655 methodology produce meaningless results. Single measurements are treated as “calibration”; environmental conditions ignored; balance not properly zeroed between measurements.
Root causes:
- Inadequate training on ISO 8655 procedure
- Shortcuts taken to save time
- Lack of documented SOP
- Calibrator not certified in ISO 8655
How to detect:
- Auditor review finds non-compliant procedures
- Results difficult to reproduce across technicians
- Balance of measurements fail quality checks
- Incomplete documentation (no temperature recorded, no environmental conditions logged)
ISO 8655-2022 specific requirements:
- Minimum 10 repetitions per volume (not fewer)
- Testing at 3 volumes: 10%, 50%, 100% nominal
- Fresh tip for each measurement
- Temperature recorded within ±0.5°C accuracy
- Humidity 45-75%
- Complete uncertainty budget provided
Solutions:
- Certified training: Ensure calibration technician completes ISO 8655 course
- Written SOP: Document detailed procedure step-by-step; have management review/approve
- Checklist: Create pre-calibration and post-calibration checklists to ensure compliance
- Documentation template: Use standardized form capturing all required data (temperature, humidity, balance ID, technician name, timestamp, etc.)
- Second-person review: Have supervisor review calibration results before signing off
Prevention cost: Low (training and procedure documentation)
Impact if ignored: Invalid calibrations; audit failure; non-compliance with ISO 17025; loss of accreditation
Error 6: Evaporation & Measurement Uncertainty
The problem: Extended calibration tests allow water to evaporate. Later measurements weigh less; volume calculations underestimate; calibration appears to show under-delivery.
Root causes:
- Calibration takes >30 minutes (technician works slowly)
- Dry environment (humidity <45%)
- Uncovered measurement vessels
- Testing in warm room
How to detect: Results show trend of decreasing mass across 10 repetitions; later measurements are progressively lower.
Example:
- Measurements 1-3: ~100.2 mg (accurate)
- Measurements 4-6: ~100.0 mg (slight evaporation)
- Measurements 7-10: ~99.8 mg (increased evaporation)
- Result: Calculated trend suggests pipette drifts low; actually it’s evaporation artifact
Solutions:
- Speed: Complete all 10 repetitions within 20-30 minutes (time is the largest factor)
- Cover vessels: Place lids on measurement vessels between measurements to minimize evaporation
- Humidity control: Increase to 50-60% RH; reduces evaporation rate
- Fresh water: Use water from sealed bottles immediately; don’t expose to air
- Evaporation correction: ISO 8655-7 allows weighing an uncovered vessel over the test period to measure evaporation; subtract from results if significant
Prevention cost: Low (procedural discipline)
Impact if ignored: ±1-3% systematic error; false under-delivery diagnosis; unnecessary pipette service
Error 7: Air Bubble Formation
The problem: Even microscopic air bubbles in the tip reduce liquid volume aspiration. Critically problematic for micro-volume pipettes where a single bubble is significant.
Root causes:
- Rapid plunger action (>20 mm/sec)
- Tip not fully submerged during aspiration
- Improper angle (>20° from vertical)
- Insufficient pre-wetting (internal air pockets)
How to detect:
- Calibration shows under-delivery (consistent negative bias)
- Visual inspection during test shows visible bubbles
- Problem occurs at small volumes; worse at 10% testing point
- Staff can see bubbles visually in tips before dispensing
Solutions:
- Pre-wetting: Aspirate/dispense 3-5 times with waste before calibration starts
- Slow plunger: Target 1-2 seconds per 10 µL (never faster than 2 mm/sec)
- Proper angle: Maintain 0-20° from vertical; enforce with pipette holders
- Submersion check: Verify tip is 2-3 mm underwater; never at surface
- Visual inspection: Before dispensing each measurement, visually inspect tip for bubbles; re-aspirate if bubbles present
Prevention cost: Low (technique emphasis)
Impact if ignored: ±2-5% under-delivery error; especially problematic for <100 µL pipettes; causes failed QC batches in pharmaceutical manufacturing
Error 8: Neglecting Intermediate Verification
The problem: Labs perform full calibration annually but never check pipettes between calibrations. Silent drift goes undetected for 6-12 months.
Root causes:
- Perceived time burden (but it’s only 10 minutes per pipette)
- Lack of awareness that pipettes drift unpredictably
- No control chart system established
- Cost perception (“we already pay for calibration service”)
How to detect: Historical data review shows out-of-tolerance failure discovered only at next formal calibration; results 6 months old may be invalid.
Real-world example:
- January: Calibration passes (100.0 µL)
- March-July: No verification; pipette drifts
- July: Experiment fails; investigator orders immediate calibration
- Result: Calibration shows 103.2 µL (out of tolerance)
- Consequences: 6 months of research data questioned; possible FDA audit if pharmaceutical
ISO 8655 expectation: Between formal calibrations (6-12 months), regular in-house verification should occur.
Solutions:
- Weekly/monthly schedule: Perform 5-10 gravimetric measurements on each pipette
- Control charts: Plot results over time; set alert limits at ±5% of tolerance
- Action plan: If approaching limits, schedule recalibration proactively (don’t wait for failure)
- Documentation: Keep verification log for each pipette (shows due diligence during audits)
- Staffing: Assign responsibility to specific technician; it’s “their” pipette’s quality
Prevention cost: Low-Medium (~10 min/week per pipette = manageable)
Impact if missed: High-undetected drift causes invalid results, audit failures, potential regulatory action
Part 7: Pipette Types & Their Unique Calibration Characteristics
Not all pipettes are created equal. Different designs have different calibration requirements, accuracy profiles, and maintenance needs.
Air-Displacement Pipettes: The Industry Standard
Design: Piston creates air cushion between piston and liquid; air compresses/expands with plunger movement.
Pros:
- Most common (90%+ of labs)
- Lowest cost ($300-800)
- Suitable for aqueous solutions
- Simple maintenance
- ISO 8655 Class A readily available
Cons:
- Poor for viscous, volatile, or foaming liquids
- Air cushion creates non-linear performance at very low volumes
- Sensitive to temperature (air expansion/contraction)
Calibration characteristics:
- Achieves ISO Class A accuracy (±1-3% error)
- Suitable for most applications except extreme sample properties
- Standard gravimetric calibration applies
Maintenance: Routine (seals, springs, piston lubrication)
Positive-Displacement Pipettes: Premium Solution
Design: Piston directly contacts liquid (no air gap); eliminates air compressibility variability.
Pros:
- Best accuracy for difficult liquids (±1-2% even with oils, organics)
- No air bubble formation
- Ideal for viscous, volatile, foaming solutions
- Better precision at very small volumes
Cons:
- 2-3x cost of air-displacement ($800-2,000+)
- Requires frequent cleaning (liquid contact with piston)
- More complex maintenance
- Not suitable for aqueous samples (no advantage; adds cost)
Calibration characteristics:
- Exceeds ISO Class A; achieves ±0.5-1% routinely
- Same gravimetric procedure as air-displacement
- Must be calibrated with the intended liquid type (if available); calibration with water may not represent organic performance
Maintenance: Regular cleaning required; piston/seal replacement more frequent
Electronic/Automated Pipettes
Design: Motorized piston; programmable aspiration/dispensing speeds; digital volume display.
Pros:
- Eliminates user technique variability
- Programmable speeds optimize for different liquid properties
- Reduced repetitive strain injury
- Software for complex protocols (serial dilutions, etc.)
Cons:
- High cost ($1,500-5,000+)
- Requires electronic recalibration (software + mechanical)
- Battery/charging requirements
- More complex troubleshooting
Calibration characteristics:
- Excellent accuracy if properly calibrated (±0.5-2%)
- Requires two-part calibration: mechanical (gravimetric, same as manual) + software (electronic offset)
- Some models have field-adjustable parameters; others require factory service
Maintenance: Electronic components; more frequent factory servicing recommended
Multichannel Pipettes: Parallel Workhorse
Design: 8, 12, or 16 independent channels operating simultaneously; used for high-throughput applications.
Pros:
- 12-16x faster than single-channel for plate operations
- Suitable for parallel sample processing
- Both air and positive-displacement versions available
Cons:
- Channel-to-channel variability (all channels rarely perfectly matched)
- More complex calibration (all channels tested in parallel)
- Higher cost ($2,000-5,000+)
- ISO 8655-2022 error limits more stringent (stricter than single-channel)
Calibration characteristics:
- ISO 8655-6:2022 requires testing all channels simultaneously
- Typically uses specialized multichannel analytical balances
- Each channel measured individually; all must pass separately
- Failure of even one channel = equipment failure
Testing procedure:
- Dispense from all 12 channels into 12 separate containers (simultaneously)
- Weigh all 12 containers on multichannel balance (parallel weighing modules)
- Analyze each channel independently
- All channels must meet specifications; cannot “average out”
Maintenance: Higher; more seal points and springs means more wear
Part 8: Pipette vs. Burette vs. Graduated Cylinder-Complete Comparison
Scientists often have access to multiple liquid measuring devices. Understanding when each is appropriate prevents choosing the wrong tool for the application.
Comparison Table: Accuracy & Precision
| Device | Volume Range | Accuracy | Precision | Best Use | Training Required |
|---|---|---|---|---|---|
| Volumetric Pipette | 1-1000 µL | ±0.5-2% | <1% CV | Precise transfers, standard prep | Yes (technique) |
| Micropipette (air-disp) | 1-1000 µL | ±1-3% | <1% CV | Research, QC, diagnostics | Yes (critical) |
| Graduated Pipette | 0.1-25 mL | ±2-5% | 1-3% CV | Less critical work, rough estimates | Minimal |
| Burette (Class A) | 0.1-50 mL | ±0.03-0.05 mL | <0.5% CV | Titrations, dropwise delivery | Yes (titration technique) |
| Graduated Cylinder | 10-2000 mL | ±2-5% (relative) | 2-5% CV | Rough volume estimates, non-critical | None |
Head-to-Head Comparison
Pipette vs. Graduated Cylinder (Most Common Comparison)
A frequent lab question: “Can I just use a graduated cylinder instead of a micropipette?”
Answer: Only if your application tolerates ±5% error.
Why pipettes win:
- Accuracy: ±1-2% vs. ±2-5% (3-5x better)
- Precision: CV <1% vs. 2-5% (higher repeatability)
- Meniscus clarity: Small (1 mL) vs. large (10 mL); easier to read accurately
- Reproducibility: Calibrated system vs. generic glassware
Cost trade-off: Pipettes $300-2,000 vs. graduated cylinders $10-50. For critical work, the accuracy justifies cost.
When graduated cylinders are acceptable:
- Solvent for non-critical washing steps
- Large-volume stock solution prep (1-2 L)
- In-field sample collection (field kits)
- Teaching demonstrations (showing general principle)
When pipettes are required:
- Any work where results affect conclusions
- Quality control or regulatory work
- Clinical diagnostics
- Research publications
- Pharmaceutical manufacturing
Pipette vs. Burette (For Small Volume Work)
Both can measure small volumes precisely. Which to use?
Pipettes excel at: Fixed-volume transfer (prepare standard solutions)
Burettes excel at: Variable, dropwise dispensing (titrations)
Example scenario: “I need to add 25 mL HCl solution to a flask.”
- Use pipette: Load exactly 25 mL in pipette; dispense completely into flask
- Use burette: Start at 0 mL; dispense until 25 mL mark; can stop mid-dispense at any volume
Pipette vs. Burette: Which is more accurate?
- Burettes: ±0.03-0.05 mL (Class A) = ±0.3% at 10 mL (slightly better)
- Micropipettes: ±1-3% typically (worse for small volumes)
- Volumetric pipettes (glass, fixed-volume): ±0.5-1% (competitive)
Verdict: At 25 mL range, burette and volumetric pipette are equivalent. At <1 mL, burette wins (0.03 mL uncertainty vs. 0.01 mL with micro). For general lab work, either is acceptable; burette preferred for titrations (dropwise control).
Part 9: Practical Maintenance & Best Practices
Calibration establishes baseline accuracy. Maintenance preserves it.
Daily Practices: 10 Minutes for Equipment Health
1. Visual Inspection Before Use
- Check for visible damage or dried residue
- Plunger should move smoothly without grinding
- No leaks or discoloration on exterior
2. Spot Verification (Weekly)
- Perform 5 gravimetric measurements on critical pipettes
- Compare to calibration baseline ± 5%
- Immediately flag if approaching tolerance limits
3. Proper Storage After Use
- Store horizontally (piston released, not compressed)
- Install protective caps
- Keep in designated storage area (not left on bench)
- Prevents seal desiccation and accidental damage
4. External Cleaning
- Wipe barrel with lint-free cloth if contacted
- Never immerse entire pipette in water (seals will be damaged)
- Clean tip seating area (pipette head) with 70% ethanol if contamination visible
Monthly Practices: Preventive Maintenance Window
1. Performance Verification
- 10 gravimetric measurements per critical pipette
- Plot on control chart
- Compare to calibration baseline and tolerance limits
2. Mechanical Check
- Plunger stroke: Should feel smooth, with consistent resistance
- Plunger return: Spring should return promptly to starting position
- No grinding or gritty sensation (indicates piston wear)
3. Seal Inspection
- Visual check: O-rings should be dark, glossy, not cracked or flattened
- If seals appear desiccated or damaged, schedule lubrication/replacement
4. Lubrication (if applicable)
- Per manufacturer recommendations (typically every 3-6 months)
- Use ONLY manufacturer-specified lubricant (e.g., Eppendorf silicone oil)
- Wrong lubricant damages seals
Quarterly Practices: Formal Calibration & Major Service
Depending on usage (3 vs. 6 months), send pipettes for:
Full Calibration Service ($75-150 per unit):
- Gravimetric testing per ISO 8655
- Mechanical inspection
- Light cleaning and lubrication
- Detailed calibration certificate
- Traceability documentation
Full Maintenance Service ($125-200 per unit) includes above plus:
- O-ring/seal replacement
- Piston cleaning/lubrication with full rebuild
- Spring inspection/replacement if needed
- Tip ejector cleaning/repair
- Preventive maintenance to extend equipment life
Seasonal Practices: Environmental Adjustment
Winter (Heating on, low humidity):
- Increase intermediate verification frequency (lower humidity increases evaporation, drift)
- Monitor lab temperature more closely (heating may cause fluctuation)
- Possible increase in calibration frequency if humidity drops below 40%
Summer (AC on, humidity high):
- Consider seasonal recalibration if temperature changes >5°C from winter
- May extend calibration intervals if humidity well-controlled
Part 10: Troubleshooting Guide-Diagnosing Equipment Problems
When pipette results are questionable, systematic troubleshooting identifies the root cause.
Troubleshooting Decision Tree
Step 1: Is the problem with the equipment or technique?
Test: Have a trained operator use the same pipette and perform 5 gravimetric measurements.
- Result matches spec → Problem is user technique (training needed)
- Result fails spec → Equipment problem (continue to Step 2)
Step 2: Is the pipette significantly out of tolerance or just at the edge?
Test: Full gravimetric calibration per ISO 8655 (10 repetitions, all three volumes)
- Systematic error >10% → Equipment needs service/replacement
- Systematic error 5-10% → Likely seal wear; recommend maintenance
- Precision (CV) poor → Piston or spring wear; recommend maintenance
- Slightly out of spec (1-5%) → Could be environmental; recalibrate in controlled conditions
Step 3: What specific component is failing?
Manual Diagnostics:
- Plunger feels stiff/gritty: Piston wear or low lubrication (clean and lubricate)
- Plunger slow-returning: Spring fatigue (schedule maintenance)
- Liquid dribbles after dispensing: Seal/O-ring damage (schedule seal replacement)
- Tips don’t eject cleanly: Ejector wear or tip jam (clean ejector or contact service)
- Consistent under-delivery: Seal leak, worn seals, or calibration drift (service)
- Consistent over-delivery: Rare; usually user technique (re-observe and retrain)
Step 4: Cost-benefit analysis for repair vs. replacement
Keep/Repair if:
- Equipment <5 years old
- Repair cost <50% of replacement
- Multiple units available (can spare for repair time)
Replace if:
- Equipment >8 years old
- Repair cost >50% of new pipette
- Critical application requiring immediate reliability
Common Problems & Solutions Matrix
| Symptom | Root Causes (Likelihood) | Diagnosis | Solution |
|---|---|---|---|
| Inconsistent volume | User technique (40%), seal wear (35%), evaporation (15%), calibration drift (10%) | Observe technique; perform gravimetric test; check environment | Retrain operator; schedule maintenance if test fails |
| Consistently low volume | Seal leak (50%), piston wear (30%), calibration drift (20%) | Gravimetric test; manual plunger test (pressure check) | Schedule service; likely seal replacement |
| Consistently high volume | User error (70%), rare: incorrect calibration (20%), contamination (10%) | Retrain operator; have certified technician verify | Training workshop; double-check with experienced user |
| High variability (poor precision) | Piston wear (45%), technique inconsistency (35%), tip contamination (15%), air bubbles (5%) | Control chart; observe technique; check seals visually | Maintenance if wear; training if technique; fresh tips |
| Plunger grinding/stiff | Piston wear (60%), low/wrong lubricant (30%), contamination (10%) | Plunger resistance test; visual inspection | Cleaning + re-lubrication; if severe, piston replacement |
| Slow spring return | Spring fatigue (80%), worn lubrication (15%), damage (5%) | Observe return speed vs. known-good pipette | Schedule full maintenance; likely spring replacement |
| Tip won’t seat | Worn pipette head (50%), bent tip (30%), wrong tip brand (20%) | Try different tip; inspect seating area | If pipette head worn, contact service; use correct tip type |
| Liquid leaks after dispensing | Broken seal (90%), worn piston (10%) | Sustained plunger test (hold for 30 sec; liquid should not leak) | Schedule seal/O-ring replacement |
| Intermittent failures | Random component failure (60%), environmental (30%), usage spike (10%) | Track failures; correlate with usage; check environment | Increase verification frequency; may need replacement |
Part 11: Frequently Asked Questions
Q1: Is a pipette more accurate than a measuring cylinder?
A: Yes, significantly. Calibrated micropipettes deliver ±0.5-2% accuracy; graduated cylinders ±2-5%. Additionally, micropipettes have smaller meniscus (easier to read precisely), certified calibration, and reproducible design. The trade-off is cost ($300-2,000 vs. $10-50) and required technique training.
Q2: How often should my pipettes be calibrated?
A: Standard answer: Every 6 months for moderate use; every 3 months for high-use labs. Better answer: Calculate based on your usage intensity and target reliability level. At minimum, ISO 17025 accredited labs must verify compliance annually. For critical applications (diagnostics, pharma QC), monthly or bi-monthly is common. Use the MTBF calculation from Part 3 to determine your optimal interval.
Q3: What’s the difference between accuracy and precision?
A: Accuracy = closeness to target (e.g., did I dispense exactly 100 µL?). Precision = consistency (did I dispense 100 µL ten times identically?). You need both. A pipette can be accurate but imprecise (average 100 µL but range 95-105 µL), or precise but inaccurate (always delivers 95 µL exactly). Calibration controls accuracy; maintenance and technique control precision.
Q4: Can I calibrate my pipette myself?
A: Possible but not recommended for regulated work. Requirements:
- Analytical balance meeting ISO 8655 specs (6-place for <20 µL; expensive)
- Controlled environment (21°C ± 2°C, humidity, pressure)
- ISO 8655 training
- Uncertainty calculation & documentation
- No external accreditation (limits credibility for audits)
For volumes >100 µL, in-house calibration is feasible. For <100 µL, balance requirements prohibit most labs. Use accredited services for critical work ($50-150 per unit).
Q5: What does “ISO 8655 compliant” mean?
A: Calibration procedure follows ISO 8655 methodology (gravimetric or photometric testing, environmental controls, three-point testing, 10+ repetitions, error limit comparison). A calibration certificate claiming “ISO 8655 compliance” should specify:
- Testing performed per ISO 8655-6 (gravimetric) or ISO 8655-8 (photometric)
- Environmental conditions documented
- Error limits compared to ISO 8655-2 standards
- Three volumes tested (10%, 50%, 100% of nominal)
- Measurement uncertainty stated
- Expiration date
If certificate lacks these elements, it’s not truly ISO 8655 compliant.
Q6: Why do pipette tips matter for calibration (ISO 8655-2022)?
A: Under the 2022 update, pipette + tip = one system. Different tip types have different:
- Seal geometry (affects pressure dynamics)
- Material properties (affect friction and wear)
- Internal dimensions (affect aspiration behavior)
- Manufacturing tolerances (all matter at microvolume scales)
If calibrated with Brand-A tips but you use Brand-B in practice, your calibration is technically invalid. You must use the exact tip type specified on the certificate, or recalibrate with new tips.
Q7: What’s the cost of pipette calibration?
A: Typical ranges:
- Calibration only (testing, no service): $50-75 per unit
- Calibration + adjustment (tuning for edge-of-spec equipment): $75-125
- Calibration + full maintenance (seals, springs, lubrication): $125-200
- Replacement (beyond economical repair): $400-2,000 depending on type
Factor 3-6 month intervals into annual budget (e.g., $200/unit × 6 pipettes × 2 intervals/year = $2,400 annually). Compare to cost of invalid results (entire research project, FDA audit penalties, regulatory action).
Q8: Can temperature affect my pipette accuracy?
A: Absolutely, and significantly. Pipettes are calibrated at 20-21°C. Each 5°C deviation causes ~0.5% volume error. A lab running at 24°C consistently over-delivers; at 17°C, under-delivers. Impact:
- ±2°C (20-22°C): Acceptable, <0.2% error
- ±5°C (16-26°C): Introduces 0.5% systematic bias
- ±5°C: Unacceptable for accurate work
Solution: Maintain lab at 21°C ± 2°C with smart thermostat; pre-equilibrate samples; consider seasonal recalibration if temperature varies widely.
Q9: What happens if I use an uncalibrated pipette?
A:
- Immediate: Equipment delivers unknown volume; results may be invalid
- Short-term: Experiments fail; rework is required; reagents wasted
- Regulatory: FDA, ISO, GLP violations if in regulated industry
- Audit: Failed findings; possible accreditation suspension
- Reputational: Published results later questioned if pipettes were uncalibrated
This is the most common source of invalid lab results. A simple 6-month calibration schedule prevents all these consequences.
Q10: How do I know if my pipette is drifting out of tolerance?
A: Implement intermediate verification (weekly or monthly in-house gravimetric checks). Plot results on control chart with warning limits at ±5% of tolerance. Drifting pipettes show a trend toward limit; trigger recalibration proactively before failure. Without intermediate verification, drift goes undetected until next scheduled calibration, potentially invalidating months of data.
From Compliance to Confidence
Pipette accuracy and calibration are not abstract quality procedures-they are the practical foundation separating valid science from waste. Every researcher, quality manager, and lab director faces the same challenge: ensuring their equipment delivers the volumes they intend.
The path from confusion to confidence involves three steps:
1. Understand the principles (Accuracy vs. precision; why ISO 8655 matters; what calibration actually measures)
2. Implement systematic practices (6-month calibration schedule based on usage; weekly intermediate verification; documented maintenance)
3. Build accountability (Assigned responsibility for equipment QC; control charts tracking performance; proactive maintenance before failure)
The investment-whether time or money-returns itself in validity of results, compliance readiness, and confidence that experiments mean what you think they mean. A $100 calibration service now prevents $10,000 in rework later. A $10/week spot-check catches drift before silent failure. A simple maintenance schedule extends equipment life by 40%.
Your pipettes are not expensive laboratory furniture. They are precision measurement tools that determine whether your data is trustworthy. Treat them accordingly-with the same rigor you apply to analytical balances or chromatography instruments. When you do, your results become something you can defend: not just valid, but defensibly valid.
Quick Reference: Implementation Checklist
Immediate Actions (This Week):
- Audit current pipette fleet (list all units, serial numbers, last calibration date)
- Identify out-of-calibration equipment (anything >6 months since last service)
- Schedule recalibration for out-of-date units
- Designate person responsible for pipette quality
- Establish calibration schedule based on usage assessment
Short-term (This Month):
- Document your pipette SOP (technique, storage, maintenance)
- Establish intermediate verification schedule (weekly or monthly)
- Create control chart template for spot-check results
- Train all staff on proper technique (hands-on demonstration, supervised practice)
- Implement calibration log system (spreadsheet or LMS)
Ongoing (Quarterly):
- Review intermediate verification results; note any drifting units
- Schedule maintenance for equipment approaching tolerance limits
- Refresh training for new or underperforming staff
- Audit environmental conditions (temperature, humidity)
- Budget for next round of calibrations
Resource Links & Standards References
ISO Standards:
- ISO 8655-2 (2022): Piston-operated volumetric apparatus Part 2-Piston pipettes
- ISO 8655-6 (2022): Gravimetric reference measurement procedures
- ISO 8655-7 (2022): Environmental conditions and alternative procedures
- ISO 17025 (2017): General requirements for laboratory accreditation
Manufacturer Specifications:
- Eppendorf Pipette Specifications & Maintenance Guides
- Gilson Pipette Calibration Standards (exceed ISO 8655)
- Rainin Pipette Performance Specifications
- Thermo Fisher Pipette Accuracy Standards
Regulatory Guidance:
- FDA 21 CFR Part 11 (Electronic Records; requires documented calibration)
- CLIA (Clinical Laboratory Improvement Amendments) – laboratory calibration requirements
- ICH Guidelines (Pharmaceutical Development & Validation)