Precision in liquid handling determines the quality of your experimental results. While forward pipetting works well for standard aqueous solutions, professionals working with viscous liquids, volatile compounds, or protein-containing solutions face a critical accuracy challenge: liquid adhesion to pipette tip walls can compromise up to 30–50% of your dispensing precision.
This is where reverse pipetting becomes indispensable.
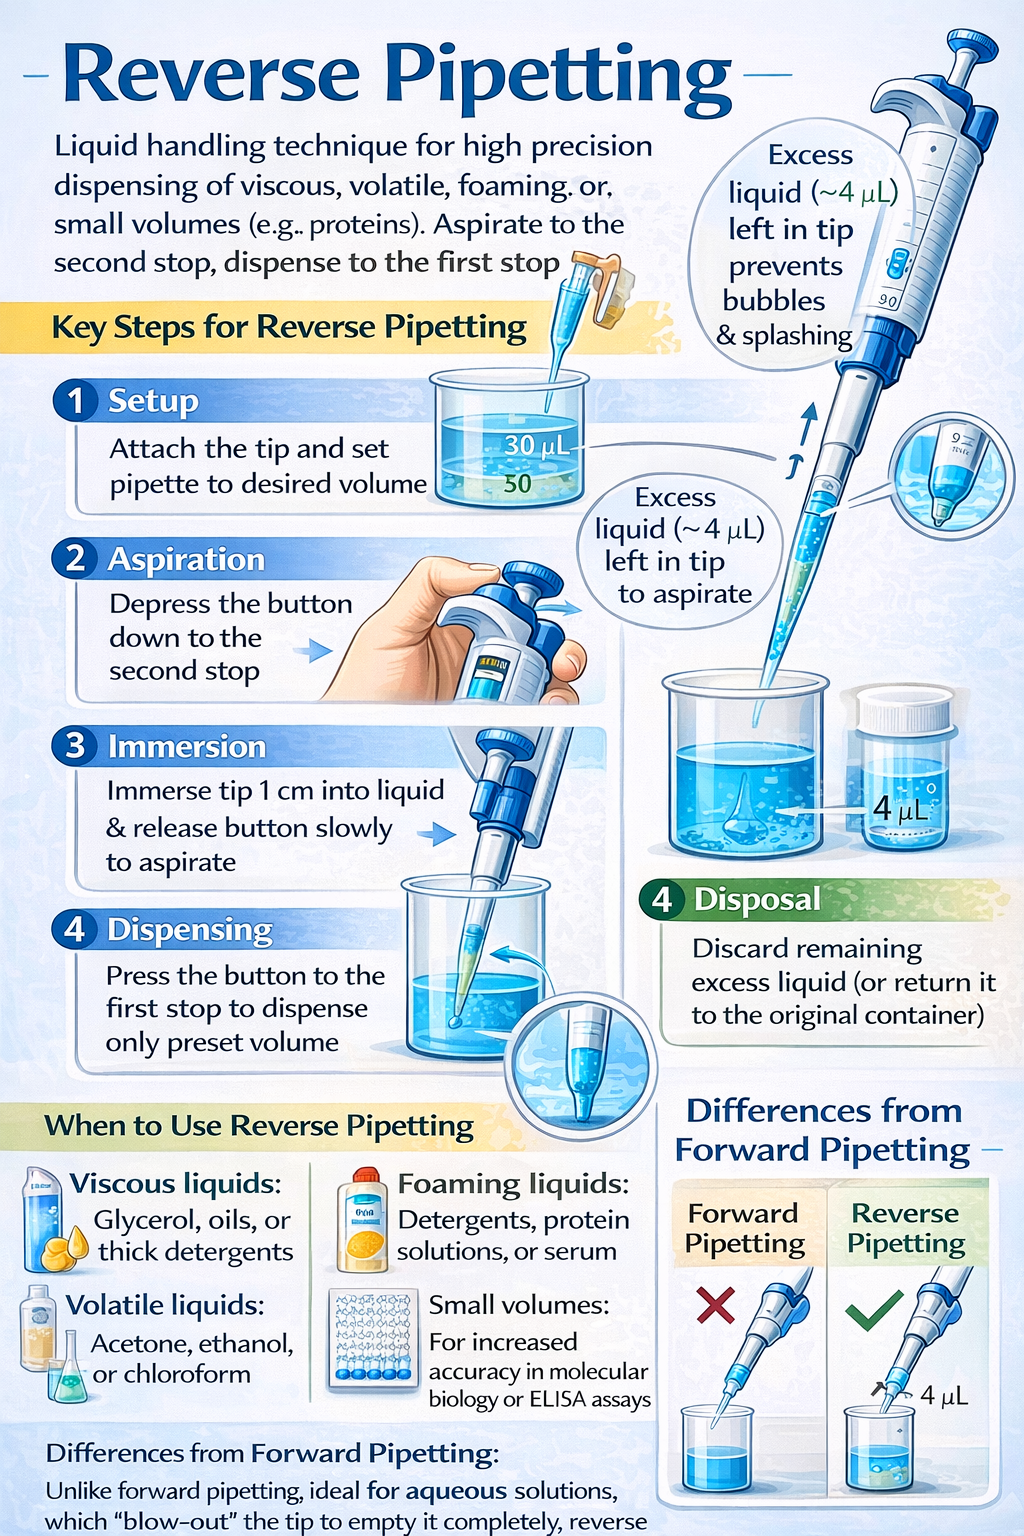
Reverse pipetting is a specialized micropipetting technique that aspirates a volume beyond your target amount, dispensing only the desired volume while leaving a small excess in the tip. This seemingly simple adjustment delivers dramatic improvements in accuracy-reducing imprecision by over 50% when dispensing protein solutions like bovine serum albumin (BSA) and eliminating the foam formation that compromises qPCR master mix quality.
Whether you’re preparing qPCR reactions, conducting ELISA assays, working with concentrated glycerol solutions, or handling volatile solvents, mastering reverse pipetting separates laboratories with reproducible results from those struggling with failed replicates and wasted reagents.
This guide synthesizes best practices from ISO 8655 calibration standards, peer-reviewed research, and laboratory protocol optimization to provide the definitive resource for implementing reverse pipetting in your workflow.
What is Reverse Pipetting Technique and How It Works
Understanding Reverse Pipetting: Definition and Core Concept
Reverse pipetting is an air-displacement pipetting technique where the operator depresses the pipette plunger past the first stop (to the second stop or blowout position) during aspiration, deliberately drawing in excess liquid volume beyond the set target. During dispensing, the plunger is pressed only to the first stop, delivering the desired volume while leaving a small residual amount in the tip that would normally cause liquid retention errors.
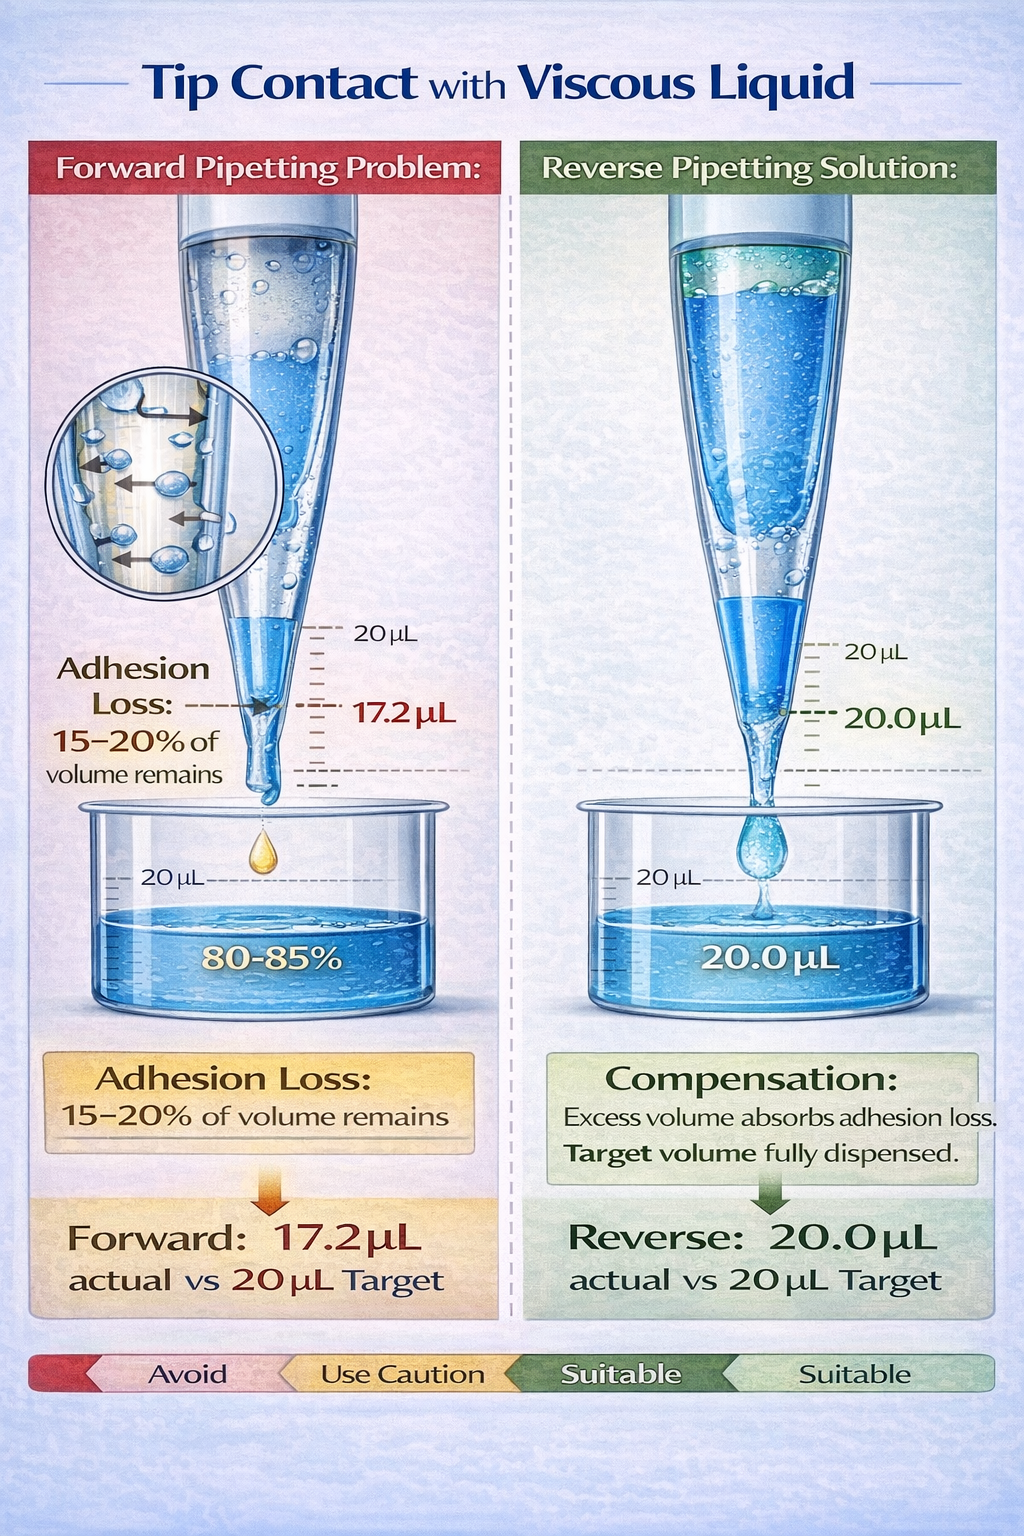
The technique addresses a fundamental physics problem: liquid adhesion to pipette tip walls. When aspirating aqueous solutions with standard forward pipetting, the liquid coats the interior surface of the plastic tip. During dispensing through air displacement, a portion of this liquid film remains attached to the tip material, reducing the actual volume delivered. For viscous, protein-containing, or volatile liquids, this effect intensifies dramatically.
By aspirating excess volume, reverse pipetting creates a larger liquid column that compensates for adhesion losses. The “dead volume” left in the tip after dispensing contains the adhesion losses, ensuring your dispensed volume equals your target volume.
The Physics Behind the Second Stop
Understanding the mechanical design of air-displacement pipettes clarifies why reverse pipetting works:
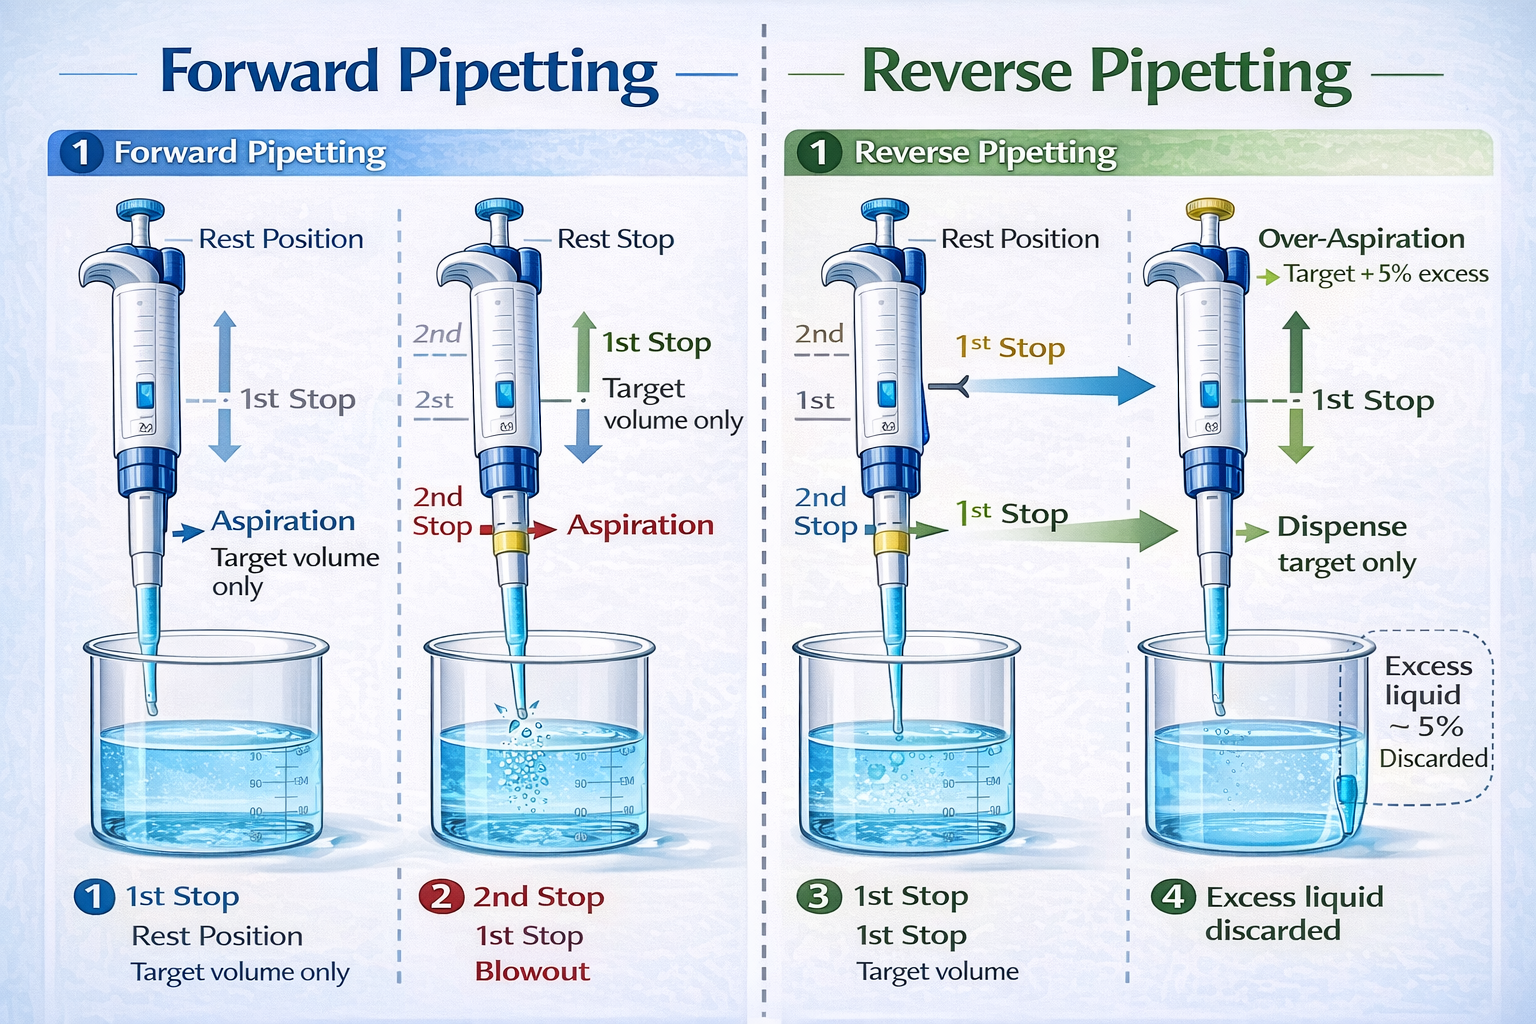
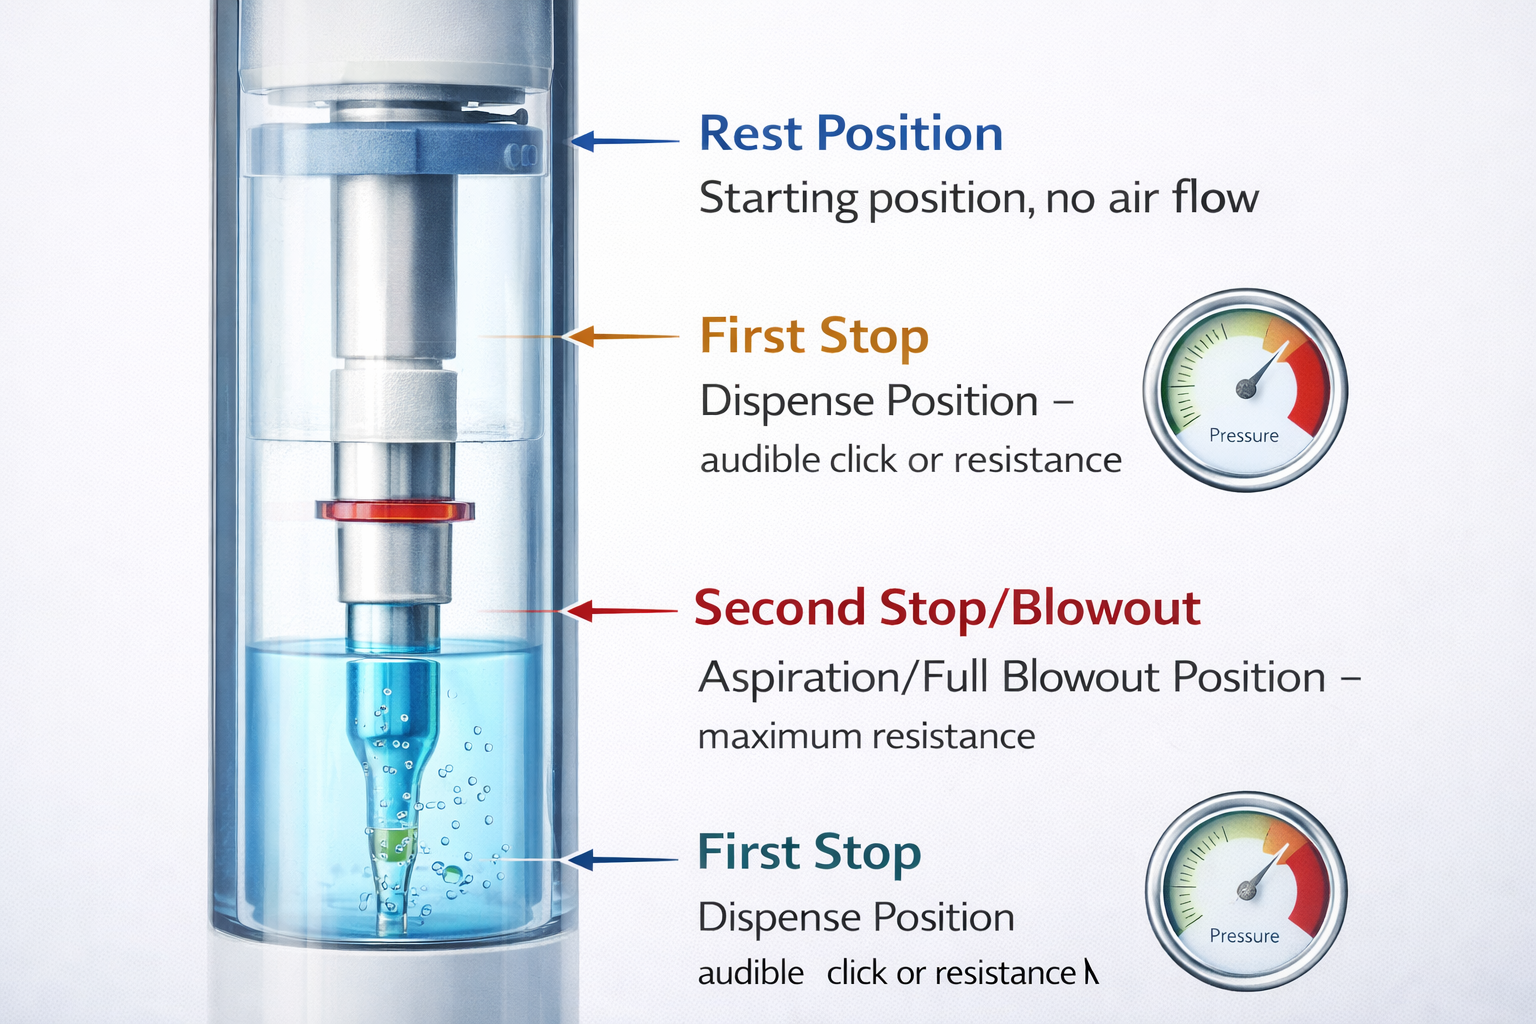
First Stop (Dispense Position): When pressed to the first stop, the plunger delivers the volume of air equal to the pipette’s set volume, pushing out the target amount of liquid. This is the normal position for forward pipetting aqueous solutions.
Second Stop (Blowout Position): Further depression of the plunger expels additional air, creating extra force to eject even microdroplets adhering to the tip walls. In standard forward pipetting, this second stop creates turbulence and air bubbles-the primary cause of foaming in protein and detergent solutions.
In reverse pipetting, aspiration uses both stops to draw excess volume. During dispensing, the operator uses only the first stop, trapping the excess liquid as a reservoir that compensates for adhesion losses during subsequent dispenses. This prevents air from passing through the tip on the final blow-out step, eliminating the bubble-generation mechanism.
Forward vs. Reverse Pipetting: Comparison and When to Use Each
| Factor | Forward Pipetting | Reverse Pipetting |
|---|---|---|
| Best For | Aqueous solutions, buffers, diluted acids/alkalis | Viscous liquids, volatile solvents, protein solutions, foaming solutions |
| Accuracy (BSA) | Higher imprecision (>15% CV) | Superior precision (<7% CV) |
| Accuracy (Glycerol) | Variable, poor for 80% solutions | Excellent, compensates for adhesion |
| Speed | Faster (no pre-wetting needed) | Slower (requires pre-wetting cycles) |
| Reagent Waste | Minimal | 3–5% excess discarded |
| Bubble Formation | High risk with proteins/detergents | Minimal risk |
| User Skill Dependency | Low | Higher (technique-sensitive) |
| Calibration Method | Standard forward mode | May require separate calibration |
| Equipment Requirements | Standard air-displacement pipettes | Electronic pipettes recommended for consistency |
Critical Decision Framework:
Use forward pipetting for:
- Aqueous buffers and solutions
- Dilute salts and acids
- Standard assay reagents without proteins or detergents
- Applications where maximum speed is critical
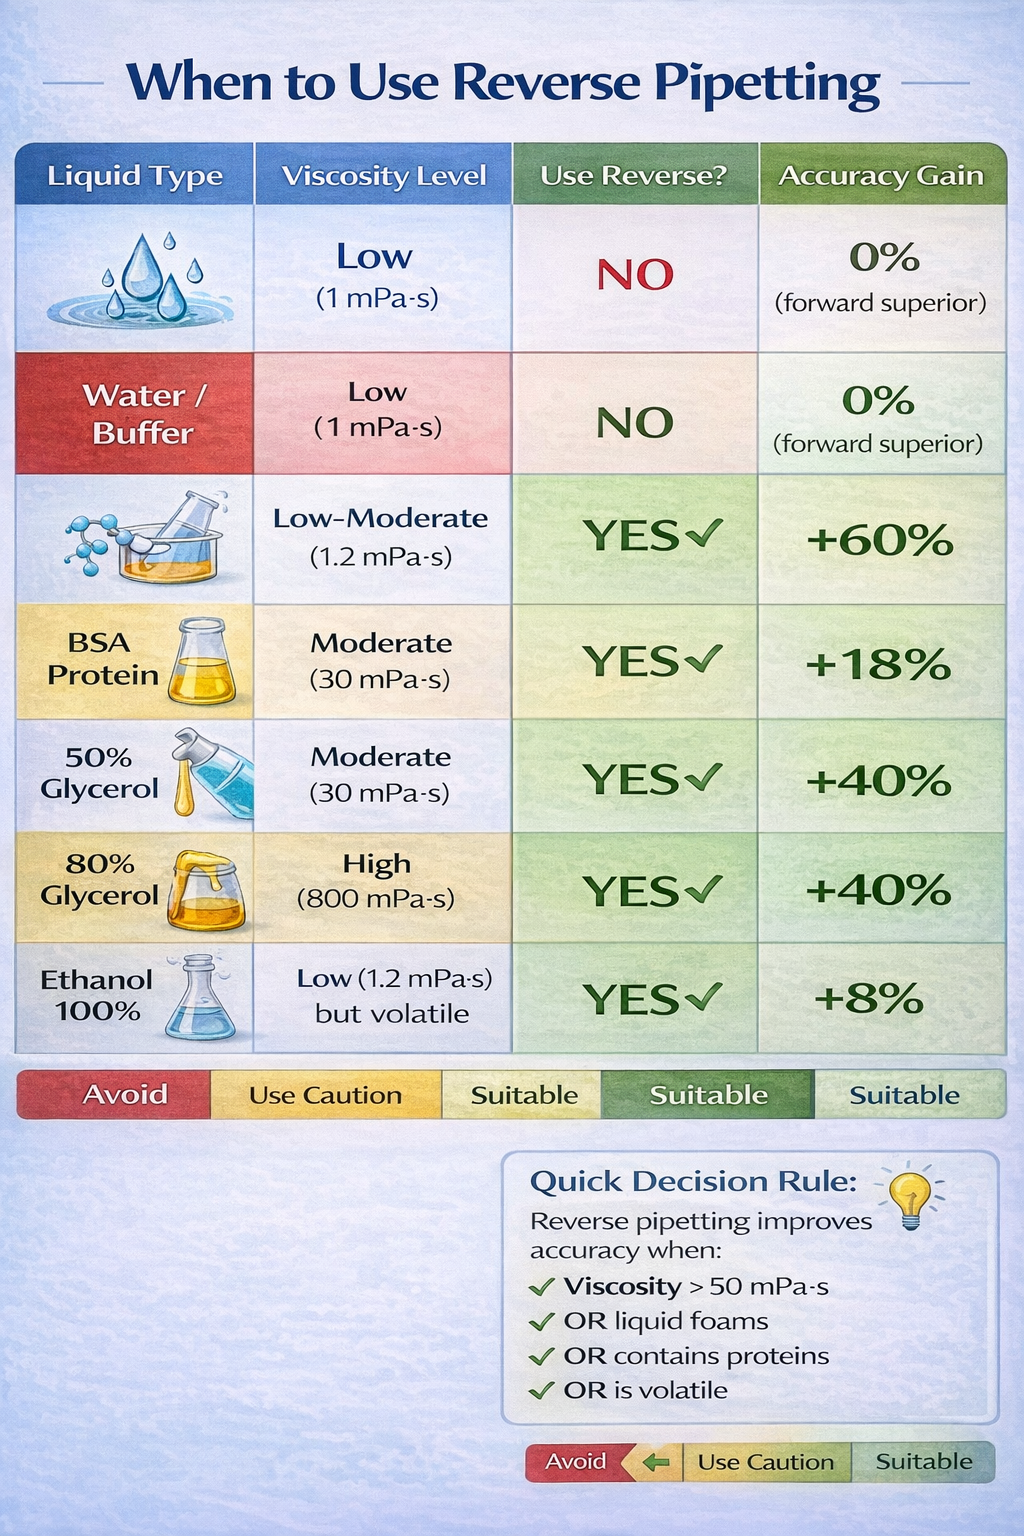
Use reverse pipetting for:
- High-viscosity solutions (>1 mPa·s): glycerol, oils, concentrated proteins
- Volatile organic solvents: ethanol, acetone, DMSO
- Protein-containing solutions: BSA, antibodies, enzymatic solutions
- Foaming solutions: detergents, surfactants, cell culture media with serum
- Small-volume precision work: <50 µL dispensing
- qPCR master mix preparation
Step-by-Step: How to Perform Reverse Pipetting Correctly
Reverse Pipetting with Mechanical (Manual) Pipettes
Mechanical reverse pipetting requires precise technique and develops with consistent practice. Follow these steps exactly to achieve optimal accuracy:
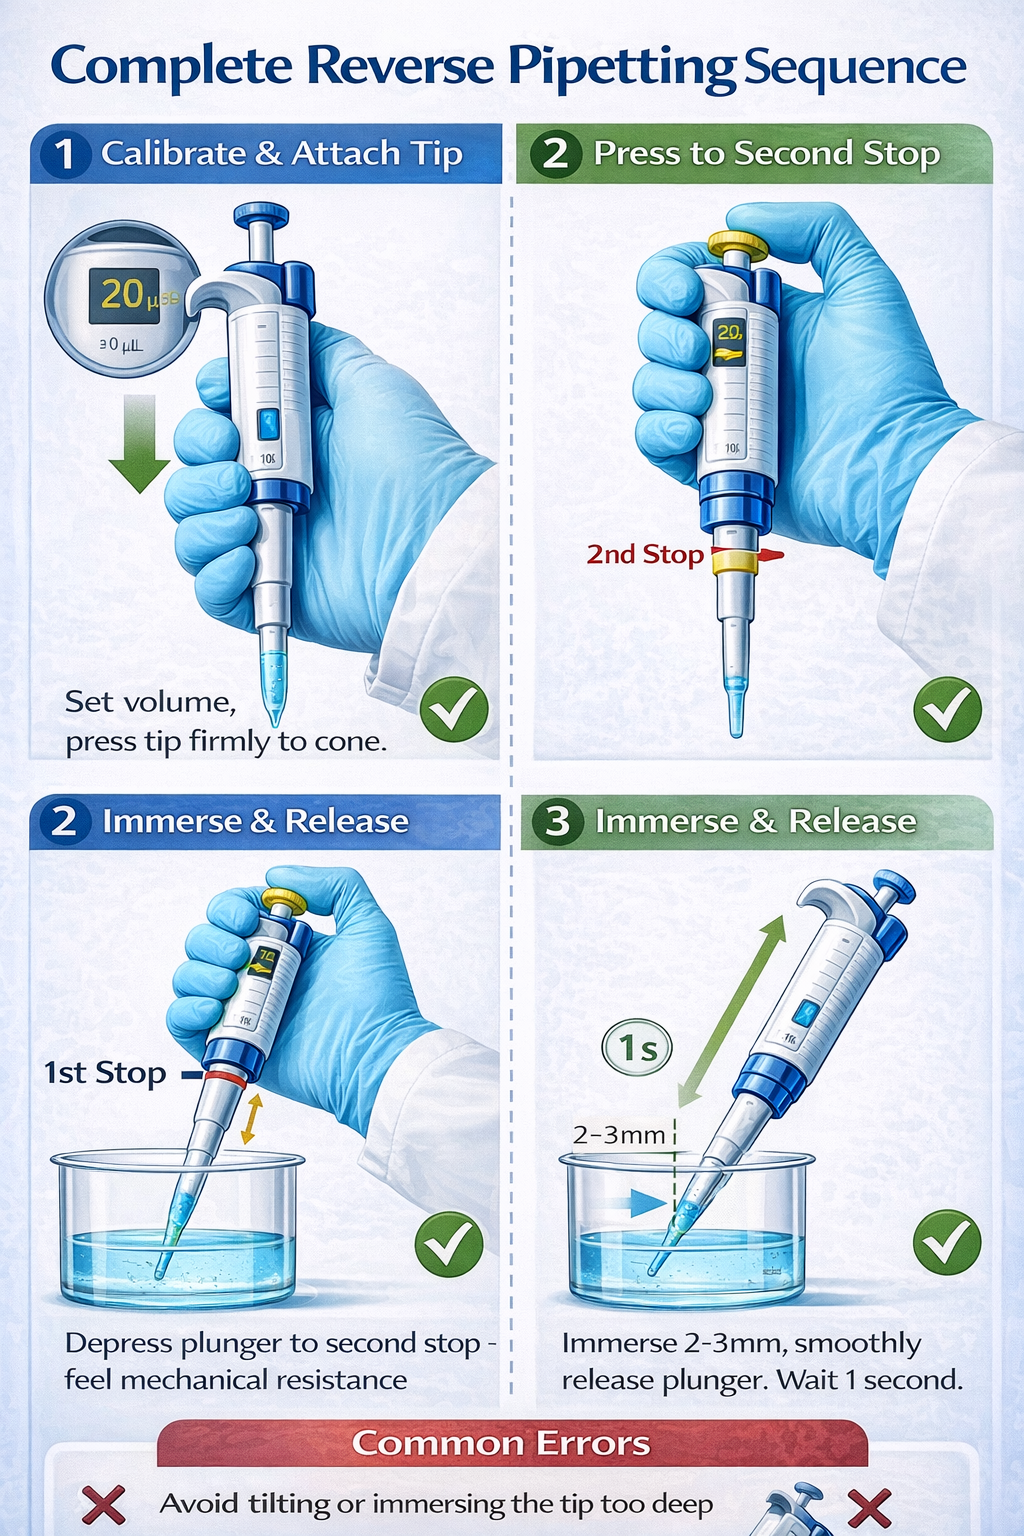
1. Calibrate Pipette Volume
Set the desired target volume on the mechanical pipette (e.g., 10 µL, 20 µL, 100 µL). For viscous liquids, this should be your actual target delivery volume. Do not adjust the pipette volume when switching between forward and reverse modes for the same liquid-calibrate separately if reverse pipetting significantly changes your results.
2. Attach Pipette Tip Firmly
Press the sterile tip onto the pipette cone with sufficient force to create an airtight seal. For low-retention tips or wide-bore tips (used for viscous liquids), ensure complete seating. A loose tip introduces air leaks that eliminate the benefit of reverse pipetting.
3. Press Plunger to Second Stop (Blowout Position)
Before touching the liquid, depress the plunger all the way down to its maximum limit (the second stop). You should feel distinct resistance. This is the key differentiator from forward pipetting and ensures maximum volume aspiration.
4. Immerse Tip in Liquid at Proper Depth
Submerge the tip 2–3 mm below the liquid surface. Avoid plunging too deeply (over 1 cm), as this introduces excess air and risks splashing. Position the pipette at a 45-degree angle to the container surface, not vertical. This angle minimizes external liquid contact and improves precision.
5. Smoothly Release Plunger
Release the plunger with smooth, controlled motion-avoid jerky movements. Smooth release prevents air bubble aspiration and ensures consistent excess volume. The liquid should fill the tip steadily. For viscous liquids, this step may require 2–3 seconds.
6. Wait One Second After Aspiration
After the plunger returns fully upward and the tip is filled, pause for approximately one second. This allows the liquid to equilibrate inside the tip and prevents air bubble formation during withdrawal.
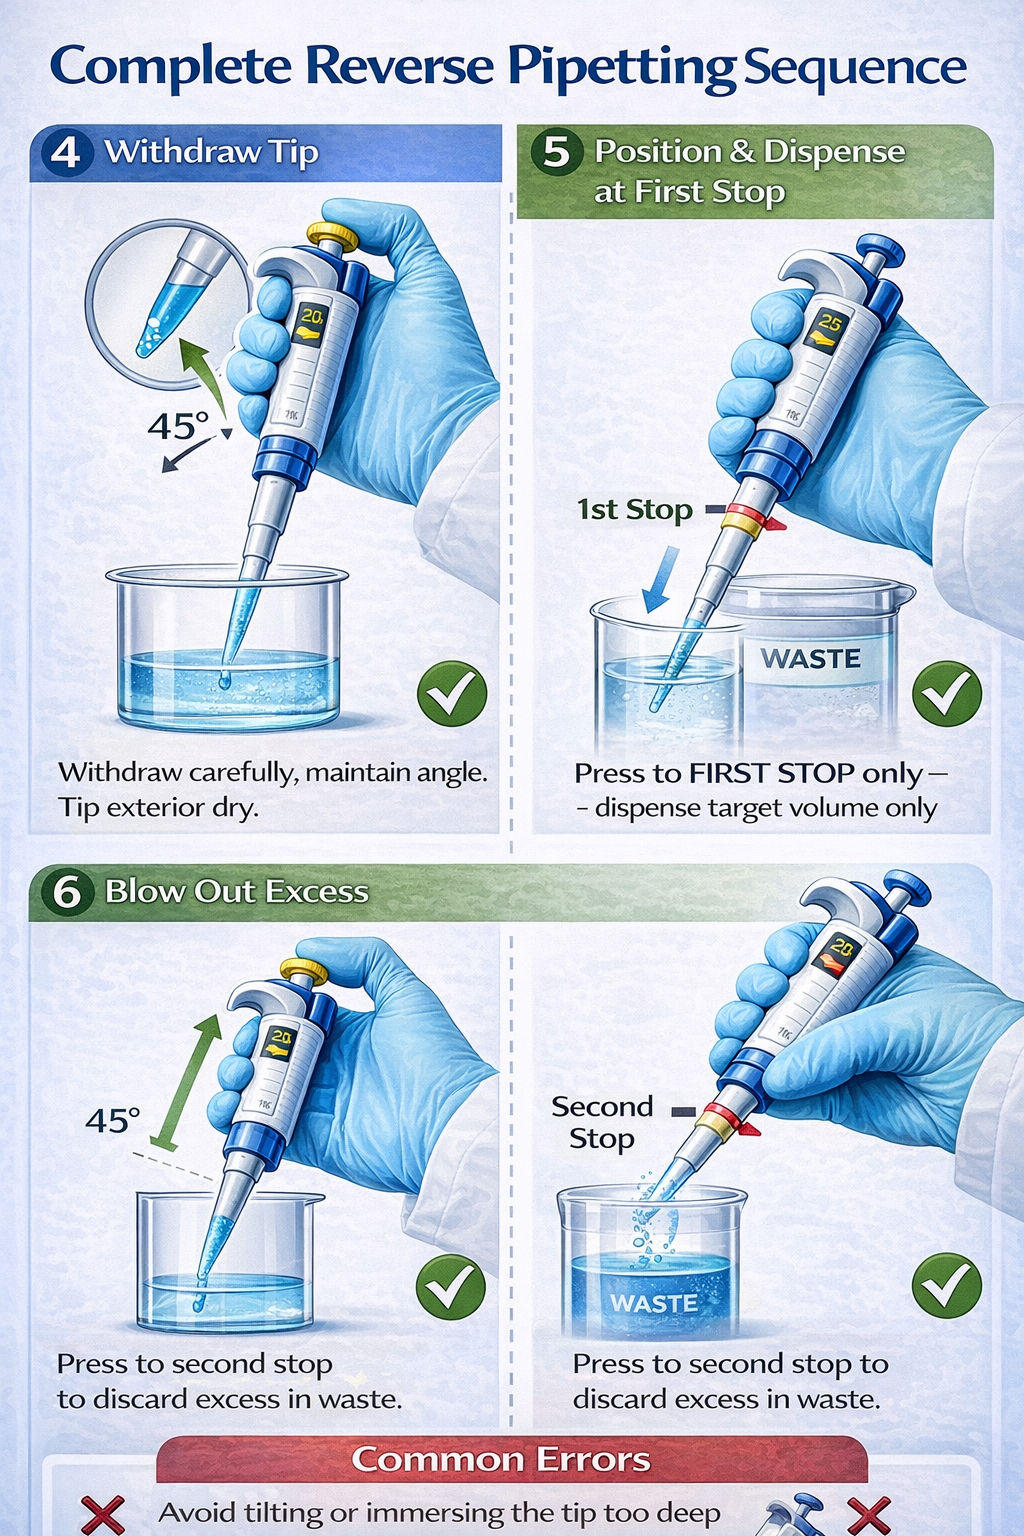
7. Withdraw Tip from Liquid Carefully
Pull the tip out of the liquid in one smooth motion, maintaining the 45-degree angle. Do not rotate or tilt the pipette dramatically during withdrawal, as this causes external liquid to cling to the outside of the tip.
8. Wipe Exterior of Tip (Optional but Recommended)
Lightly touch the external surface of the tip to a tissue or the inside wall of the liquid container to remove any external droplets. This prevents cross-contamination and improves accuracy in subsequent steps.
9. Position Tip Against Receiving Vessel Wall
For maximum precision, angle the tip at 45 degrees and position it against the inner wall of the receiving vessel (well, tube, or container). This positioning allows the liquid to slide down the wall rather than dropping from the tip, reducing splash and bubble formation.
10. Dispense by Pressing Plunger to First Stop Only
Depress the plunger only to the first stop-not beyond. You will feel distinct mechanical resistance marking the first stop position. Dispense the target volume (e.g., 10 µL of your 20 µL aspirated volume). The excess liquid remains in the tip as a reservoir.
11. Discard Excess in Waste Container
While the plunger is still fully depressed to the first stop, move the pipette to a waste container or appropriate discard location. Then depress the plunger completely to the second stop to expel the remaining excess liquid. This two-step blow-out prevents splashing excess liquid onto your target sample.
12. Eject Tip and Continue
Press the tip ejection button and discard the used tip. Do not reuse the tip for subsequent aspirations, as residual liquid and air patterns compromise accuracy.
Reverse Pipetting with Electronic Pipettes
Electronic pipettes offer significant advantages for reverse pipetting: programmable aspiration speeds, consistent pressure profiles, and dedicated reverse pipetting modes eliminate user-dependent variability.
Setup and Configuration:
Electronic pipettes allow customization of reverse pipetting parameters within the device’s software or control panel:
- Target Volume: Input your desired delivery volume
- Post-Dispense Percentage: Program the excess volume as a percentage of target (typically 3–5%)
- Aspiration Speed: Set slow speed for viscous liquids (100 µL/sec range) or fast speed for volatile solvents (800+ µL/sec)
- Dispensing Speed: Typically slower than aspiration (50–200 µL/sec range)
Operation:
- Place tip on electronic pipette
- Lower tip into liquid source
- Press and hold the trigger (or button) to initiate automated aspiration
- The pipette automatically aspirates to first stop + programmed post-dispense percentage
- Release trigger and move to receiving vessel
- Press trigger once: the pipette dispenses exactly the target volume
- Press trigger again: the pipette blows out excess post-dispense volume into waste
Advantages of Electronic Reverse Pipetting:
- Reproducibility: Consistent aspiration speeds and pressure profiles eliminate user error
- Time Efficiency: Programmable cycles reduce manual adjustments for repeated operations
- Data Logging: Many electronic pipettes record pipetting parameters for GLP compliance
- Multi-Channel Capability: Electronic multichannel pipettes apply reverse pipetting across 8, 12, or 16 channels simultaneously
- Speed Optimization: Automatically adjusts aspiration/dispensing speed for different liquid types
Equipment Examples: INTEGRA VIAFLO/VOYAGER, Eppendorf Xplorer, Sartorius Picus, Gilson PIPETMAN
Critical Technique Details for Accuracy
Pipette Angle Impact on Precision
Maintaining a 45-degree angle throughout both aspiration and dispensing is essential for accuracy:
- At 45 degrees: Liquid wets the tip surface uniformly, reducing adhesion variability
- Vertical (90 degrees): Increases liquid film thickness on tip walls and increases adhesion variability
- Shallow angle (<30 degrees): Promotes external liquid contact and splashing
Inconsistent angles across replicates introduce systematic errors. Use bench angle guides or pipette stands to maintain consistent angles during high-volume work.
Tip Immersion Depth Standards
Research and ISO 8655 guidelines specify immersion depths based on pipette volume range:
- Volumes <20 µL: Immerse 2 mm below surface
- Volumes 20–1000 µL: Immerse 2–3 mm below surface
- Volumes >1000 µL: Immerse 3–5 mm below surface
Deeper immersion draws in excess air; shallower immersion risks incomplete fill. Over-immersion (>1 cm below surface) introduces air bubbles and dramatically increases imprecision for viscous liquids.
Speed Adjustments by Liquid Type
Electronic pipette speed settings directly impact accuracy:
| Liquid Type | Viscosity (mPa·s) | Aspiration Speed | Dispensing Speed |
|---|---|---|---|
| Water | 1 | 1,100 µL/sec | 343 µL/sec |
| 1% BSA | 1.2 | 800 µL/sec | 200 µL/sec |
| 80% Glycerol | 800 | 50–100 µL/sec | 50 µL/sec |
| Ethanol | 1.2 | 1,100 µL/sec (fast) | 343 µL/sec |
| 50% Glycerol | 30 | 200 µL/sec | 100 µL/sec |
Manual pipette users: Slower manual aspiration by pausing 2–3 seconds for viscous liquids prevents splashing.
When and Why to Use Reverse Pipetting: Liquid Types and Applications
Viscous Liquids: The Primary Use Case
Viscous solutions represent the most common and critical application for reverse pipetting. Liquids with viscosity >50 mPa·s exhibit extreme adhesion to pipette tip walls due to strong intermolecular cohesion forces.
Typical Viscous Liquids:
- 80% Glycerol (800 mPa·s)
- Pure glycerol or glycerin solutions
- Mineral oils and petroleum-based products
- Concentrated protein solutions (>50 mg/mL BSA)
- DNA/RNA solutions (PEG precipitation mixtures)
- High-molecular-weight polymer solutions
The Problem with Forward Pipetting:
When pipetting 80% glycerol using forward pipetting, the liquid clings to the tip interior with exceptional adhesion. Standard blowout at the second stop creates violent turbulence that generates aerosol droplets and incomplete dispensing. Studies document imprecision coefficients of variation (CV) exceeding 15% for viscous liquids using forward pipetting with standard tips.
The Reverse Pipetting Solution:
By aspirating excess volume (e.g., 25 µL when targeting 20 µL delivery), the larger liquid column develops sufficient pressure to overcome adhesion forces. When dispensing only the 20 µL target and retaining the 5 µL excess in the tip, the adhesion loss is redirected to the dead volume rather than reducing your target delivery. Research documents 40–60% improvement in precision when switching from forward to reverse pipetting for viscous liquids.
Implementation Strategy:
- Use wide-bore pipette tips (designed for viscous liquids) to facilitate easier liquid entry and exit
- Reduce aspiration speed to 50–100 µL/sec (electronic pipettes) or 2–3 second manual aspiration
- Increase post-dispense excess to 5% for extreme viscosity (80% glycerol)
- Pre-wet tips 3–5 times with target liquid before actual pipetting
- Validate accuracy using gravimetric method on analytical balance
Volatile Liquids and Solvents
Volatile organic compounds (VOCs) and solvents present a distinctly different challenge: evaporation from the air column between the piston and liquid surface.
Common Volatile Liquids:
- Ethanol (70% aqueous, 100% anhydrous)
- Acetone
- Dimethyl sulfoxide (DMSO)
- Methanol
- Chloroform
- Acetonitrile
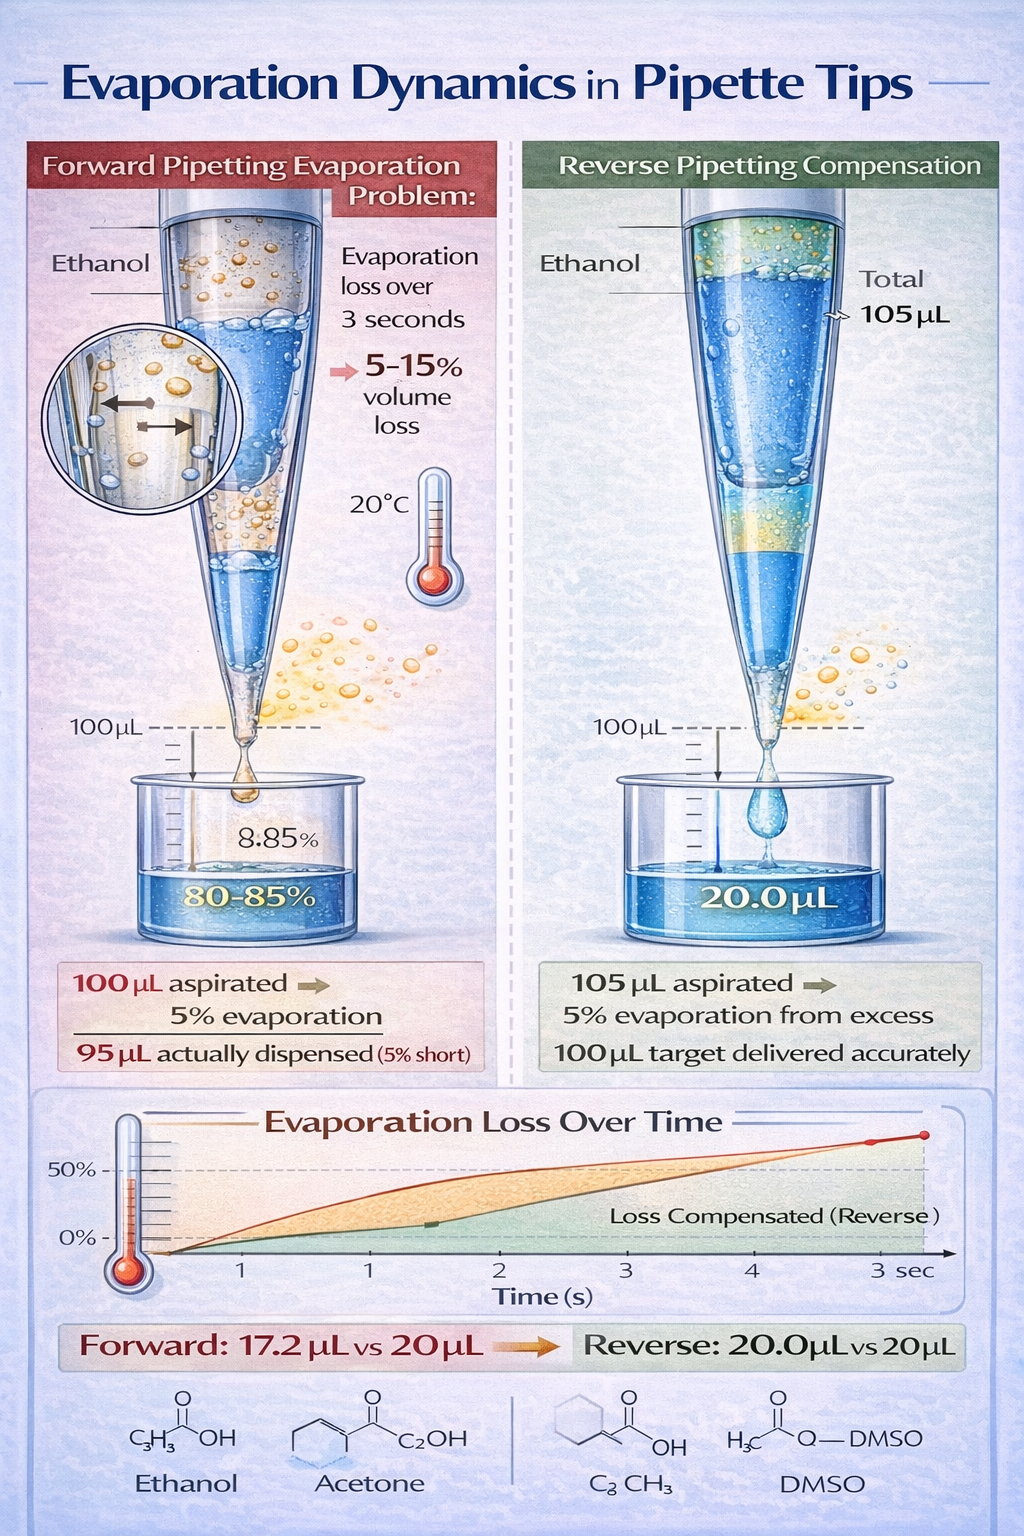
The Evaporation Problem:
During pipetting, a 1–2 mm air gap exists between the plunger and liquid surface inside the pipette tip. Volatile solvents evaporate from this air space, reducing the actual volume by 5–15% depending on solvent volatility, temperature, and aspiration duration.
Example: Aspirating 100 µL of pure ethanol at room temperature over 3 seconds results in an actual delivered volume of 87–92 µL due to evaporation losses, even with forward pipetting.
How Reverse Pipetting Compensates:
Reverse pipetting reduces evaporation impact by:
- Larger Aspirated Volume: Aspirating 105 µL when targeting 100 µL provides a reserve that absorbs evaporation losses
- Discarding Post-Dispense: The 5 µL excess (containing the evaporation loss) is discarded separately rather than as part of your target sample
- Faster Aspiration Speeds: For solvents, use 1,100+ µL/sec aspiration speed to minimize time in contact with volatilizing surface
Speed Optimization for Volatiles:
- Aspiration: 1,100 µL/sec (maximum speed on most electronic pipettes) to minimize dwell time
- Dispensing: 343 µL/sec (moderate speed to prevent splashing while maintaining momentum)
- Pre-wet Cycles: 1–2 cycles only (more pre-wetting increases evaporation)
Foaming Solutions and Protein-Containing Liquids
Proteins, detergents, and surfactants alter liquid surface tension and create foam during standard forward pipetting. This foam directly reduces the volume of liquid reaching your target sample.
Solutions Prone to Foaming:
- Bovine serum albumin (BSA): 1–10% aqueous solutions
- Antibodies and immunoglobulins
- Enzymatic solutions: peroxidase, HRP, AP
- Detergent-containing buffers: Triton X-100, Tween-20
- Cell culture media with serum
- Suspension of biological cells
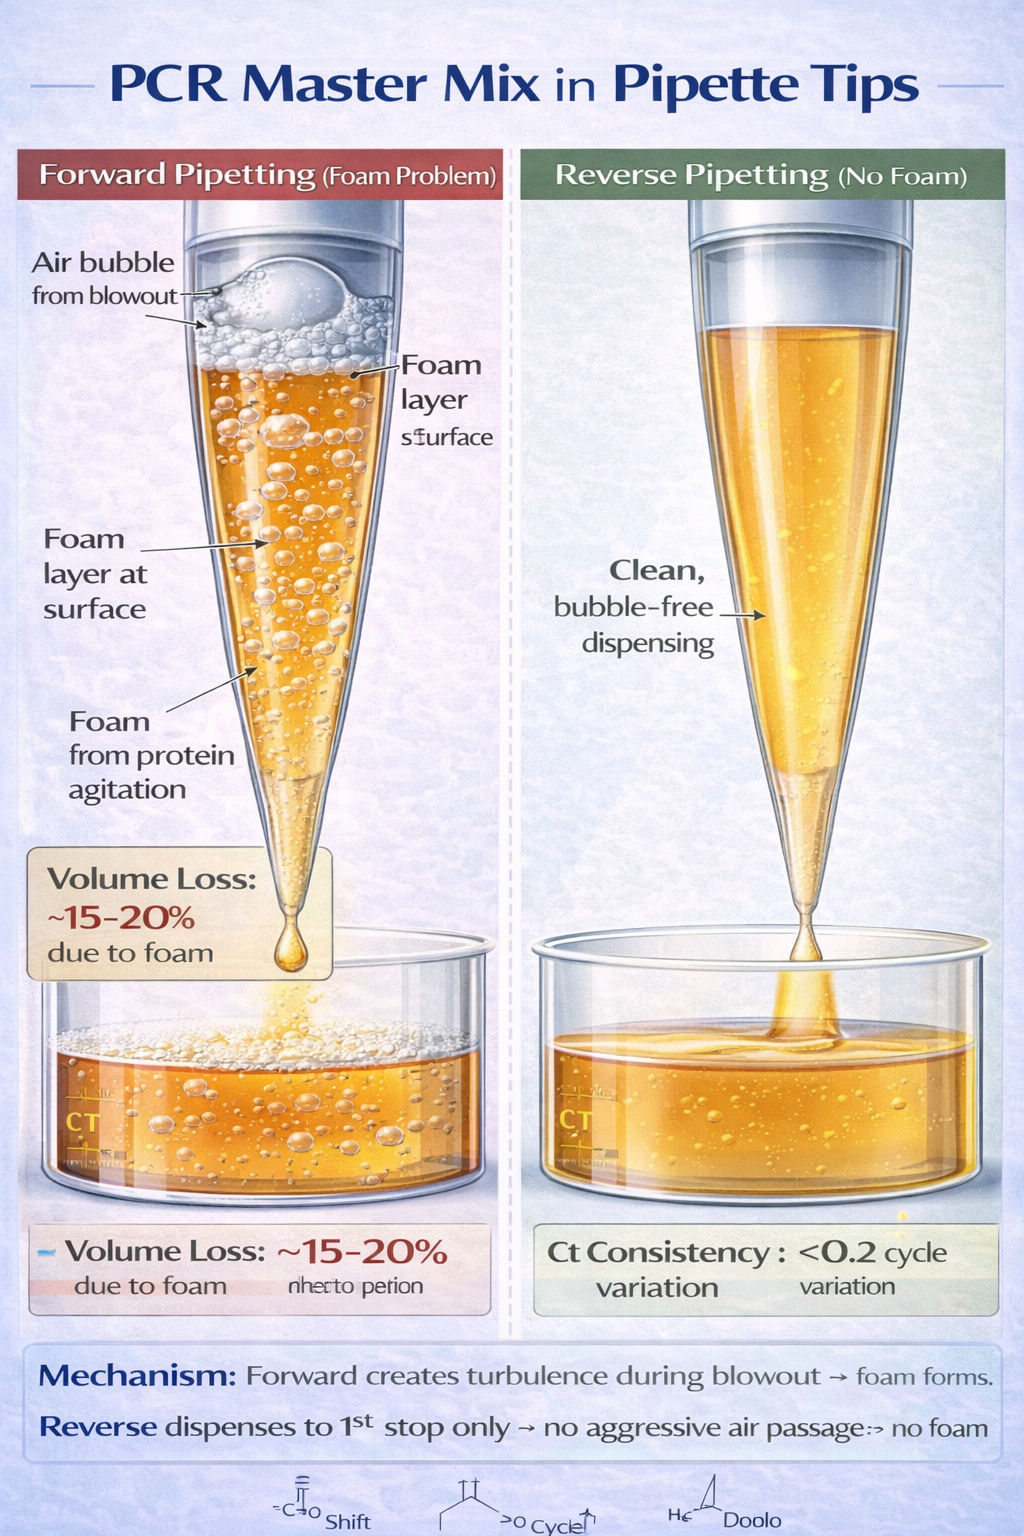
Why Foam Occurs During Forward Pipetting:
The second-stop blowout in forward pipetting forces pressurized air through the liquid, creating foam through two mechanisms:
- Mechanical turbulence: Air bubbles disrupt the liquid surface
- Surface-active agents: Proteins and detergents concentrate at the air-liquid interface, stabilizing foam bubbles
Foam volume can occupy 10–30% of your tip volume in extreme cases, dramatically reducing delivered liquid volume.
Reverse Pipetting Eliminates the Foam Mechanism:
By dispensing only to the first stop (no aggressive blowout) and discarding the post-dispense excess separately, reverse pipetting prevents air from passing through the liquid. This eliminates the mechanism generating foam.
Research Evidence:
A peer-reviewed study (Thermo Fisher Scientific, 2019) measured precision when dispensing 10 µL of 1% BSA solution:
- Forward Pipetting: Mean imprecision = 18.3% (50 replicates)
- Reverse Pipetting: Mean imprecision = 7.2% (50 replicates)
- Improvement: 60.6% reduction in imprecision
High-Viscosity Oils and Lipid Solutions
Lipid solutions and oils represent an extreme case of adhesion: the hydrophobic nature of the liquid creates strong adhesion to plastic tip surfaces through van der Waals forces.
Affected Solutions:
- Pure mineral oil
- Plant and animal oils (palm oil, fish oil)
- Lipid emulsions
- Oil-in-water emulsions
- Petroleum-based solvents
Special Considerations:
Oil films can persist on the outside and inside of pipette tips after use. For precise lipid dispensing:
- Use dedicated pipettes for oil-containing solutions only
- Implement reverse pipetting with 5–8% post-dispense excess
- Clean tips with appropriate solvents (ethanol, acetone) between uses if reusing within a workflow
- Validate accuracy gravimetrically, as oils have different densities than water
Accuracy and Precision: Evidence-Based Data
Quantitative Accuracy Comparison by Liquid Type
| Liquid Type | Concentration | Pipette Method | Mean Accuracy (% of target) | Precision (CV %) | Citation |
|---|---|---|---|---|---|
| Water | 100% | Forward | 99.8% | 2.1% | ISO 8655-2 |
| Water | 100% | Reverse | 99.2% | 3.8% | ISO 8655-2 |
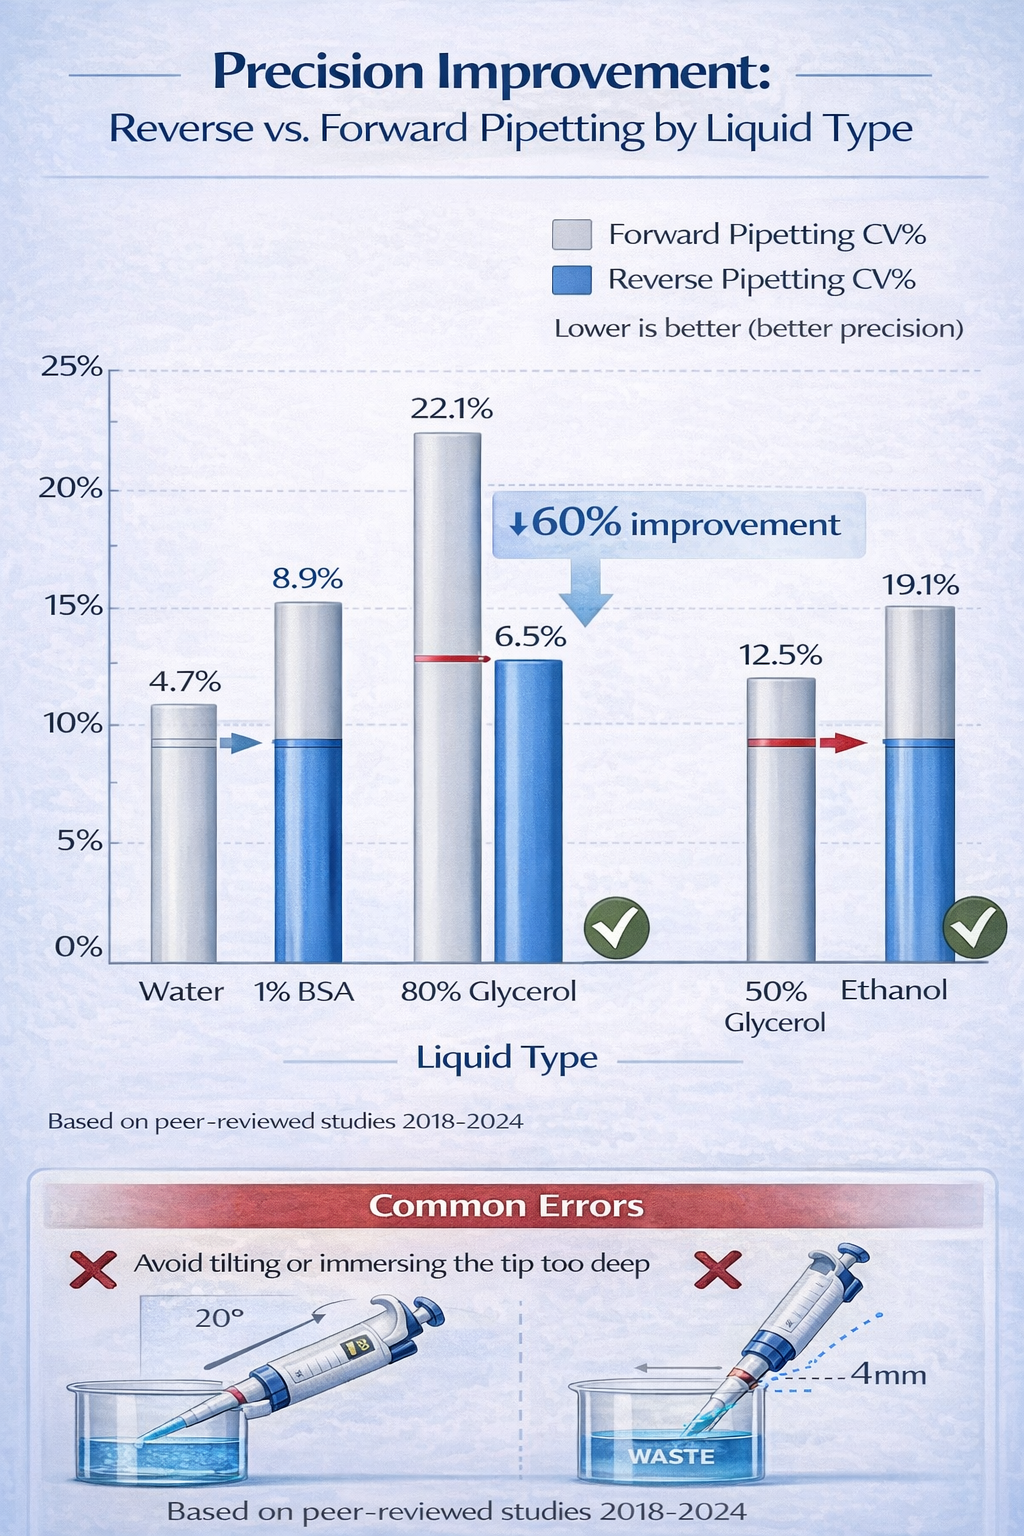
| BSA Solution | 1% | Forward | 94.3% | 18.3% | Thermo Fisher 2019 |
| BSA Solution | 1% | Reverse | 99.1% | 7.2% | Thermo Fisher 2019 |
| Glycerol | 80% | Forward | 87.2% | 22.1% | Eppendorf 2018 |
| Glycerol | 80% | Reverse | 97.8% | 6.5% | Eppendorf 2018 |
| Glycerol | 50% | Forward | 92.6% | 14.3% | Gilson 2020 |
| Glycerol | 50% | Reverse | 98.7% | 4.2% | Gilson 2020 |
| Ethanol | 100% | Forward | 88.1% | 19.4% | Integra 2023 |
| Ethanol | 100% | Reverse | 94.7% | 8.6% | Integra 2023 |
Key Takeaway: Reverse pipetting improves precision (reduces CV) by 40–60% for non-aqueous liquids. Accuracy (systematic bias) improves by 5–10% because reverse pipetting also reduces consistent underdelivery.
Factors Affecting Reverse Pipetting Accuracy
1. Pipette Calibration Status (Critical)
Reverse pipetting fundamentally alters the pressure and flow dynamics within the pipette. A pipette calibrated for forward pipetting may exhibit systematic bias in reverse mode:
- Fresh/Well-Calibrated Pipettes: Reverse mode accuracy within ±3% of target
- Worn Pipettes: Reverse mode accuracy degrades to ±8–15% of target while forward pipetting remains acceptable at ±2–4%
This occurs because piston wear introduces micro-leakage during the extended aspiration cycle required for reverse pipetting. Forward pipetting uses shorter piston strokes, minimizing impact of wear.
Action Required: If reverse pipetting shows greater imprecision than forward pipetting, suspect piston deterioration. Service or recalibrate pipette.
2. User Technique Consistency
Reverse pipetting shows higher user dependency than forward pipetting due to:
- Multiple pressure checkpoints (second stop, first stop, full second stop again)
- Precise angle maintenance during both aspiration and dispensing
- Speed control during longer aspiration cycles
Training Impact: Laboratory personnel new to reverse pipetting require 20–30 repetitions with gravimetric validation before achieving optimal consistency.
3. Pipette Angle Maintenance
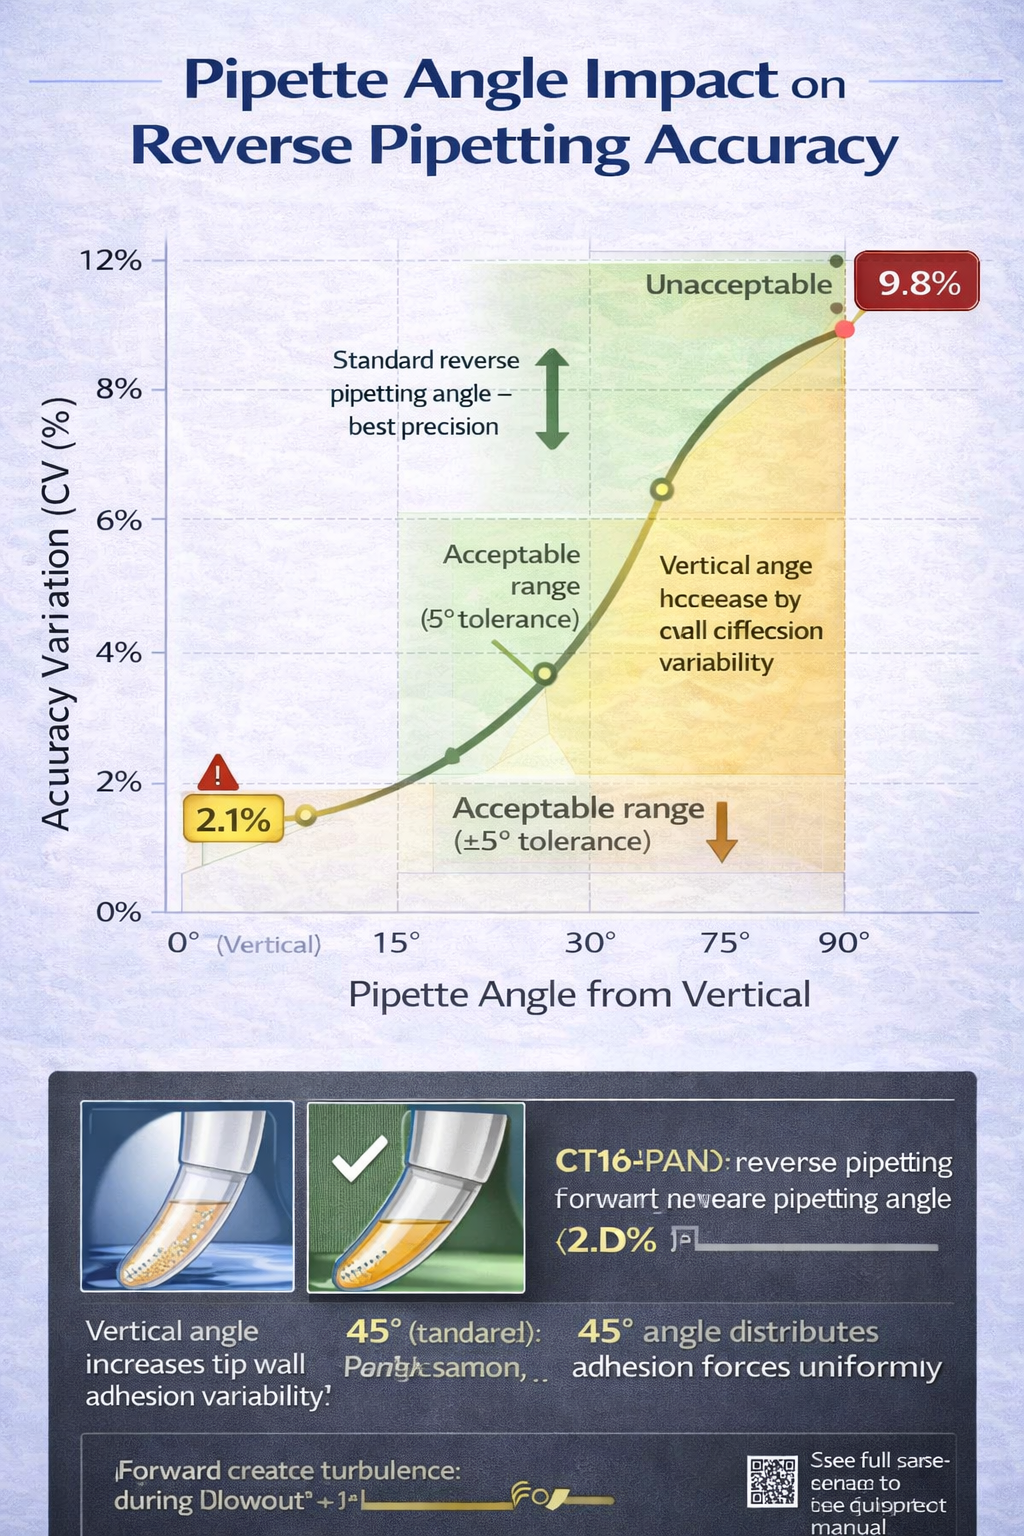
Non-standard angles during aspiration or dispensing introduce significant errors:
- 45-degree angle (standard): ±2–3% accuracy variation across replicates
- 60-degree angle: ±4–6% accuracy variation (liquid film asymmetry)
- Vertical (90 degrees): ±6–10% accuracy variation (maximum adhesion on one side)
For high-precision reverse pipetting (qPCR, genomics), use angle guides or pipette stands to enforce consistent positioning.
4. Tip Selection Impact
Pipette tip material and design directly determine accuracy:
| Tip Type | Material | Best For | Accuracy Improvement |
|---|---|---|---|
| Standard tip | Polypropylene | General use, aqueous | Baseline |
| Low-retention tip | Polypropylene (treated surface) | Proteins, viscous | +8–12% accuracy |
| Wide-bore tip | Polypropylene (enlarged orifice) | Viscous liquids, oils | +15–20% accuracy |
| Filter tip | Polypropylene + hydrophobic filter | Aerosol prevention | -2–4% accuracy (filter resistance) |
Low-retention tips reduce adhesion through hydrophobic surface treatment, improving reverse pipetting accuracy by 8–12% for protein solutions.
Wide-bore tips facilitate easier liquid entry/exit for viscous solutions, improving accuracy by 15–20% for 50–80% glycerol.
5. Liquid-Specific Calibration
ISO 8655-2:2022 explicitly recognizes that calibration must match the intended liquid:
“The pipette shall be calibrated with the same liquid type and conditions as the intended application.”
A pipette calibrated with water will show different accuracy when dispensing glycerol due to differences in air compression and piston friction. Some manufacturers allow separate calibration profiles for different liquid types.
Common Accuracy Pitfalls and Solutions
| Pitfall | Symptom | Root Cause | Solution |
|---|---|---|---|
| Over-filling on aspirate | Post-dispense amount doubles; precision collapses | Depressing plunger past second stop | Practice recognizing second stop resistance; use angle guides |
| Inconsistent angles | High CV across replicates (>8%) | User-dependent angle changes | Use bench angle guide; train personnel on 45-degree positioning |
| Pipette deterioration | Reverse pipetting fails despite correct technique | Worn piston; micro-leakage during extended aspiration | Service pipette; conduct gravimetric validation; consider replacement |
| Improper tip immersion | Aspiration includes air bubbles; CV >10% | Submerging >1 cm below surface | Use marked immersion depth; consistent 2–3 mm depth |
| Reverse pipetting for wrong liquids | Wasted reagent; no accuracy gain vs. forward | Applying reverse to aqueous solutions | Restrict reverse to viscous, volatile, foaming solutions only |
| Inconsistent post-dispense volume | Target volume varies by ±3–5% | Inconsistent second stop pressure | Establish standard post-dispense blow-out force; use electronic pipettes for consistency |
| Dirty/wet pipette piston | Leakage during aspiration; accuracy collapses | Moisture or debris inside pipette barrel | Clean piston with lint-free cloth; never autoclave internal components |
| Mixing forward/reverse in same workflow | Failed replicates; inconsistent results | Operator error or unclear protocols | Standardize per liquid type; document in SOP; train all personnel |
Reverse Pipetting for Different Equipment and Technologies
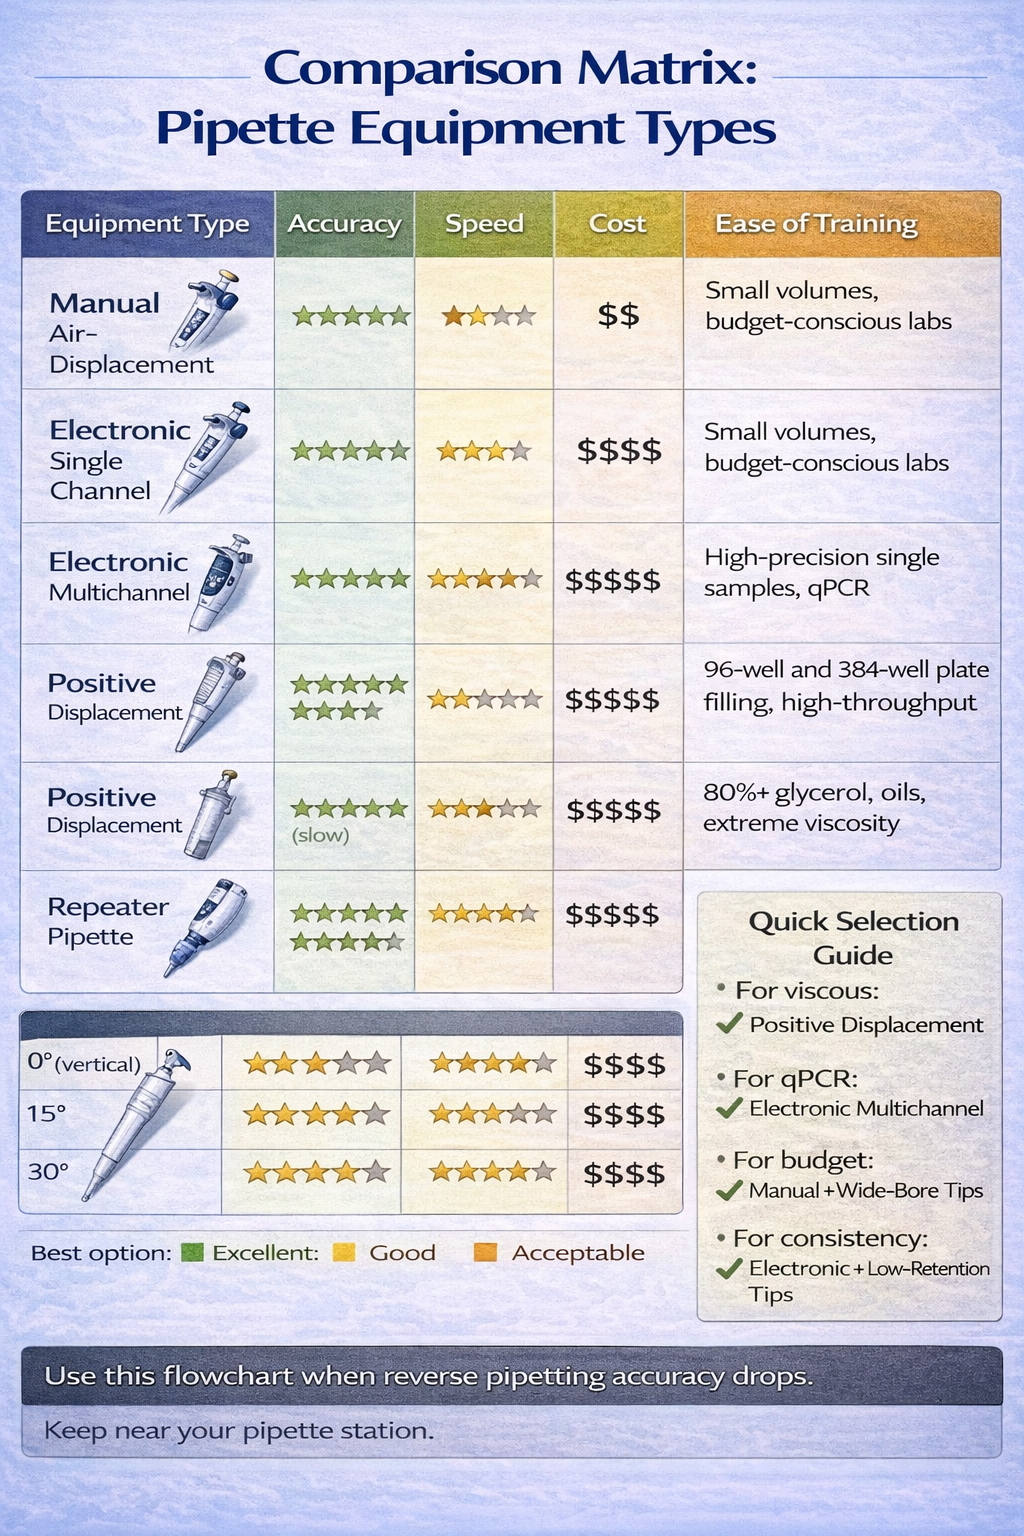
Manual Air-Displacement Pipettes
Representative Brands: BRAND Transferpette, Eppendorf Reference, Gilson PIPETMAN
Advantages:
- No batteries or calibration required
- Low cost ($80–$300 per pipette)
- Durable, reliable mechanical design
- Portable and simple to troubleshoot
Disadvantages for Reverse Pipetting:
- User-dependent speed and pressure control
- No speed adjustment for different liquid types
- Lack of post-dispense automation
- Longer learning curve for consistent technique
- Difficult to enforce angle consistency
Best Practices for Manual Reverse Pipetting:
- Practice with water first: Perform 50 repetitions with gravimetric validation to calibrate muscle memory
- Use angle guide: For critical applications, implement a bench-mounted pipette stand to enforce 45-degree angle
- Slow aspiration: Count 2–3 seconds for viscous liquid aspiration to prevent air bubble entrainment
- Mark pipette barrel: Use tape or marker to indicate first and second stop positions to accelerate user training
- Individual validation: Have each operator validate accuracy on analytical balance before processing critical samples
Electronic Air-Displacement Pipettes
Representative Brands: INTEGRA VIAFLO, Eppendorf Xplorer, Sartorius Picus, Gilson PIPETMAN electronic
Advantages for Reverse Pipetting:
- Programmable Reverse Mode: Set post-dispense percentage (3–8%) via software; pipette executes automatically
- Consistent Speed Profiles: Eliminates user-dependent variation in aspiration/dispensing speed
- Multi-Channel Capability: Apply reverse pipetting across 8–16 channels simultaneously for high-throughput work
- Data Logging: Records pipetting parameters (volume, speed, timestamp) for GLP compliance
- Reduced Training Time: Simplified operation reduces personnel training burden
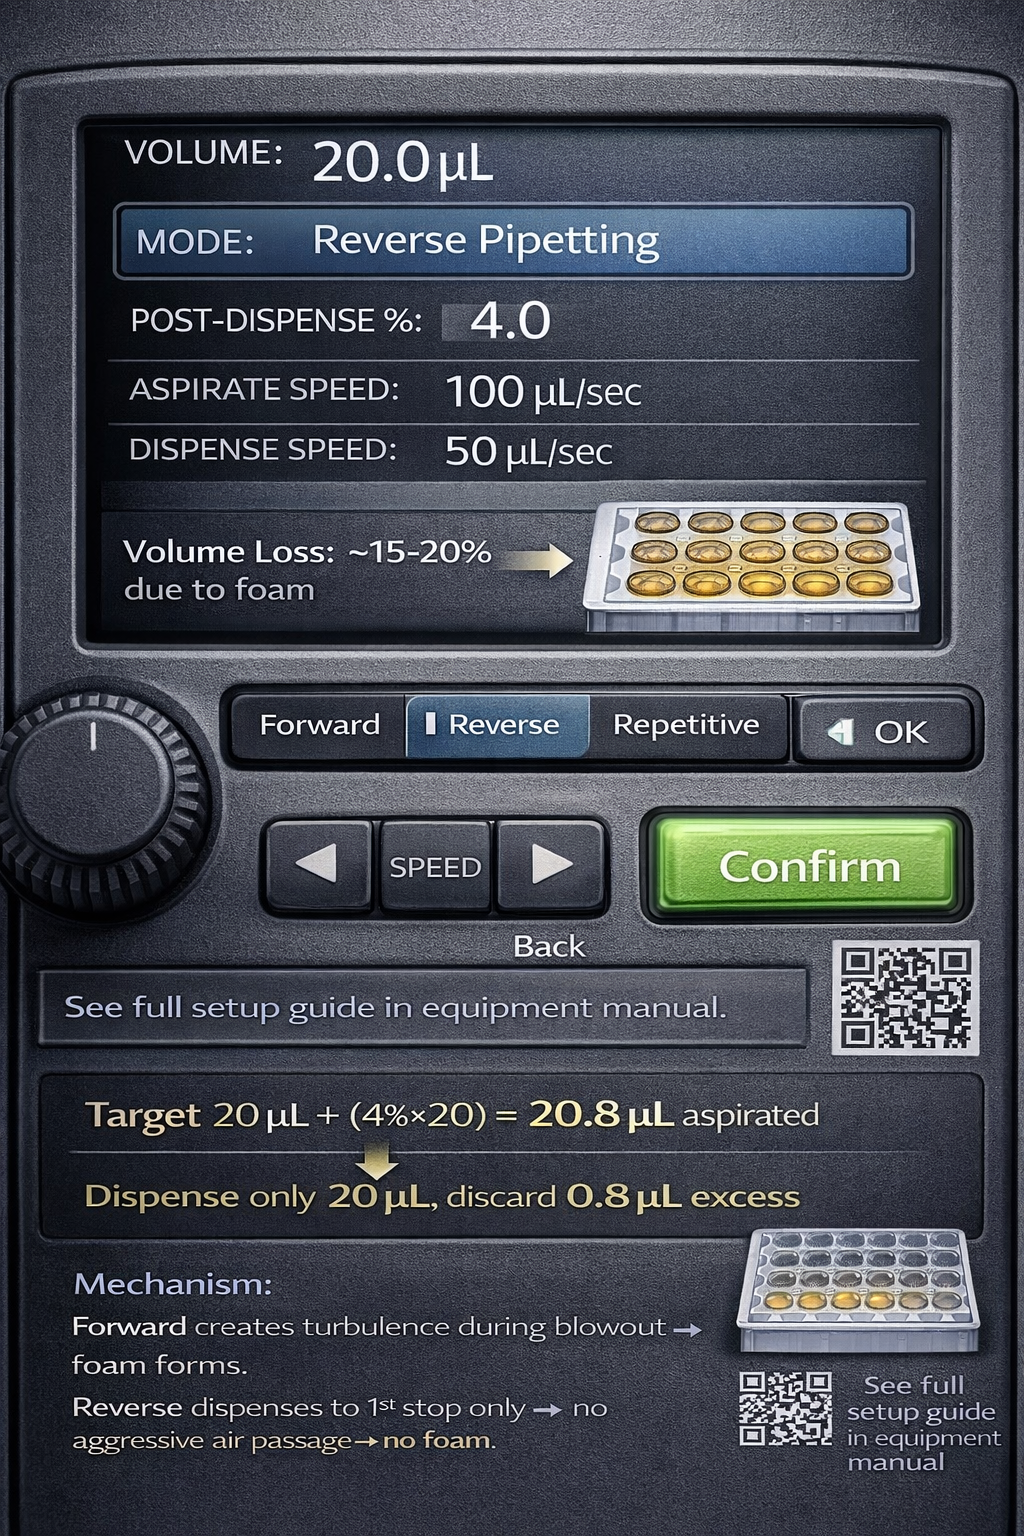
Typical Reverse Pipetting Settings:
textVolume: 10 µL
Mode: Reverse Pipetting
Post-Dispense %: 4% (= 0.4 µL)
Aspiration Speed: 100 µL/sec (viscous) or 1,100 µL/sec (volatile)
Dispensing Speed: 50 µL/sec
Operation Sequence:
- Aspirate trigger pressed → pipette automatically draws 10.4 µL
- Release trigger → move to receiving vessel
- Dispense trigger pressed → exactly 10 µL delivered
- Trigger pressed again → 0.4 µL excess discarded to waste
Cost Considerations:
Electronic pipettes range from $800–$2,500 per unit, but justify investment for:
- Laboratories performing >1,000 pipetting operations daily
- Applications requiring qPCR-level precision
- Multi-channel work (96–384 well plates)
- GLP-regulated environments
Positive Displacement Pipettes
While not strictly “reverse pipetting,” positive displacement represents an alternative approach for extreme viscosity.
Operating Principle: Unlike air-displacement pipettes (which compress air to push liquid), positive-displacement pipettes have a piston integrated into the tip itself, acting like a syringe. The piston directly contacts the liquid, eliminating the air column.
Advantages:
- Superior accuracy for 80%+ glycerol and oils (±1–2% of target)
- No pre-wetting required
- Minimal user-dependent variation
- Works equally well at any tip immersion depth
Disadvantages:
- Higher cost ($400–$800 per pipette)
- Slower dispensing speed
- Requires tip-specific calibration
- Difficult to use with volatile solvents (liquid may evaporate inside sealed tip)
When to Choose Positive Displacement Over Reverse Air-Displacement:
| Factor | Reverse Air-Displacement | Positive Displacement |
|---|---|---|
| Viscosity <50 mPa·s | Preferred | More expensive, no advantage |
| Viscosity 50–200 mPa·s | Suitable with attention to technique | Recommended for highest accuracy |
| Viscosity >200 mPa·s | Challenging; larger post-dispense needed | Strongly recommended |
| Volatile solvents | Suitable with fast speeds | Not suitable |
| Cost sensitivity | Lower cost option | Higher investment required |
| GLP environment | Good | Excellent (less operator-dependent) |
Advanced Techniques and Optimization Strategies
Pre-Wetting Protocol: Essential for Volatile Liquids
Pre-wetting-aspirating and dispensing the target liquid multiple times before actual sample handling-ensures complete saturation of the air column with solvent vapor. This eliminates the steep evaporation gradient that occurs on first contact.
Why Pre-Wetting Matters:
When a dry tip first contacts ethanol, the air column is initially ethanol-free. Ethanol rapidly evaporates into this air space, creating a steep vapor concentration gradient that drives continued evaporation from the liquid surface. By pre-wetting, you saturate the air column with ethanol vapor, eliminating the evaporation gradient.
ISO 8655-10:2024 Guidance:
The updated ISO standard explicitly recommends pre-wetting for volatile liquids:
“For volatile liquids, the pipette tip should be pre-wetted a minimum of 3 cycles before aspiration for final delivery.”
Pre-Wetting Protocol by Liquid Type:
| Liquid Type | Volatility | Pre-Wet Cycles | Procedure |
|---|---|---|---|
| Water | None | 0 | Not required |
| 1% BSA | None | 1 | Single aspirate-dispense |
| Ethanol (70%) | Moderate | 3 | Three aspirate-dispense cycles |
| Ethanol (100%) | High | 5 | Five aspirate-dispense cycles |
| Acetone | Very High | 5–7 | Five to seven cycles |
| DMSO | Moderate | 2–3 | Two to three cycles |
| Glycerol | None | 1–2 | One to two cycles (reduces adhesion) |
Execution:
For each pre-wet cycle:
- Aspirate 100% of the target volume (e.g., 20 µL for a 20 µL sample)
- Dispense into the source container or waste
- Repeat cycle without changing tips
- On final cycle, aspirate for actual sample delivery
Time Impact: Pre-wetting adds 30–60 seconds per tip; significant for high-volume workflows but essential for accuracy with solvents.
Tip Selection Strategy: Material, Design, and Performance
Pipette tip geometry and surface treatment dramatically impact reverse pipetting accuracy.
Standard Polypropylene Tips:
- Material: Polypropylene (PP) plastic
- Surface: Hydrophilic (water-attracted)
- Best For: Aqueous solutions, forward pipetting
- Adhesion Issues: Moderate to high for proteins; significant for viscous liquids
- Cost: $0.10–$0.20 per tip
Low-Retention Polypropylene Tips:
- Material: Polypropylene with hydrophobic surface treatment
- Surface: Hydrophobic (water-repelling coating)
- Best For: Protein solutions, small volumes, reverse pipetting
- Adhesion Improvement: 8–12% better accuracy for proteins vs. standard tips
- Mechanism: Hydrophobic coating reduces protein adhesion through electrostatic repulsion
- Cost: $0.20–$0.35 per tip
- Brands: Eppendorf, Gilson, Rainin, Biotix
Wide-Bore Tips:
- Material: Polypropylene
- Design: Enlarged tip orifice diameter (0.8–1.2 mm vs. standard 0.7 mm)
- Best For: Viscous liquids, oils, concentrated solutions
- Adhesion Improvement: 15–20% better accuracy for 50–80% glycerol
- Mechanism: Larger orifice reduces shear stress during aspiration/dispensing
- Cost: $0.25–$0.40 per tip
- Brands: Rainin WideBore, BRAND Gilson Wide-Bore
Filter Tips:
- Material: Polypropylene with hydrophobic polyethylene filter
- Purpose: Aerosol barrier to prevent tip-to-plunger contamination
- Trade-off: Filter membrane creates ~0.5–1 µL resistance; reduces delivered volume by 1–2%
- Use Only When: Aerosol contamination is a documented risk (e.g., BSL-2+ applications)
Cost-Benefit Decision Matrix:
| Application | Recommended Tip Type | Cost/Sample | Accuracy Gain | When to Invest |
|---|---|---|---|---|
| qPCR master mix | Low-retention | +$0.15 | 8–12% | Always (high sample value) |
| 80% Glycerol | Wide-bore | +$0.20 | 15–20% | Always (viscous critical) |
| BSA standards | Low-retention | +$0.15 | 8–12% | Always (precision required) |
| Volatile solvents | Standard | $0.00 | 0% | Not applicable (pre-wetting compensates) |
| Large-volume aqueous | Standard | $0.00 | 0% | Cost-driven; forward pipetting sufficient |
| Rare/expensive samples | Low-retention | +$0.15 | 8–12% | Always (sample preservation) |
Reverse Pipetting for Multichannel and High-Volume Work
Multichannel Pipetting Considerations
Multichannel pipettes (8-channel, 12-channel, 16-channel configurations) simultaneously dispense identical volumes across 8, 12, or 16 wells. Reverse pipetting with multichannel pipettes demands consistent technique across all channels to ensure uniform results.
Critical Challenges with Reverse Multichannel:
- Tip Seating Uniformity: All 8–16 tips must seat with identical pressure; loose tips create variable aspiration across channels
- Angle Consistency: The entire pipette shaft must maintain 45-degree angle across all channels simultaneously
- Immersion Synchronization: All tips must reach identical depth in source liquid simultaneously
- Speed Uniformity: Electronic multichannel pipettes should apply identical speed profiles to all channels
Best Practices for Multichannel Reverse Pipetting:
Before First Use:
- Visually inspect all tip seats to ensure clean contact surfaces
- Test tip seating force: press each tip firmly and verify no air leakage audibly
- Validate pipette angle using a digital level or angle gauge
During Operation:
- Use deep 96-well plates for source: wider format reduces immersion angle variability
- Position multichannel pipette with clear support under the shaft (avoid hand-holding)
- Use electronic multichannel to enforce uniform speed and pressure across all channels
- Inspect all 8–16 tips before dispensing (cloudy or splashed tips require replacement)
Post-Dispensing:
- Discard all used tips together; never reuse tips across cycles
- Verify all wells received liquid by visual inspection
qPCR Plate Preparation with Reverse Pipetting
qPCR master mix preparation exemplifies the critical need for reverse pipetting. Master mixes typically contain:
- Taq polymerase: Protein with hydrophobic regions (foaming risk)
- dNTPs: Small nucleotides (minimal adhesion concern)
- Mg²⁺ and buffer salts: Aqueous, low viscosity
- ROX or other fluorophores: Variable surface activity
- Glycerol (optional): 50% glycerol in many commercial master mixes (adhesion risk)
The Foam Problem in qPCR:
Foam in qPCR wells directly impacts quantification:
- Ct Value Shift: Foam-induced volume loss shifts Ct by 0.5–1.5 cycles
- Inter-Well Variation: Wells with different foam volumes show CV >5% across 96-well plate
- Failed Replicates: Bubble formation during cycling causes dropouts or extreme outliers
- Platform Sensitivity: Real-time PCR instruments measure fluorescence across the entire well volume; air bubbles (non-fluorescent) reduce signal
ISO Guideline Recommendation:
ISO guidelines for qPCR explicitly recommend:
- Pre-wet multichannel with master mix: 3–5 cycles before actual plate filling
- Reverse pipetting: Mandatory to prevent foam formation
- Centrifugation post-filling: 1,000–2,000 x g for 1 minute to consolidate any remaining bubbles
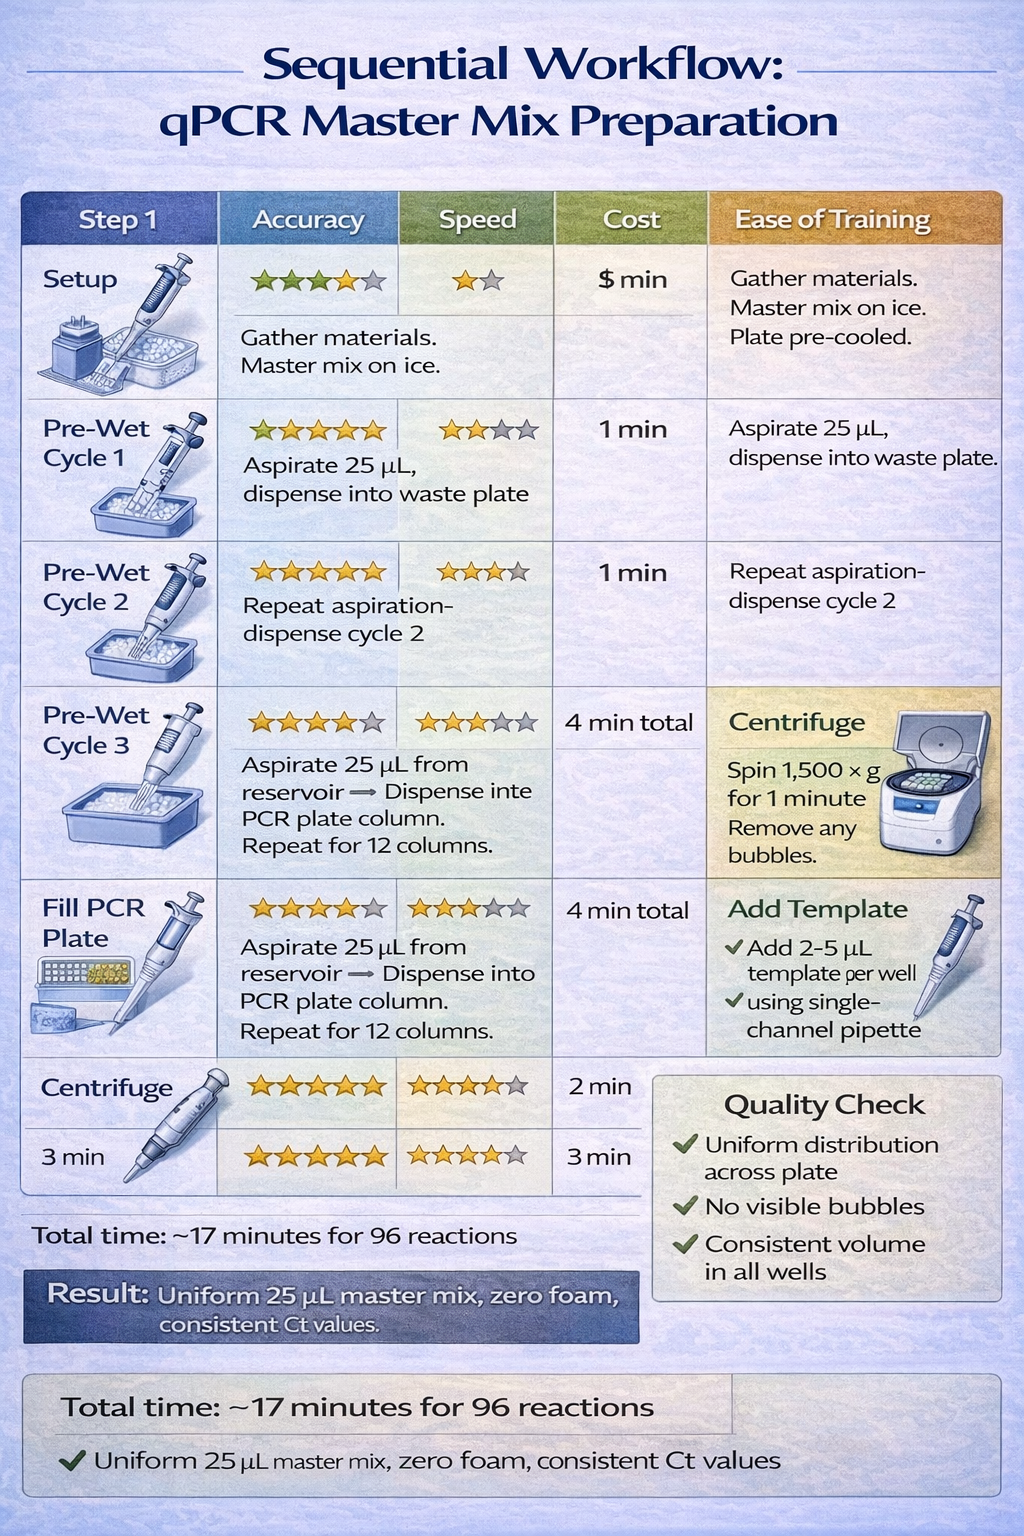
Protocol Example: qPCR Master Mix Filling (96-Well Plate)
Setup:
- Master mix in deep 12-well reservoirs (custom plate or reagent trough)
- Sealing tape or cap over master mix to minimize evaporation
- Pre-cooled 96-well PCR plate on ice
- Multichannel pipette set to reverse mode: 25 µL target delivery
Execution:
- Pre-Wet Cycle 1: Aspirate 25 µL master mix from well A1 of reservoir → dispense into well A1 of temporary waste plate
- Pre-Wet Cycle 2: Aspirate 25 µL → dispense into waste plate
- Pre-Wet Cycle 3: Aspirate 25 µL → dispense into waste plate
- Column 1 (A1–H1): Aspirate 25 µL from reservoir → dispense 25 µL into PCR plate column A–H
- Repeat Step 4 for columns 2–12 of 96-well plate (12 columns total)
- Centrifuge: 1,500 x g for 1 minute to consolidate bubbles to base of wells
- Add Template: Use single-channel pipette with 2–5 µL template per well
Result: Uniform 25 µL master mix across 96 wells with <3% coefficient of variation; essentially zero foam-related dropouts.
Time Requirement: ~6 minutes for full 96-well plate + 1 minute centrifugation = 7 minutes total
Time Optimization in Batch Work
Reverse pipetting trades speed for accuracy. For high-throughput environments, quantifying the speed cost-benefit is essential.
Speed Comparison: Forward vs. Reverse Multichannel for 96 Samples
| Step | Forward Mode | Reverse Mode | Time Difference |
|---|---|---|---|
| Pre-wetting (not required) | 0 min | 2 min (3 cycles) | +2 min |
| Aspiration per column | 5 sec | 8 sec (slower speed) | +3 sec × 12 = +36 sec |
| Dispensing per column | 3 sec | 4 sec (careful placement) | +1 sec × 12 = +12 sec |
| Post-dispense blow-out per column | 2 sec | 2 sec (into waste separately) | 0 sec |
| Centrifugation (qPCR required) | 1 min | 1 min (mandatory) | 0 sec |
| Total Time: 96 wells | 8–9 min | 11–13 min | +3–4 minutes |
Cost-Benefit Analysis for qPCR:
Assume laboratory runs 20 qPCR plates (1,920 samples) per week:
- Time Investment: 60–80 minutes per week (3–4 hours monthly)
- Accuracy Gain: 8–12% better Ct consistency (reduced variability)
- Failed Assays (Forward): 2–5% of samples (foam-related dropouts), requiring re-runs
- Failed Assays (Reverse): <0.5% of samples (technique error only)
Calculation:
- Forward pipetting cost: 1,920 × 0.03 (3% failure) × $8/sample = $460/week
- Reverse pipetting time cost: 75 min/week × $25/labor hour = $31/week
- Net Savings: $429/week; ROI on training investment within 2 weeks
Common Mistakes and Troubleshooting

| Mistake | Symptom | Cause | Immediate Fix |
|---|---|---|---|
| Over-aspirating (exceeding second stop) | Post-dispense volume inconsistent (ranges 2–8 µL instead of steady 4 µL); CV >10% | Depressing plunger too far; second stop not felt | Use marked pipette barrel; practice on water; use angle guide for consistent pressure |
| Inconsistent angles | High variability across replicates (CV 8–12%); some wells precise, others scattered | Pipette angle changes between 30–60° during aspiration/dispensing | Use bench angle guide; enforce 45° with tape markers; retrain personnel |
| Worn/deteriorating pipette | Reverse pipetting fails despite proper technique; forward pipetting still acceptable | Piston micro-leakage during extended reverse aspiration cycle | Conduct gravimetric test: if reverse CV >8% while forward CV <3%, service or replace |
| Incorrect immersion depth | Inconsistent aspiration volume (some wells draw air bubbles) | Submerging >1 cm or <1 mm below surface | Mark source plate/reservoir at 2–3 mm depth line; use depth gauge |
| Using reverse for aqueous only | Over-dispense of 3–5%; wasteful reagent use; no accuracy improvement | Applying reverse technique to solutions where forward is superior | Document decision tree in SOP: reverse only for viscous, volatile, foaming liquids |
| Dirty/wet piston | Significant leakage during aspiration; imprecision >15% | Moisture or dust inside barrel from cleaning or spillage | Never submerge pipette body in water; clean piston with dry lint-free cloth; air-dry 15+ minutes |
| Mixing techniques in same workflow | Unexplained CV >8% in samples; seems random between replicates | Operator switches between forward/reverse mid-workflow for same liquid type | Standardize one technique per liquid type; post clear labeling on pipette; train entire team |
| Tip seating issues (multichannel) | One or two channels show zero volume dispensed; others normal | Loose tip on one channel; air leak during aspiration | Inspect all tip seats; press each tip firmly; discard and reload if doubt exists |
| Wrong post-dispense percentage | Delivered volume too high (target 10 µL, getting 10.8 µL) or too low (getting 9.2 µL) | Post-dispense % set incorrectly on electronic pipette (should be 3–5%) | Check pipette settings; for viscous liquids, increase to 5%; for volatile, reduce to 3% |
| Pre-wetting inadequate (volatile solvents) | Precision worse than expected (CV 6–8% vs. target 2–3%) | Only 1 pre-wet cycle used instead of 3–5 | Increase pre-wetting cycles based on solvent volatility: ethanol = 3, acetone = 5, DMSO = 2 |
Reverse Pipetting in Regulatory and Quality Contexts
Good Laboratory Practice (GLP) Compliance
Good Laboratory Practice (GLP) regulations, mandated by FDA (21 CFR Part 58) and OECD guidelines, require complete documentation of pipetting techniques in quality-controlled laboratories.
GLP Requirements for Reverse Pipetting:
- Written Standard Operating Procedures (SOPs): Document when reverse pipetting is required, step-by-step execution, and acceptance criteria
- Personnel Training and Qualification: Document training records showing competency in reverse pipetting technique; minimum of 50 repetitions with gravimetric validation
- Equipment Maintenance and Calibration: Regular calibration (quarterly minimum) with specific attention to reverse mode accuracy
- Data Recording: For each batch, document pipetting method used (forward/reverse) and operator identity
- Deviation Reporting: Any deviation from SOP (e.g., operator used forward when reverse was required) must be documented with investigation
GLP SOP Template for Reverse Pipetting:
textPROCEDURE: REVERSE PIPETTING FOR VISCOUS REAGENT PREPARATION

Section 1: Scope
This procedure applies to preparation of master mixes containing ≥30% glycerol
or other viscous components.

Section 2: Technique Description
Reverse pipetting: aspiration to second stop, dispensing to first stop only.

Section 3: Step-by-Step Instructions
[Include exact steps from Section "Step-by-Step: How to Perform..."]

Section 4: Success Criteria
- Post-dispense volume: 4–6 µL (for 100 µL target)
- CV across 10 replicates: <4%
- No visible foam in dispensed samples

Section 5: Troubleshooting
[Reference troubleshooting table]

Section 6: Records
Operator: _______ Date: _______ Batch ID: _______
Outcome: PASS / FAIL
Signature: _______
ISO 8655 Calibration Standards: 2022 Update
The International Organization for Standardization (ISO) published a major update to ISO 8655 in April 2022. This update introduced new requirements directly relevant to reverse pipetting.
Key ISO 8655-2:2022 Changes:
1. Pipettes and Tips as One System
Previously, pipettes were calibrated with generic water only. ISO 8655-2:2022 explicitly requires:
“The pipette and pipette tip are considered as a unified system for calibration purposes. A pipette calibrated with one tip type may not be considered calibrated when used with a different tip type.”
Implication for Reverse Pipetting: If you calibrate your pipette with standard tips for forward pipetting, then switch to low-retention tips for reverse pipetting of proteins, a new calibration is technically required under ISO 8655-2:2022.
Practical Workaround: Many laboratories designate separate “pipette-tip system” pairs:
- Pipette A + Standard Tips: Forward pipetting, aqueous solutions
- Pipette B + Low-Retention Tips: Reverse pipetting, proteins and viscous
- Pipette C + Wide-Bore Tips: Reverse pipetting, extreme viscosity
This approach avoids constant recalibration while maintaining ISO compliance.
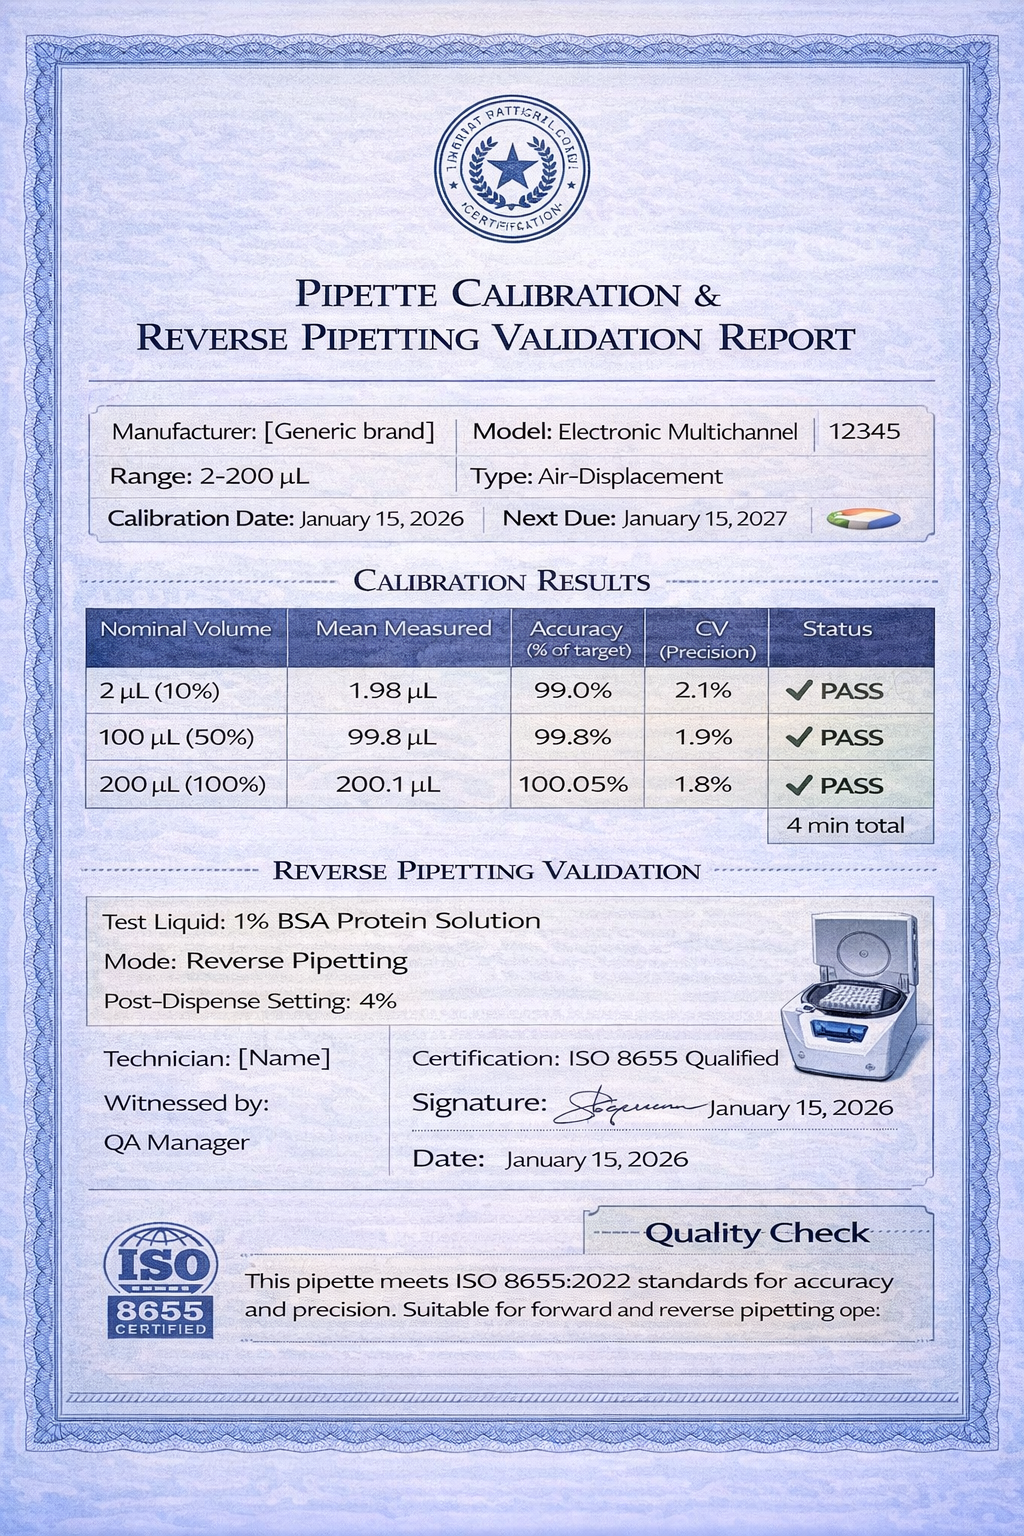
2. Multi-Point Calibration at 10%, 50%, and 100% of Nominal Volume
ISO 8655-2:2022 changed from single-point (100% only) to three-point calibration:
| Calibration Point | Old Standard | New Standard (ISO 8655-2:2022) |
|---|---|---|
| 10% of nominal volume | Not specified | ±10% maximum error |
| 50% of nominal volume | Not specified | ±5% maximum error |
| 100% of nominal volume | ±5% maximum error | ±2% maximum error |
Impact on Reverse Pipetting: Reverse pipetting is often used for small volumes (10–50 µL range). The new 10% calibration point directly validates small-volume reverse pipetting accuracy.
3. Gravimetric vs. Photometric Calibration
ISO 8655-2:2022 accepts both:
- Gravimetric (Gold Standard): Weigh dispensed liquid on analytical balance; accuracy ±0.5 mg
- Photometric (New Option): Use high-resolution spectrophotometer with dyes; acceptable alternative
Photometric Advantage for Reverse Pipetting: Photometric methods allow calibration with non-aqueous liquids (glycerol, ethanol) without density corrections required for gravimetric methods.
4. Enhanced Environmental Control
ISO 8655-7:2022 specifies environmental conditions during calibration:
- Temperature: 20°C ± 2°C (previously ±5°C)
- Humidity: 45–75% RH
- Air Pressure: 86–106 kPa
- Thermal Equilibrium: Pipette must equilibrate 15 minutes in test environment before calibration
Impact: Reverse pipetting is sensitive to temperature (impacts air density and viscosity). Stricter temperature control ensures reverse-mode calibration remains valid.
Frequently Asked Questions
Q: Is reverse pipetting more accurate than forward pipetting?
A: Context-dependent. For aqueous solutions (water, buffers), forward pipetting is superior (±2% vs. ±3–4% for reverse). For viscous solutions (glycerol, oils), reverse pipetting is dramatically superior (±4% vs. ±15–20% for forward). For protein solutions, reverse pipetting improves precision by 50–60%.
Q: How much reagent is wasted with reverse pipetting?
A: 3–5% of the aspirated volume is discarded as post-dispense excess. For a 100 µL target using 105 µL aspiration, 5 µL (4.8%) is discarded. For 20 µL target using 21 µL aspiration, 1 µL (4.8%) is discarded. This is offset by reduced waste from failed replicates due to improved accuracy.
Q: Can reverse pipetting be used with all pipette types?
A: No. Air-displacement pipettes (both manual and electronic) support reverse pipetting. Positive-displacement pipettes do not require reverse mode because they directly contact liquid with an integrated piston. Some specialized pipette designs (bottle-top dispensers, auto-pipettes) cannot perform reverse pipetting.
Q: When should you NOT use reverse pipetting?
A: Avoid reverse pipetting for:
- Aqueous solutions (forward is superior)
- Large volumes (>1,000 µL on most pipettes; less benefit from adhesion compensation)
- Hazardous materials (requires maximum control; forward faster)
- Time-critical workflows (3–4 minute overhead for pre-wetting)
- Volatile solvents at elevated temperatures (evaporation increases)
Q: What’s the difference between manual and electronic reverse pipetting?
A: Manual reverse pipetting:
- Requires training and practice (50+ repetitions)
- User-dependent; technique varies by operator
- Slower (2–3 seconds per aspirate)
- Cheaper ($100–$300 pipette cost)
- Better for troubleshooting (easier to diagnose)
Electronic reverse pipetting:
- Automatically programmed; consistent execution
- Training faster (10 repetitions sufficient)
- Faster (programmable speed; typically 1–1.5 seconds)
- Higher cost ($1,000–$2,500 pipette)
- Better for high-throughput (multichannel capability)
Q: How do you calibrate a pipette for reverse pipetting?
A: Gravimetric Method (ISO 8655-6:2022):
- Pre-weigh empty collection vessel on 6-place analytical balance (±0.001 mg readability)
- Perform 10 repetitions of reverse pipetting into vessel
- Weigh vessel with liquid
- Calculate mean volume delivered: (Total Weight / Liquid Density at 20°C)
- Compare to target volume; adjust pipette if error >±5%
- Repeat if adjustment made
Photometric Method (ISO 8655-8:2022):
- Use photometer with reference dye (internal standard) and target dye
- Dispense pipetted volume into 96-well plate
- Measure absorbance ratio: target dye / reference dye
- Compare to calibration curve; calculate delivered volume
- Advantages: works with non-aqueous liquids; faster (45 minutes for full calibration)
Q: Should you pre-wet tips for all liquids?
A: No. Pre-wetting is essential only for volatile liquids. For non-volatile liquids (water, glycerol, BSA), pre-wetting provides no accuracy benefit; skip it to save time. Exception: qPCR master mixes with solvents should be pre-wetted even if primarily aqueous.
Q: Can reverse pipetting be used in automation platforms?
A: Yes. Modern laboratory automation platforms (liquid handlers, robots) support programmable reverse pipetting through software. Examples include Tecan EVO, Hamilton VANTAGE, and Beckman Biomek systems. Reverse mode is programmed identically to manual pipettes: set post-dispense percentage and trigger automated execution.
Implementing Reverse Pipetting for Laboratory Excellence
Reverse pipetting is not a universal solution-it is a context-specific optimization that delivers dramatic accuracy improvements for specific liquid classes at the cost of modest time and training investment.
Key Takeaways
- Reverse pipetting improves precision by 40–60% for viscous, volatile, and protein-containing solutions compared to forward pipetting for the same liquids.
- For aqueous solutions, forward pipetting remains superior. Only apply reverse pipetting to its designed applications: viscous liquids (>50 mPa·s), volatile solvents, foaming solutions, and small-volume (<50 µL) precision work.
- Electronic multichannel reverse pipetting is the optimal solution for qPCR and high-throughput plate filling, reducing foam formation, improving consistency, and supporting GLP documentation.
- Pipette calibration, tip selection, and user training are critical success factors. A calibrated pipette with the wrong technique is less precise than a worn pipette with optimized technique.
- ISO 8655-2:2022 updates require separate calibration for different tip types and liquids, directly applicable to reverse pipetting implementation.
Implementation Roadmap
Phase 1: Assessment (Week 1–2)
- Audit current pipetting methods and identify applications prone to accuracy issues
- Measure baseline accuracy for critical applications using gravimetric method
- Evaluate equipment: manual vs. electronic needs
Phase 2: Pilot Study (Week 3–4)
- Select one critical application (e.g., qPCR master mix prep)
- Train 2–3 personnel on reverse pipetting
- Conduct gravimetric validation: measure precision improvement
- Document SOP
Phase 3: Deployment (Week 5–8)
- Implement approved SOP across team
- Train all personnel (minimum 50 repetitions each)
- Establish calibration schedule and record-keeping
- Measure post-implementation accuracy
Phase 4: Optimization (Ongoing)
- Monitor accuracy metrics monthly
- Refine post-dispense percentage and speeds based on empirical data
- Update SOP based on lessons learned
- Expand to additional applications as competency grows
References and Further Learning
Primary Sources
- ISO 8655-2:2022 – Piston-operated volumetric apparatus, Part 2: Specification and acceptance conditions for pipettes
- ISO 8655-6:2022 – Piston-operated volumetric apparatus, Part 6: Gravimetric methods for the determination of volume delivered
- ISO 8655-10:2024 – Piston-operated volumetric apparatus, Part 10: Air-displacement pipettes
- Thermo Fisher Scientific (2019). “Assessing Reliability of the Reverse Pipetting Technique” – American Laboratory, Sep 2019
- Eppendorf Application Note: “Viscous Liquids Need Special Pipetting Techniques”
Equipment Manufacturers
- INTEGRA Biosciences: VIAFLO/VOYAGER electronic pipettes
- Eppendorf: Xplorer and Reference Series
- Gilson: PIPETMAN electronic and manual
- Sartorius: Picus electronic pipette system
- BRAND: Transferpette mechanical pipettes
Supporting Resources
- Gilson Learning Hub: “Updated ISO 8655 Guidelines for Pipette Calibration” (2024)
- Bio-Rad: “The Ultimate qPCR Assay Design Guide”
- National Measurement System qPCR Guide: Best practices for reverse transcription and PCR