The surgical outcome begins long before the first incision. It begins with the selection of the right instruments, organized into the right packs, maintained to the right standard, and used for the precise function each one was designed to serve. A surgeon with incorrect or poorly maintained instruments is limited not by skill but by tools — and those limitations show up in tissue handling quality, hemostasis reliability, suture placement precision, and ultimately in the patient’s recovery.
This guide delivers the complete functional breakdown that veterinary surgical instrument education usually omits: not just instrument names, but what each category does, why it exists in the surgical workflow, what belongs in a basic pack, when specialty instruments become necessary, and how to maintain the instruments that make good surgery possible.
Whether you are a veterinary student learning instrument identification, a clinic owner building or auditing your surgical pack inventory, a surgical technician looking for a comprehensive reference, or a buyer making purchasing decisions for a practice — this is the most complete and practically structured guide to veterinary surgical instruments available.
Section 1 — What Are Veterinary Surgical Instruments?
How They Differ from General Veterinary Tools
General veterinary tools — stethoscopes, thermometers, otoscopes — gather clinical information. Surgical instruments act directly on tissue. The distinction matters because the quality requirements for surgical instruments are fundamentally higher: blade sharpness, hinge function, jaw alignment, surface finish, and metal alloy composition all directly affect tissue handling quality, surgical precision, and infection risk.
Why Instruments Are Grouped by Function
The functional classification of surgical instruments is not an academic convenience — it is the organizing logic of surgical workflow. During a procedure, the surgeon works through a sequence: create access (cutting), establish a field (retracting), manage bleeding (clamping/hemostasis), work within the field (grasping and dissecting), and close (suturing). Each instrument category supports one of these workflow stages. Understanding function before memorizing names is the most practical way to build and use a surgical instrument inventory.
Why Correct Instrument Choice Matters
Using the wrong instrument for a task is not simply inefficient — it is potentially harmful. Using Mayo scissors for fine tissue dissection tears tissue rather than separating it. Using a hemostat sized for a large vessel on a fragile small-caliber vessel damages surrounding tissue. Using a needle holder with worn jaw serrations spins the suture needle during closure, compromising suture placement accuracy. Correct instrument selection is a clinical decision with direct consequences for tissue trauma, hemostasis, and healing.
Section 2 — The Main Categories of Veterinary Surgical Instruments
Every veterinary surgical instrument belongs to one of six functional categories. Understanding this classification system makes the entire instrument landscape coherent.
| Category | Function in Surgical Workflow | Key Instruments |
|---|---|---|
| Cutting and Dissecting | Creating incisions and separating tissue planes | Scalpels, scissors |
| Grasping and Holding | Holding tissue and structures for manipulation | Tissue forceps, Allis forceps |
| Clamping and Hemostatic | Controlling bleeding and securing vessels/pedicles | Hemostats, Carmalts, towel clamps |
| Retracting | Maintaining exposure of the surgical field | Handheld and self-retaining retractors |
| Suturing | Driving needles through tissue for wound closure | Needle holders |
| Specialty | Procedure-specific functions beyond general surgery | Orthopedic, dental, ophthalmic instruments |
Each category exists because surgical workflow requires a specific mechanical action at a specific stage of the procedure. No category is redundant with another.
Section 3 — Cutting and Dissecting Instruments
Cutting instruments are the most immediately recognizable surgical tools — and the most important to select correctly, because every tissue encounter that creates a surgical wound begins with them.
Scalpel Handles
What they do: Hold surgical blades securely during tissue incision. The handle provides grip, control, and leverage for precise incision depth and direction.
Handle sizes in veterinary surgery:
- No. 3 handle — the most common in small animal veterinary surgery; slender, balanced for fine incision work; accepts blade sizes 10, 11, 12, 15, and 15c
- No. 4 handle — heavier, longer; used in larger patients and large animal surgery; accepts blades 20, 21, 22, 23, and 25
- No. 8 handle — a broader-grip alternative to No. 4 for large animal use
Handles are reusable stainless steel instruments that must be cleaned and sterilized between uses. Disposable scalpel units with permanently attached blades and retractable blade shields are available — preferred in high-volume surgery settings where speed and safety during blade handling are priorities.
Scalpel Blades
What they do: Create the primary tissue incisions of the surgical procedure. The blade shape determines the type of incision best achieved.
Blade selection guide:
| Blade Number | Shape | Primary Use | Handle Compatibility |
|---|---|---|---|
| No. 10 | Curved belly, broad | General skin incisions; the most commonly used blade in small animal surgery | No. 3 |
| No. 11 | Triangular, pointed tip | Puncture incisions, stab incisions, lancing, opening vessels | No. 3 |
| No. 12 | Curved cutting edge on outer curve (sickle) | Small confined spaces, abscess lancing | No. 3 |
| No. 15 | Small curved blade, similar to No. 10 but smaller | Precise small incisions, cat declaw, ophthalmic procedures | No. 3 |
| No. 20 | Large curved belly | General large-animal incisions | No. 4 |
| No. 22 | Larger version of No. 10 | Large skin incisions in bigger patients | No. 4 |
| No. 23 | Large pointed blade | Large animal general use | No. 4 |
Important: Disposable blades should be changed between procedures and replaced during a single procedure if blade sharpness is compromised. A dull blade tears tissue rather than cutting it — increasing trauma, bleeding, and healing time.
Safe blade handling: Always use a blade loading/unloading device or needle holder — never handle surgical blades with bare fingers. Blade injuries are among the most common sharps injuries in veterinary surgery.
Mayo Scissors
What they do: Cut through heavier, denser tissues — fascia, fibrous tissue, muscle, and suture material. The Mayo is a heavy-bodied scissors with a shorter blade relative to handle length.
Design variants:
- Straight Mayo — suture cutting; also used for heavy fibrous tissue in a straight-line approach
- Curved Mayo — dissection of heavy tissues, working around structures in deeper fields
When to use Mayo scissors: Any time the tissue being cut offers meaningful resistance — fascia during abdominal entry, dense subcutaneous tissue, fibrous adhesions, or suture material during wound closure. The Mayo’s robust blade construction handles these materials without flexing.
When not to use Mayo scissors: Fine tissue dissection, working near neurovascular structures, or any situation requiring delicate tissue separation. The Mayo is designed for force, not finesse. Using it on delicate tissue creates unnecessary trauma.
Metzenbaum Scissors
What they do: Dissect delicate soft tissue planes with precision. The Metzenbaum is distinguished by its long shank-to-blade ratio — the handles are long relative to the blade — which provides mechanical advantage for fine control and keeps the surgeon’s hand away from the surgical field.
Design features:
- Long slender shanks
- Short, delicate blades that may be straight or curved
- Blunt-tipped design reduces risk of inadvertent puncture during dissection
When to use Metzenbaum scissors: Dissecting tissue planes around blood vessels, nerves, and ducts; separating organ attachments; opening fascial layers with care; any dissection where tissue trauma must be minimized.
The fundamental scissors rule: Metzenbaums dissect; Mayos cut heavy tissue and sutures. Using Metzenbaums to cut sutures dulls their delicate blades rapidly and renders them less effective for dissection. This is one of the most consistent instrument misuse errors in surgical practice.
Bandage and Utility Scissors
What they do: Cut bandages, wound dressings, sutures at skin level, and external materials without the tissue-contact precision requirements of surgical scissors.
Design: Angled lower blade with a blunt tip that slides safely under bandage layers without risk of penetrating skin. Heavy-gauge construction for repeated cutting of bandage materials. Not sterilized for intra-surgical use in most practices — these are treatment and wound management tools.
Section 4 — Grasping, Holding, and Clamping Instruments
This category encompasses both the tissue-holding forceps used for manipulation and the hemostatic clamps used for vessel and pedicle control. Both share a grasping mechanism but serve different functional purposes.
Tissue Forceps (Thumb Forceps)
What they do: Grasp and stabilize tissue during dissection, manipulation, and suture placement. Thumb forceps are spring-action instruments held between the thumb and first two fingers — they spring open naturally and close with applied pressure.
Types and selection:
Adson Forceps (Toothed):
Fine-tipped with 1×2 teeth at the tip. Provides secure grip on dense tissue, skin, and fascia with minimal slippage. The interlocking teeth bite tissue firmly — appropriate for skin closure and tissue that can tolerate the small tooth marks.
Brown-Adson Forceps:
Multiple fine teeth in a row across both tips rather than a single interlocking pair. Provides a broad, multi-point grip useful for tissue manipulation during dissection, particularly when working with subcutaneous tissue and dense connective tissue. Standard in basic veterinary surgical packs.
Smooth Dressing Forceps (Non-Toothed):
Flat, serrated tips without teeth. Used for grasping delicate tissues (intestine, mesentery, blood vessel walls) where tooth marks would cause damage, and for handling swabs, gauze, and wound dressings. The lack of teeth means less grip security on dense tissue — correct tissue selection is important.
Russian Forceps:
A distinctive spoon-shaped cupped tip with transverse serrations. Provides a broad, atraumatic grip on larger tissue surfaces — useful in bladder surgery, tissue mobilization, and large tissue bed management.
Allis Tissue Forceps
What they do: Grip tissue and structures more firmly than thumb forceps, with a ratchet locking mechanism that maintains grip without continuous hand pressure. Multiple small teeth along the jaw faces provide a secure, distributed grip.
When to use: Grasping and retracting cut tissue edges during dissection, holding body wall layers during abdominal closure, securing the round ligament and mesovarium during ovariohysterectomy. The Allis provides grip with moderate tissue trauma — appropriate for tissue that will be removed or that can tolerate firm handling, but not for delicate or vascular structures.
Hemostatic Forceps (Hemostats)
What they do: Clamp blood vessels and tissue pedicles to control bleeding during surgery. Hemostats have locking ratchet handles (box locks) that maintain clamping pressure without the surgeon holding them — freeing both hands for other tasks while the clamp controls hemorrhage.
The jaw faces have transverse serrations that prevent tissue slippage under compression.
Types by size and application:
Mosquito Hemostats (Halsted Mosquito):
The smallest hemostatic forceps — fine, delicate jaws available in straight and curved configurations. Designed for small caliber vessels, particularly in cats, small dogs, and fine dissection work. The narrow jaw tips provide precise placement in confined surgical fields.
Essential in feline surgery and any small-patient work. The mosquito hemostat is one of the highest-use instruments in the basic small animal surgical pack.
Kelly Hemostats:
Medium-sized hemostatic forceps, partially serrated — serrations extend only halfway down the jaw length, leaving the distal half smooth. Used for medium-caliber vessels and as general hemostatic instruments in medium-sized patients. Curved Kelly hemostats are most versatile for soft tissue surgery.
Crile Hemostats:
Similar size to Kelly hemostats but fully serrated along the entire jaw length — provides a more secure grip on tissue and vessels. The fully serrated jaw makes Crile hemostats particularly suitable for pedicle clamping and situations where grip security is more important than the partial release provided by Kelly-type jaws.
Rochester-Carmalt Hemostats:
Large, heavy hemostatic forceps with longitudinal serrations interrupted by transverse grooves at the tips. Designed for large tissue pedicles — the standard clamp for ovarian pedicles and uterine body during canine ovariohysterectomy. The Carmalt’s broad jaw distributes compression across a large tissue volume, reducing the risk of pedicle crushing through a single transverse crush line.
Size selection summary:
| Patient/Structure | Appropriate Hemostat |
|---|---|
| Small vessels, cats, small dogs | Mosquito hemostat |
| Medium vessels, medium dogs | Kelly or Crile |
| Large pedicles, large dogs (OHE) | Rochester-Carmalt |
| Very large vessels or pedicles | Rochester-Ochsner or larger |
Towel Clamps
What they do: Secure surgical draping material to the patient’s skin, maintaining the sterile field perimeter throughout the procedure. Also used to temporarily hold tissue layers or structures in some surgical contexts.
Types:
- Backhaus towel clamps — the most common; sharp-pointed, penetrating tips that pierce through draping material and skin to create a secure hold; cannot be unlocked without removing the clamp
- Non-penetrating towel clamps — grip the drape edge without piercing tissue; appropriate for patients where drape penetration is undesirable
Why towel clamps matter: A surgical drape that shifts during the procedure contaminates the sterile field — potentially bringing non-sterile surfaces into contact with the surgical wound. Correctly placed towel clamps prevent this from happening. Most basic surgical packs include four towel clamps — one for each corner of the primary field drape.
Section 5 — Retracting Instruments
Retractors maintain exposure of the surgical field — holding tissue and organs away from the area of active surgical work so the surgeon can see and access structures without requiring an additional hand. Without adequate retraction, surgical access is compromised, lighting is blocked, and tissue trauma from manual handling increases.
Handheld Retractors
Require a surgical assistant or technician to hold the retractor during the procedure. Provide flexible, adjustable retraction in response to the surgeon’s needs.
Army-Navy Retractor:
A double-ended, S-shaped flat retractor with a slightly curved blade at each end. One end is slightly wider than the other, providing two retraction options in one instrument. Extremely versatile for superficial to medium-depth retraction in abdominal and soft tissue surgery. The most commonly used general-purpose handheld retractor in small animal practice.
Senn Retractor (Rake Retractor):
Double-ended: one end has three sharp curved prongs that dig into tissue for secure grip; the other end is a flat blunt blade for atraumatic retraction. The sharp-prong end is used for tissue layers that need to be pulled with some force; the flat end for delicate structures.
Malleable Retractors:
Flat, ribbon-like metal blades that can be bent to any desired curvature for the surgical situation. Particularly useful for deep abdominal surgery where standard rigid blades cannot access the necessary angle.
Self-Retaining Retractors
Maintain their position without an assistant, using a locking or spring mechanism that holds the retractor blades at a set distance apart. Self-retaining retractors free both of the surgeon’s hands for dissection and instrumentation — a significant operational advantage, particularly in single-surgeon procedures.
Gelpi Retractor:
A hinged, self-retaining retractor with two sharp single-prong tips that embed into tissue at each blade end. The ratchet mechanism holds the blades open at a set width. Excellent for muscle-layer retraction in orthopedic and spinal procedures, and for soft tissue surgery requiring sustained exposure of a narrow deep field. Available in multiple sizes for different patients and incision depths.
Weitlaner Retractor:
Similar mechanism to the Gelpi but with multiple curved prongs (typically 3×4 or 2×3 configuration) rather than single points. The multi-prong design distributes retraction force across a broader tissue area, reducing the risk of single-point trauma in softer tissues. Available in sharp and blunt tip configurations — blunt tips preferred when the retractor will be placed near neurovascular structures.
Balfour Abdominal Retractor:
A large self-retaining frame retractor specifically designed for abdominal surgery. A central blade (the bladder blade) retracts the caudal abdominal wall while two lateral arms with hooks retract the lateral abdominal walls. The Balfour retractor provides circumferential exposure of the abdominal cavity — standard equipment for canine and feline abdominal surgery at any significant depth.
West (Finochietto) Rib Retractor:
Self-retaining retractor used to spread the rib cage for thoracic surgical access. The ratchet mechanism holds the thorax open without manual effort. Sized appropriately for thoracic wall thickness — multiple sizes needed for different patient sizes.
Section 6 — Suturing Instruments
The closure of the surgical wound is the final operative act — and the quality of the closure is determined in part by the precision with which suture needle and material can be controlled. Suturing instruments support that control.
Needle Holders
What they do: Grip and drive curved surgical needles through tissue for suture placement. Needle holders must hold the needle rigidly at a precise location on the needle — typically at the junction of the rear third — without allowing the needle to rotate or shift position during tissue penetration.
Why jaw quality matters critically: A needle holder with worn serrations, misaligned jaws, or insufficient clamping force allows the suture needle to spin or shift during tissue penetration. Misdirected needle placement during tissue closure causes uneven wound apposition, suture pull-through, and in some tissue beds (urinary tract, intestinal tract) can mean the difference between a watertight closure and a leak.
Types:
Mayo-Hegar Needle Holder:
The most common needle holder in veterinary surgical practice. Tungsten carbide-tipped jaw inserts (gold-handled models) provide superior needle grip and dramatically longer service life than standard steel jaw models. Available in multiple lengths — shorter models for confined spaces, longer models for deep abdominal surgery. Heavy ratchet locking mechanism holds the needle securely between suture throws.
Olsen-Hegar Needle Holder:
Combines a needle holder with built-in scissors in the shanks — suture can be cut without changing instruments, which saves time and reduces the need for a second instrument during closure. Particularly useful in single-surgeon procedures. The trade-off is that the scissors element requires maintenance, and accidental suture cutting mid-closure is a risk if technique is not deliberate.
Mathieu Needle Holder:
A spring-action, palm-grip needle holder without a ratchet — release is achieved by squeezing the handles rather than unlocking a ratchet, which can improve continuous suturing speed for experienced surgeons. Less commonly used in general veterinary practice but standard in some specialty surgical environments.
Needle holder selection note: Buy tungsten carbide-tipped (gold handle) models for routine use. The additional cost over standard steel jaw models is returned many times over in needle grip reliability and instrument lifespan. Standard steel jaw needle holders lose grip effectiveness after relatively few uses when frequently holding harder modern suture needles.
Supporting Suturing Instruments
During closure, tissue forceps are used to stabilize the wound edges as the needle is passed through them — preventing the tissue from moving away from the needle tip. Brown-Adson or Adson toothed forceps are the standard supporting instrument during skin closure. Smooth forceps are used for subcutaneous and deeper tissue layers where tooth marks would be inappropriate.
Section 7 — Specialty Veterinary Surgical Instruments
Specialty instruments extend surgical capability beyond the soft tissue procedures that a basic pack addresses. A veterinary practice’s need for specialty instruments is determined by its case mix, surgical scope, and the species it treats.
Orthopedic Instruments
Orthopedic surgery involves bone — a tissue that requires a fundamentally different tool set from soft tissue surgery. Bone cannot be cut with scissors, grasped with standard forceps, or sutured with needle holders.
Bone cutting instruments:
- Bone rongeurs — heavy-jawed instruments that bite and remove small amounts of bone; available in different jaw configurations (straight, angled) for different access requirements
- Osteotomes and chisels — straight-bladed cutting instruments driven by a mallet to split or cut bone along controlled lines
- Bone saws — motorized or manual oscillating saws for larger bone sections; essential for corrective osteotomies and joint replacement procedures
Bone holding forceps:
- Kern bone-holding forceps — large ratchet-locking forceps for gripping and stabilizing long bones during fracture repair
- Lewin bone-holding forceps — for smaller bone fragments
Periosteal elevators:
Flat-bladed instruments for stripping periosteum (the fibrous covering of bone) away from the bone surface to expose cortex for instrumentation. Essential in orthopedic exposure. The Freer elevator is a double-ended periosteal elevator commonly used in small animal orthopedics.
Implant instrumentation:
Orthopedic implant systems (bone plates, screws, intramedullary pins, external skeletal fixation) each require a specific set of placing and removal instruments — drill bits, screwdrivers, pin chucks, countersinks, measuring gauges, and implant-specific holders. These are system-specific and typically purchased as complete implant system sets.
Dental Instruments
Dental instruments for dogs and cats are covered extensively in the companion article on small animal veterinary tools. Key instruments in the veterinary dental surgical context include:
Dental elevators and luxators:
Thin, blade-tipped instruments that are worked into the periodontal ligament space to sever the ligament fibers that anchor the tooth root, allowing controlled loosening before extraction.
Dental extraction forceps:
Grasping forceps specifically designed for gripping tooth crowns and roots for controlled extraction after luxation is complete. Sized and shaped for different tooth types — incisors, canines, premolars, molars.
Root tip picks:
Fine-tipped instruments for retrieving fractured root tips from the alveolus.
Ophthalmic Instruments
Ophthalmic surgery demands the finest instruments available — patient eyes are among the most delicate surgical fields in veterinary medicine. Standard general surgical instruments are too large, too heavy, and too imprecise for intraocular work.
Iris scissors: Very short, fine, curved scissors with precise blade closure — used for conjunctival, corneal, and iris tissue
Strabismus scissors: Used for cutting conjunctival and subconjunctival tissue
Iris forceps: Fine-tipped, delicate forceps for intraocular tissue
Castroviejo needle holder: A spring-grip, very fine needle holder for ophthalmic suture work with 6-0 to 9-0 gauge sutures
Colibri forceps: Fine corneal forceps with a platform grip for steady tissue handling
Soft Tissue Specialty Instruments
Spay hook (Snook hook):
A blunt-tipped curved hook instrument used to locate and exteriorize the uterine horn through a ventral midline incision during canine and feline ovariohysterectomy. The hook is passed through the incision, swept laterally, and rotated to engage and lift the uterine horn to the incision surface. A fundamental instrument in the basic small animal surgical pack.
Babcock forceps:
Non-crushing, fenestrated forceps with smooth, rounded tips designed for atraumatic grasping of tubular and hollow visceral structures — intestine, ureter, reproductive tract. The fenestrated design allows tissue to be held with minimum compression trauma. Preferred over Allis forceps when working with bowel or bladder tissue.
Doyen intestinal clamps:
Non-crushing intestinal clamps used to occlude bowel lumen without cutting off blood supply — used to control intestinal content spillage during enterotomy or intestinal resection procedures.
Balfour retractor blades:
Additional or alternative blade sizes for the Balfour frame system, allowing customization for different patient sizes and abdominal depths.
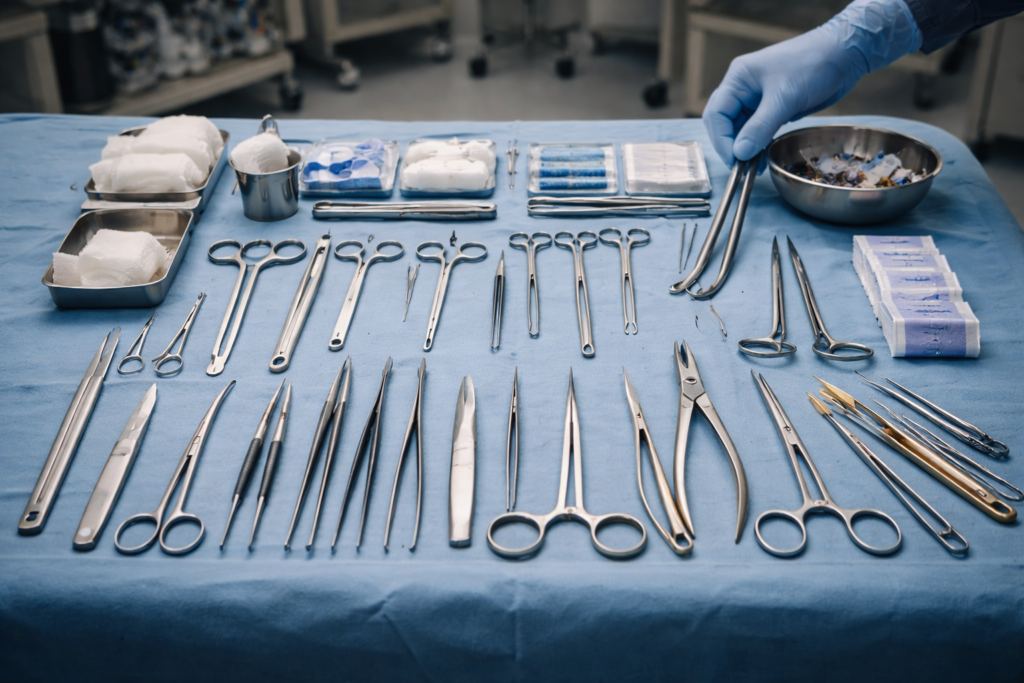
Section 8 — Basic Surgical Pack Breakdown
The basic veterinary surgical pack is the standardized, pre-sterilized instrument collection that supports the most commonly performed soft tissue procedures in general practice — ovariohysterectomy (spay), castration, wound exploration and debridement, intestinal surgery, and general soft tissue procedures.
Standard Basic Small Animal Surgical Pack Contents
| Instrument | Quantity | Function in the Pack |
|---|---|---|
| Scalpel handle (No. 3) | 1 | Primary tissue incision |
| Towel clamps (Backhaus) | 4 | Drape securing, field perimeter |
| Brown-Adson tissue forceps | 1 | Tissue manipulation, suture support |
| Rat-tooth (Adson toothed) forceps | 1 | Skin edge control during closure |
| Mosquito hemostats (curved) | 4 | Small vessel control, fine hemostasis |
| Crile or Kelly hemostats (curved) | 4 | Medium vessel and pedicle control |
| Rochester-Carmalt hemostats | 4 | Large pedicle control (OHE) |
| Mayo scissors (curved) | 1 | Heavy tissue cutting, suture cutting |
| Metzenbaum scissors (curved) | 1 | Fine tissue dissection |
| Needle holder (Mayo-Hegar) | 1–2 | Suture needle driving |
| Spay hook | 1 | Uterine horn exteriorization (OHE) |
| Army-Navy retractors | 2 | Body wall retraction |
| Gauze sponges (4×4) | 10 | Field absorption, tissue protection |
| Sterilization indicator strip | 1 | Confirming sterilization completion |
Based on published clinical pack standards from UC Davis Covelo Clinic and ASPCA Pro surgical guidelines.
Why Each Component Belongs
The pack above is not assembled arbitrarily — each instrument serves at least one function that no other instrument in the pack can substitute for. The spay hook is the only instrument capable of reliably locating the uterine horn through a small ventral midline incision. The Carmalt forceps are the only instrument in the pack sized for large ovarian and uterine pedicles. The Metzenbaum scissors are the only instrument for safe periuterine dissection without vessel damage. Remove any component and the pack has a functional gap.
Starting with Two Packs as Minimum
A single pack does not allow consecutive same-day procedures — once a pack has been used, it requires cleaning, inspection, reassembly, and re-sterilization before it can be used again. The minimum practical surgical instrument inventory for any clinic performing regular surgery is two complete identical packs, allowing one to be in use while the other is in the sterilization cycle.
High-volume practices should hold three to four packs per procedure type to allow same-day capacity without sterilization delays between cases.
Section 9 — How to Choose the Right Veterinary Surgical Instruments
The Instrument Buyer Framework
1. Define your practice scope before purchasing
A general small animal practice and a specialist referral surgical center have almost nothing in common in their instrument needs beyond the basic soft tissue pack. Define what procedures your practice actually performs — and will perform in the next 12–24 months — before specifying any instrument beyond the basic pack.
2. Assess stainless steel quality as a primary selection criterion
Veterinary surgical instruments are manufactured in several steel grades. The highest quality surgical instruments are made from Grade 316L or equivalent high-carbon stainless steel — harder, more corrosion-resistant, capable of holding a finer edge for longer. Lower-grade instruments made from softer steel dull faster, corrode more readily, and fail at hinges and box locks under repeated use and sterilization cycling.
How to assess quality at purchase:
- Jaw alignment: close the instrument tips under magnification — they should meet perfectly along their entire length
- Hinge resistance: the hinge should move smoothly without stiffness, looseness, or side-play
- Surface finish: look for uniformly polished surfaces without pitting, grinding marks, or rough spots that harbor bacteria
- Box lock tightness: excessive play in the box lock is a manufacturing defect that worsens with use
3. Consider ergonomics and instrument balance
A needle holder or scissors that is poorly balanced for the surgeon’s hand size causes fatigue in extended procedures and reduces precision. Instruments are available in different handle sizes, grip styles, and shank lengths. Equip for the surgeons who will use them.
4. Match instrument sizing to patient size
Mosquito hemostats appropriate for a 3 kg cat are inappropriate for a 45 kg dog’s ovarian pedicle. Instrument sizing must reflect the patient population the practice serves. Mixed-breed practices serving a wide weight range need size variation across categories.
5. Verify sterilization compatibility
All metal instruments in the basic pack are autoclave-compatible. Specialty instruments with heat-sensitive components (plastic handles, electronic elements, fiber optic cables) require cold chemical sterilization or other validated sterilization methods. Verify compatibility with your sterilization infrastructure before purchasing.
6. Evaluate service life and total cost of ownership
High-quality instruments from established manufacturers cost significantly more per unit but last 10–20 years with proper care. Low-quality instruments may require replacement after 18–24 months of regular use. The per-use cost of quality instruments is almost always lower over a realistic clinical lifespan.
7. Assess supplier support
Can the supplier sharpen blunt scissors? Can they repair hinges? Do they offer a warranty against manufacturing defects? Instrument maintenance services are a practical consideration that budget purchasing often ignores — until the third replacement purchase forces the recognition.
Section 10 — Instrument Care, Sterilization, and Maintenance
Instrument maintenance is not housekeeping. It is the system that protects the investment, reliability, and patient safety value of every instrument in the surgical pack. A poorly maintained instrument is not simply a dull tool — it is a potential source of cross-infection, a surgical unreliable, and an instrument that will fail before its design lifespan should allow.
Step 1 — Immediate Post-Surgical Care
The most damaging thing that happens to surgical instruments is drying of blood, saline, and organic material on their surfaces before cleaning. As these materials dry, they bond to the metal surface, corrode it, and damage hinges.
Immediate action after every procedure:
- Remove instruments from the surgical field and place them in a pre-soak container of water (not saline — saline is corrosive) or enzymatic presoak solution within 30 minutes of procedure completion
- Keep all hinged instruments open during soaking — closed instruments trap contamination in the hinge and box lock where the presoak cannot reach
- Never leave blood or organic material to dry on instrument surfaces
Step 2 — Cleaning
Manual cleaning:
Using a soft instrument brush and instrument-specific detergent (not standard cleaning products — alkaline detergents corrode instrument metal), scrub all surfaces, hinges, jaw faces, and serrations thoroughly. Pay particular attention to the ratchet teeth of box-lock instruments — these accumulate dried material that is invisible until inspected closely.
Ultrasonic cleaner:
An ultrasonic cleaner uses high-frequency sound waves to create cavitation bubbles in a cleaning solution — the collapse of these bubbles creates microjet cleaning action that reaches every surface of the instrument, including hinge recesses and serration valleys that a brush cannot reliably access. Ultrasonic cleaning is significantly more thorough than manual cleaning alone and is considered best practice in high-quality instrument maintenance programs.
Rinse thoroughly: After ultrasonic or manual cleaning, rinse instruments with distilled or deionized water — tap water mineral deposits accelerate spotting and surface degradation.
Step 3 — Drying
All instruments must be completely dry before sterilization and storage. Residual moisture on instruments during autoclaving creates water stains, surface oxidation, and accelerates corrosion of the stainless steel. Dry with clean, lint-free towels or forced warm air. Ensure all hinge areas are specifically dried.
Step 4 — Lubrication
Hinged instruments — hemostats, needle holders, scissors — require regular lubrication of their box lock and pivot joints to maintain smooth operation and prevent corrosion.
Use instrument milk (water-soluble instrument lubricant) — not machine oil, WD-40, or general-purpose lubricants. These oil-based products leave residues that are not steam-penetrable, interfere with sterilization, and can cause adverse reactions if residue contacts tissue. Instrument milk is water-soluble, steam-compatible, and prevents the metallic oxidation that causes instrument hinges to stiffen and eventually seize.
Apply instrument milk by soaking instruments in a diluted bath, then removing them without rinsing — the lubricant should remain on the instrument surface going into sterilization.
Step 5 — Inspection
Before every pack assembly, inspect every instrument:
- Scissors: Hold them up to light and close them slowly — blades should glide smoothly with even resistance and close precisely at the tips without crossing or gapping. Test on two layers of gauze — they should cut cleanly through, not push or tear.
- Hemostats and needle holders: Check jaw alignment when locked — the tips should meet precisely. Check ratchet function — should lock and release cleanly at each position without slipping. Check for side-play in the box lock.
- Tissue forceps: Check tip alignment and tooth mesh. Misaligned teeth do not grip tissue reliably.
- Scalpel handles: Check blade slot security — the blade should seat firmly without wobble.
Instruments that fail inspection should be removed from the pack, tagged for repair or sharpening, and replaced before the pack is assembled. An uninspected pack is a pack of unknown reliability.
Step 6 — Pack Assembly and Sterilization Indicator
Instruments are assembled into pack configuration — typically on a sterile towel that forms the inner wrap of the pack — and wrapped in two layers of autoclave-compatible wrap (crepe paper, non-woven wrap, or instrument container trays). A sterilization indicator strip (chemical or biological) is placed inside every pack.
Biological indicators (spore tests) — the gold standard for sterilization validation. Should be run weekly in every autoclave used in surgical instrument sterilization. A positive spore test (failed kill) indicates autoclave malfunction and must trigger an immediate service response before any instruments sterilized in that autoclave cycle are used.
Step 7 — Autoclaving
Standard sterilization parameters:
- Gravity-cycle autoclaves: 121°C at 103 kPa for 30 minutes (instruments and wrapped packs)
- Pre-vacuum autoclaves (porous load): 134°C at 206 kPa for 3–5 minutes
Critical rules during autoclaving:
- All hinged instruments must be in the open position inside the pack — closed instruments trap air that prevents steam contact with inner surfaces
- Do not overload autoclave trays — overcrowding prevents steam penetration between packs
- Allow complete drying of packs before removal — wet packs are contaminated immediately on contact with non-sterile surfaces (strike-through contamination)
Step 8 — Storage
Sterile packs must be stored in a clean, dry, dust-free environment away from moisture, traffic, and direct sunlight.
Pack sterility shelf life:
- Cloth-wrapped packs: typically 3–4 weeks in closed storage
- Hard container/cassette trays: 6 months or more (event-related sterility — depends on storage conditions, not just time)
- Peel pouches: check manufacturer guidance; typically 6–12 months
Inspect every pack before use: torn wrapping, wet packs, compromised seals, or packages stored on the floor — all should be considered contaminated and re-sterilized before surgical use.
Corrosion Prevention Summary
| Cause of Corrosion | Prevention |
|---|---|
| Dried blood and saline on surfaces | Pre-soak within 30 minutes; use distilled water, not saline |
| Alkaline or chlorine-based cleaners | Use instrument-specific neutral pH detergents |
| Water mineral deposits during drying | Rinse with distilled/deionized water |
| Oil-based lubricants | Use only water-soluble instrument milk |
| Moisture during autoclaving | Complete drying before and after autoclave |
| Pitting from repeated handling | Use soft brushes only; avoid abrasive pads |
| Dissimilar metals in contact | Never mix chromium plated and stainless instruments in same pack |
Section 11 — Common Mistakes in Surgical Instrument Selection and Use
Using the wrong instrument for the job
Using Mayo scissors for fine tissue dissection, Metzenbaums for cutting sutures, or hemostats as tissue retractors — all common, all damaging to both instrument and tissue. Every instrument has a function it was designed for; use within that function.
Buying cheap instruments with poor surface finishing
Instruments that appear identical visually but are made from inferior steel alloys differ enormously in clinical performance and service life. Pitting, roughness, or visible grinding marks on new instruments indicate inferior manufacture. These instruments harbor bacteria in surface defects, corrode rapidly under autoclaving, and fail at hinges and box locks far earlier than quality instruments.
Underinvesting in the basic pack
A clinic that spends heavily on advanced diagnostic imaging and then cuts costs on its surgical instruments has inverted its investment priorities. The basic pack is used in every surgical procedure — its reliability and quality affect every surgical patient. This is not an area to economize.
Neglecting maintenance
Instruments that are not pre-soaked immediately after use, not lubricated regularly, not inspected before pack assembly, and not validated through weekly biological indicator testing will fail prematurely. The maintenance protocol described in this guide is not optional — it is the system that protects both instrument investment and patient safety.
Building packs without workflow logic
A surgical pack assembled without considering the logical sequence of surgical steps wastes the time of surgical assistants searching for instruments during procedures. Packs should be organized by use sequence — dissection instruments together, hemostatic instruments together, closure instruments together — so the assistant can pass the right instrument before it is needed.
Expanding into specialty instruments too early
Purchasing orthopedic or laparoscopic instrument sets before the surgical team has mastered basic soft tissue surgery and before procedure volume justifies the investment creates instrument inventory that sits unused, loses lubrication, and requires sterilization cycling maintenance without clinical return.
Poor storage and organization
Instruments stored loosely in drawers, stacked against each other, or handled roughly during transport sustain tip damage, surface scratching, and hinge stress that shortens their working life. Instrument trays with individual instrument holders, wall-mounted racks for large instruments, and individual labeling of specialty instrument sets are the organization standard that protects the investment.
Section 12 — Must-Have vs. Specialty Instruments
Prioritization Framework
| Instrument | Priority | Notes |
|---|---|---|
| Scalpel handles (No. 3 and No. 4) | Must-have | Day 1 |
| Disposable blades (10, 15, 22) | Must-have | Consumable; always in stock |
| Towel clamps (Backhaus) ×4 per pack | Must-have | Day 1 |
| Mosquito hemostats (curved) ×4 per pack | Must-have | Day 1 |
| Crile or Kelly hemostats ×4 per pack | Must-have | Day 1 |
| Rochester-Carmalt hemostats ×4 per pack | Must-have | Day 1 |
| Mayo scissors (curved) | Must-have | Day 1 |
| Metzenbaum scissors (curved) | Must-have | Day 1 |
| Brown-Adson tissue forceps | Must-have | Day 1 |
| Adson toothed forceps | Must-have | Day 1 |
| Needle holder (Mayo-Hegar, TC) | Must-have | Day 1 |
| Spay hook | Must-have (small animal practice) | Day 1 |
| Army-Navy retractors | Must-have | Day 1 |
| Gelpi or Weitlaner self-retaining retractors | Recommended upgrade | Add early |
| Balfour abdominal retractor | Recommended | Any abdominal surgery volume |
| Babcock forceps | Recommended | Bowel and visceral surgery |
| Allis tissue forceps | Recommended | General soft tissue expansion |
| Second needle holder (Olsen-Hegar) | Recommended | Solo surgeon efficiency |
| Video otoscope retractor | Advanced | Specialty ear surgery |
| Orthopedic instrument set | Specialty | When performing orthopedics |
| Dental extraction instrument set | Specialty | With dental surgical capability |
| Ophthalmic instrument set | Specialty | Ophthalmic procedures |
| Laparoscopic instrument set | Advanced | Laparoscopic surgical scope |
Section 13 — FAQ
What are the basic veterinary surgical instruments?
A basic veterinary surgical pack contains: scalpel handle and blades, towel clamps (×4), tissue forceps (toothed and smooth), mosquito hemostats, Crile or Kelly hemostats, Rochester-Carmalt hemostats, Mayo scissors, Metzenbaum scissors, needle holder, spay hook, Army-Navy retractors, and gauze sponges. These instruments collectively support the complete soft tissue surgical procedure from incision through closure.
What are the five main categories of surgical instruments?
The five primary functional categories are: (1) cutting and dissecting instruments (scalpels, scissors), (2) grasping and holding instruments (tissue forceps, Allis forceps), (3) clamping and hemostatic instruments (hemostats, Carmalts, towel clamps), (4) retracting instruments (Army-Navy, Gelpi, Balfour), and (5) suturing instruments (needle holders). Specialty instruments such as orthopedic, dental, and ophthalmic instruments form a sixth category for procedure-specific work.
What is the difference between Mayo and Metzenbaum scissors?
Mayo scissors have a short blade relative to the handle, heavy construction, and are designed for cutting tough tissues (fascia, muscle) and suture material. Metzenbaum scissors have a long handle-to-blade ratio, delicate blades, and are designed for fine tissue dissection around vessels and organs. Using Metzenbaums to cut sutures dulls their blades and ruins their dissection capability.
What instruments belong in a basic veterinary surgical pack?
A standard basic pack includes: 1 scalpel handle, 4 towel clamps, 1–2 tissue forceps, 4 mosquito hemostats, 4 Crile/Kelly hemostats, 4 Carmalt hemostats, 1 Mayo scissors, 1 Metzenbaum scissors, 1–2 needle holders, 1 spay hook, 2 Army-Navy retractors, and 10 gauze sponges, plus a sterilization indicator strip.
What do needle holders do?
Needle holders grip curved surgical needles at a precise point on the needle body and drive them through tissue for suture placement. They have locking ratchet handles to maintain needle grip without continuous hand pressure. Jaw quality — specifically whether the jaws are tungsten carbide tipped — determines how reliably the needle is held without spinning or shifting during tissue penetration.
How should veterinary surgical instruments be sterilized?
The standard method is steam autoclaving — typically at 121°C for 30 minutes (gravity cycle) or 134°C for 3–5 minutes (pre-vacuum cycle). All hinged instruments must be open during autoclaving. Packs must be completely dry after the cycle before handling. A biological spore indicator should be included in weekly autoclave validation testing.
How do you choose high-quality veterinary surgical instruments?
Evaluate: stainless steel grade (look for Grade 316L or high-carbon equivalents), jaw alignment under magnification, hinge smoothness without side-play, surface finish uniformity (no pitting or grinding marks), ratchet lock function, and supplier reputation. Consider tungsten carbide tip (TC/gold handle) models for needle holders. Assess total cost of ownership across the expected instrument lifespan — quality instruments consistently deliver lower cost per use than budget alternatives.
When does a clinic need specialty instrument sets?
A practice needs specialty instruments when it regularly performs procedures beyond standard soft tissue surgery. Orthopedic instruments become necessary when fracture repair, joint surgery, or osteotomy procedures are part of the surgical caseload. Dental extraction instruments become necessary when performing tooth extractions beyond basic scaling. Ophthalmic instruments are required for intraocular and eyelid surgery. The case volume threshold that justifies specialty instrument investment depends on procedure frequency, case revenue, and sterilization cycle management capacity.
Section 14 — Conclusion: Instruments Defined by Function, Chosen by Purpose
Veterinary surgical instruments are not a catalog of names to memorize — they are a functional system that supports every stage of the operative procedure, from the first incision to the final suture. Understanding them through their function — what they do, when they belong in the workflow, and why each category exists — is the foundation of intelligent instrument selection, pack building, and surgical team efficiency.
Build your basic pack deliberately, with quality instruments selected for their stainless steel grade, jaw precision, and hinge reliability — not for their price tag. Maintain every instrument with the discipline that precision tools demand: pre-soak immediately after use, clean thoroughly, lubricate regularly, inspect before every pack assembly, and validate sterilization weekly with biological indicators. Replace instruments that fail inspection without compromise.
Expand into specialty instrument sets as your surgical scope genuinely warrants — driven by case volume, not by aspirational purchasing. The best surgical instrument inventory is one that is complete, reliable, well-maintained, and precisely matched to the procedures your practice actually performs.
When every instrument in the pack works as designed, the surgeon’s skill is fully expressed — and the patient benefits from every element of that precision.